 卷积神经网络
# 承上启下
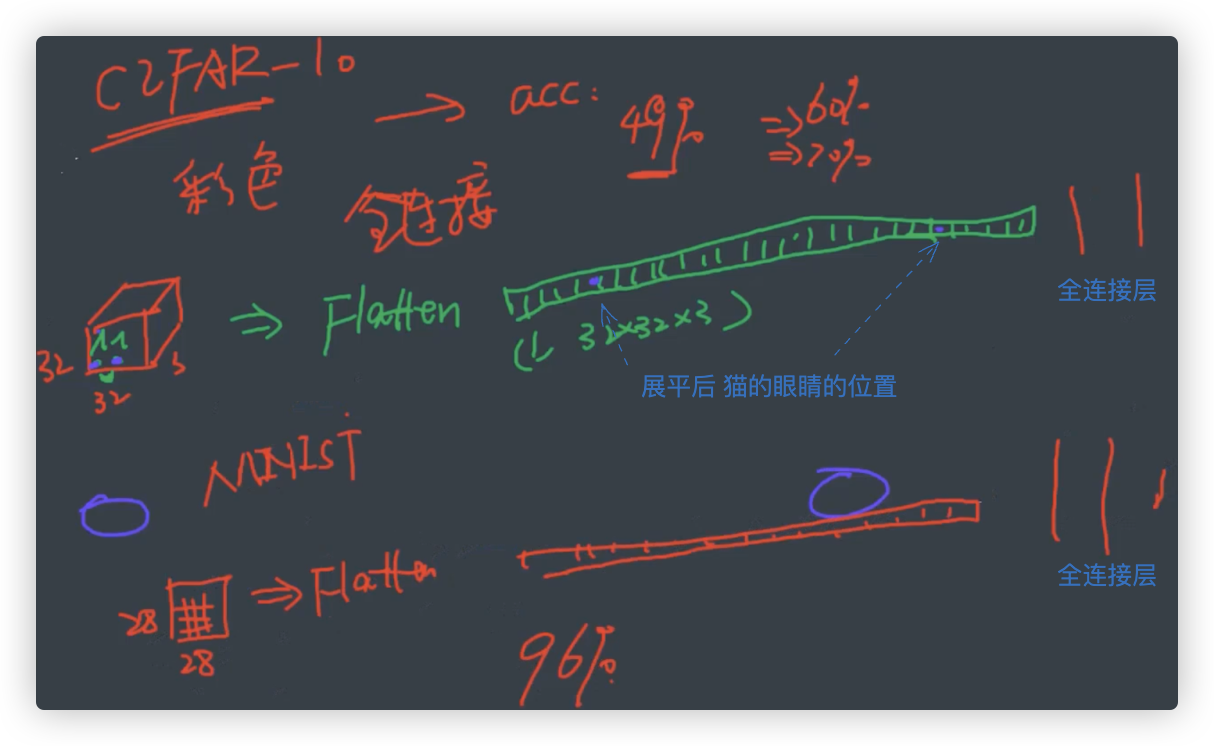
在全连接神经网络的学习中,我们实现了两个分类案例. 其一是CIFAR-10, 其二是MINIST手写识别体.
- CIFAR-10 在全连接神经网络中 无论你怎么进行优化,其准确率都很难突破 百分之60.
- MINIST手写识别体. 在全连接神经网络中,其准确率能达到 百分之96.
其根本原因是因为,通过全连接神经网络可以较好地完成一般的分类与回归任务.
但是对于较复杂的图片数据, 如CIFAR-10 数据集等, 全连接神经网络表现出明显的不足..
扩展来说,
C2FAR-10是复杂的彩色图片,展平后, [丢失了原图片中的空间位置信息]..全连接网络有心而力不足了.
手写识别的图片是灰度图,图片数据也简单,全连接神经网络勉强能处理好.
我们说,全连接神经网络将图片展平后丢失了图片中的空间信息.
而在CNN中输入的图片信息是不用展平的,图片是几维,给输入层的数据就是几维,在后续的偏平化层才会展平.
卷积神经网络目前被广泛应用于计算机视觉相关任务中,比如图片分类、物体识别、人脸识别等..
# 输入层
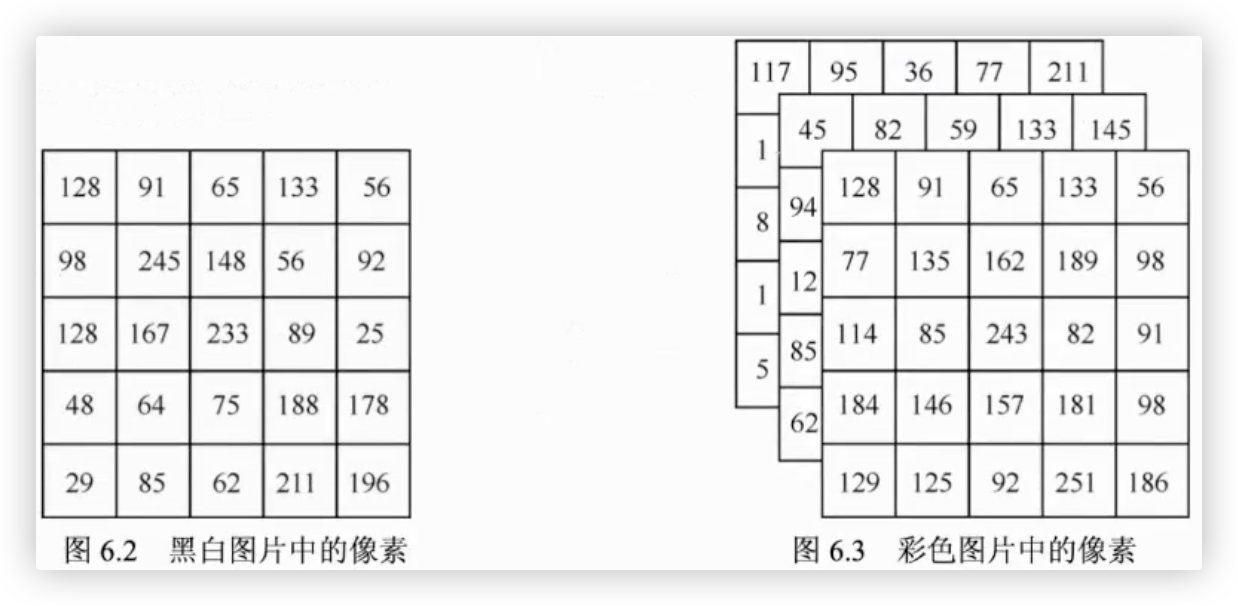
黑白图片
- 只有一个通道(channel). 黑白图片中的每个像素点都为0-255的值.
(5,5,1)就表示这是一张长宽都为5像素的黑白图片. 1指的是通道数为1.
彩色图片
- 由三个通道组成. 彩色图片中的每一个像素都由0-255的三个值组成. 这三个值分别代表红、绿、蓝.
(5,5,3)就表示这是一张长宽都为5像素的彩色图片. 3指的是通道数为3.
# 卷积层
通过卷积层 可以有效的提取图片中有用特征
# 黑白图的卷积操作
注: 针对黑白图,卷积核的通道数是一
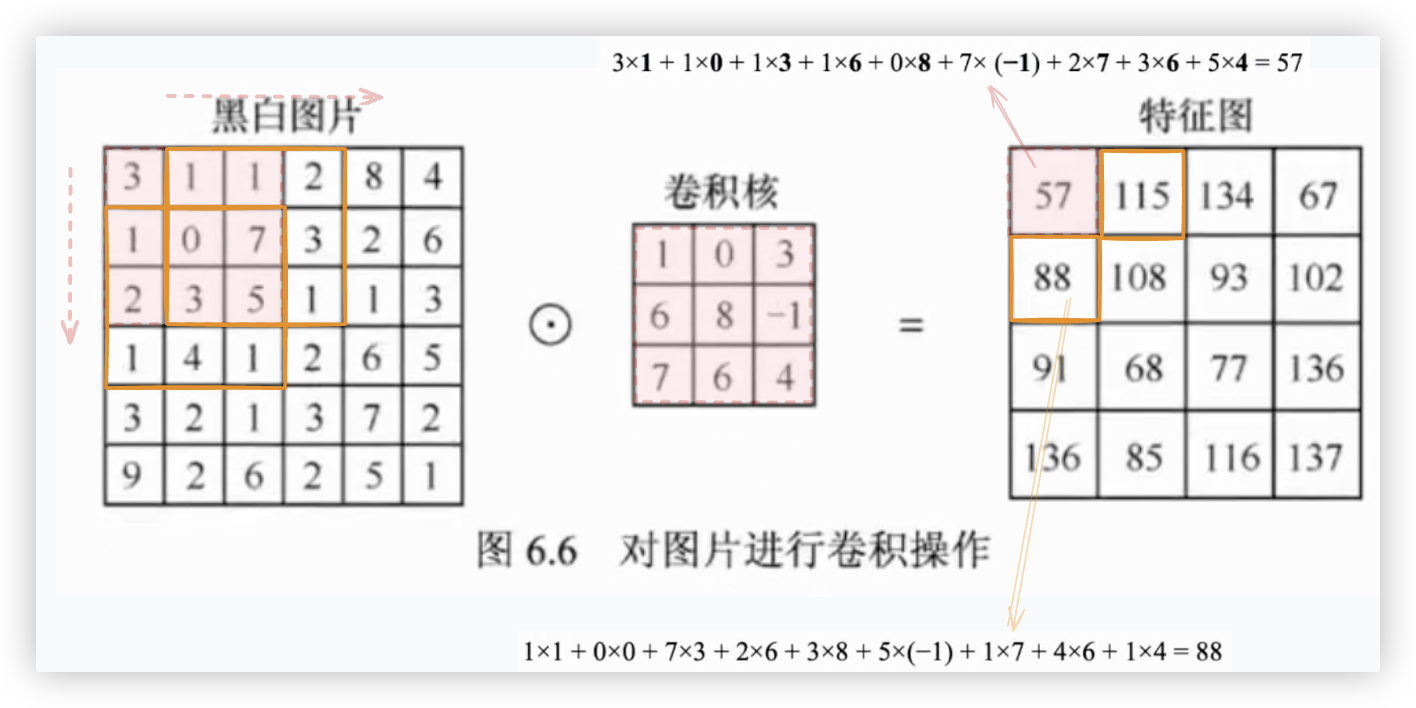
卷积操作的过程为对卷积核中的值与图片中对应部分的像素值从左到右、从上到下依次计算卷积.
卷积操作的结果即为这个卷积核对这张图片完成卷积操作后的输出,称为特征图..
# 彩色图的卷积操作
注: 针对彩色图,卷积核的通道数是三
紧邻的上一小节阐述了对于一个通道的黑白图片使用卷积层处理的过程.
在本小节我们将阐述对于3个通道的彩色图片使用卷积层处理的过程.
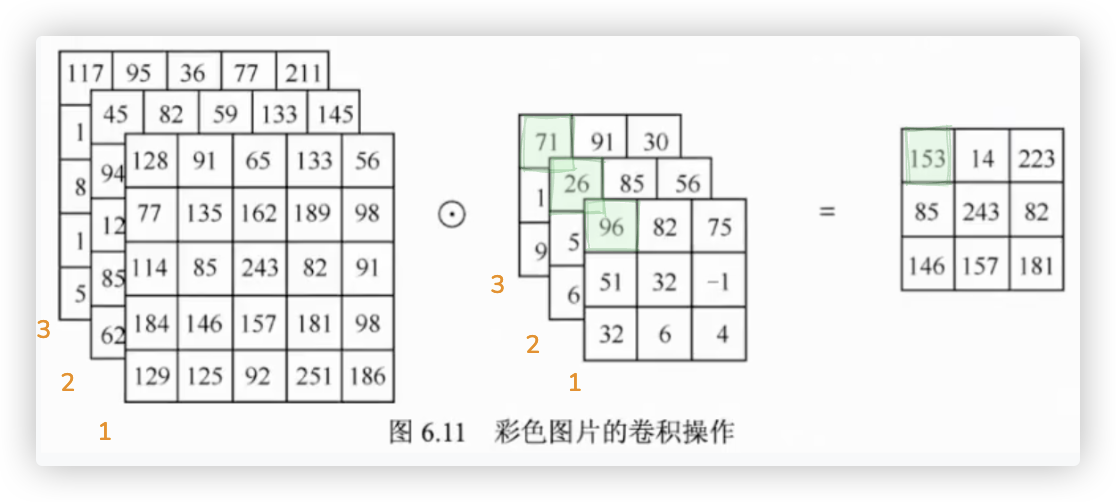
彩色图片RGB三个通道的数据分别与卷积核的三通道对应进行点积操作.会得到三张特征图.
这三张特征图对应位置的值相加,得到一张最终的特征图.
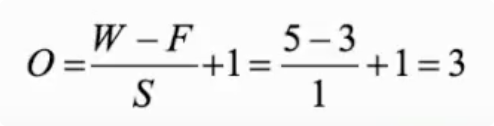
# 特征图的尺寸
# 不补零
无论是黑背图片还是彩色图片,若不补零,经过卷积操作得到的特征图的尺寸满足以下公式.
将长与宽一致的图片的尺寸用W来表示,卷积核的尺寸用F来表示,步长值用S来表示.
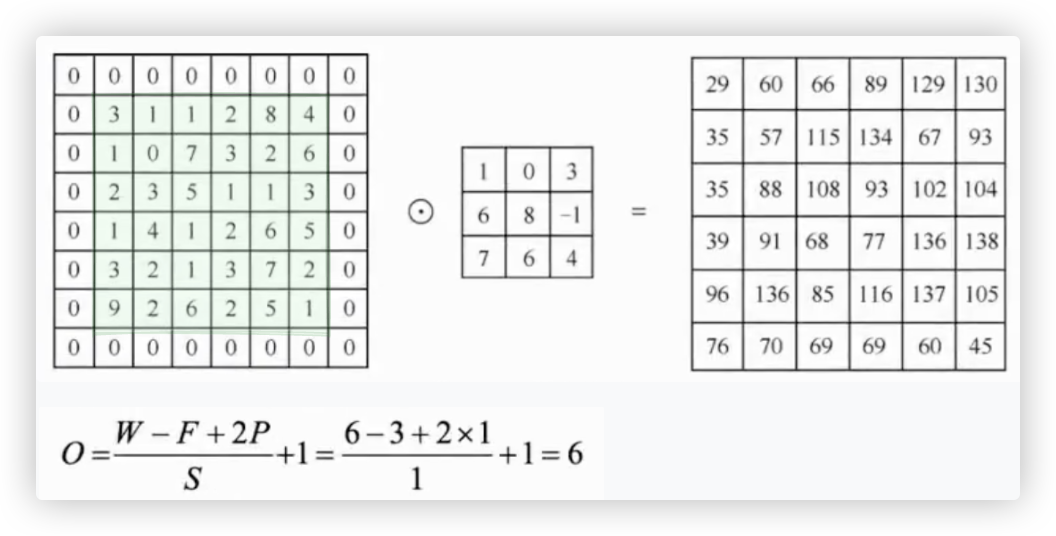
# 补零
补零操作可以有效的解决图片经过卷积操作后得到的特征图尺寸变小的问题.
W为图片的尺寸,F为卷积核的尺寸,P为图片周围补零的层数,S为步长.
# 代码实现
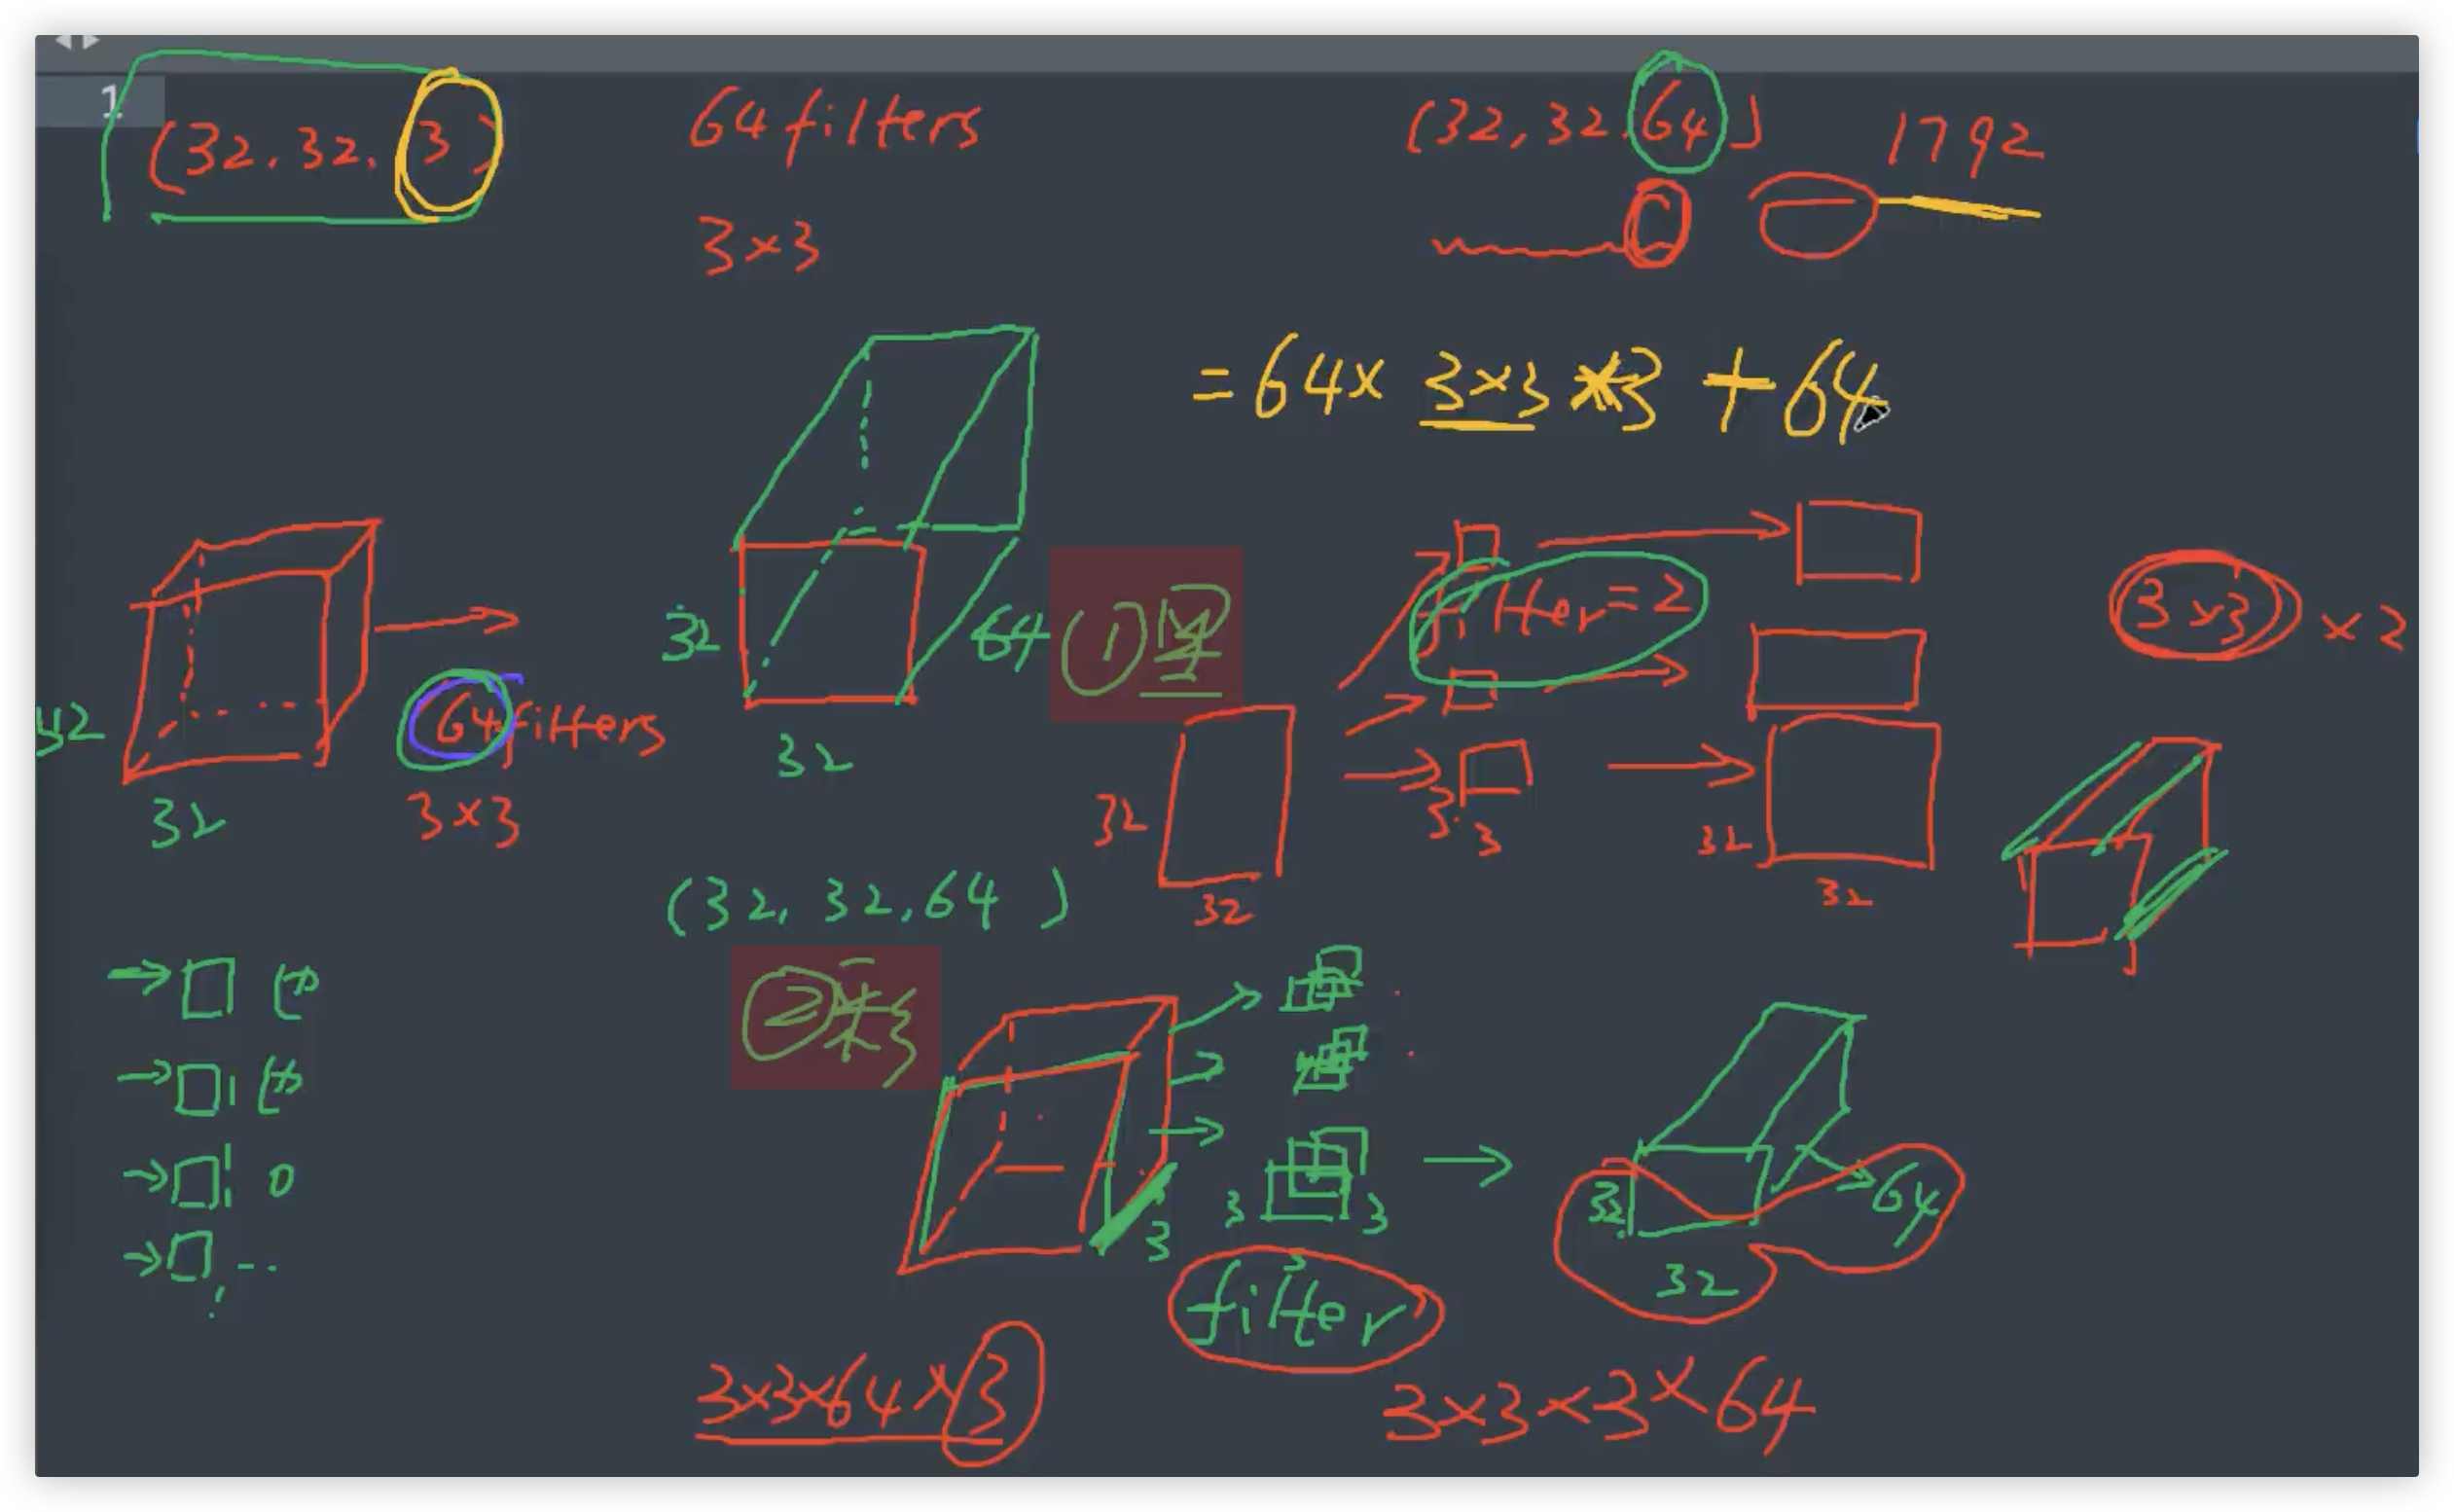
注: 我们通常会对一张图片使用多个卷积核..以提取图片的不同特征.
每一个卷积核与图片经过卷积操作后得到的特征图会叠放在一起,作为下一层的输入..
import numpy as np
img = [
[3, 1, 1, 2, 8, 4],
[1, 0, 7, 3, 2, 6],
[2, 3, 5, 1, 1, 3],
[1, 4, 1, 2, 6, 5],
[3, 2, 1, 3, 7, 2],
[9, 2, 6, 2, 5, 1],
]
img = np.array(img).reshape(1, 6, 6, 1) # 第一个1指一张图片,最后一个1指该图片的通道数1,是张黑白图片
kernel = np.array([
[1, 0, 3],
[6, 8, -1],
[7, 6, 4]
], dtype=np.float32).reshape(3, 3, 1, 1) # 卷积核的大小为3x3,第一个1指该卷积核为单通道,第二1指只有1个卷积核
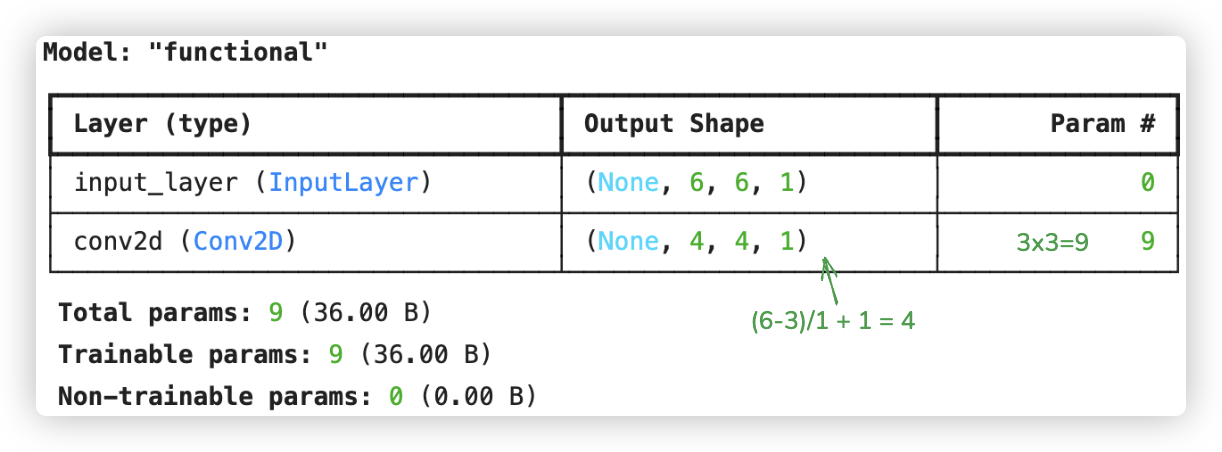
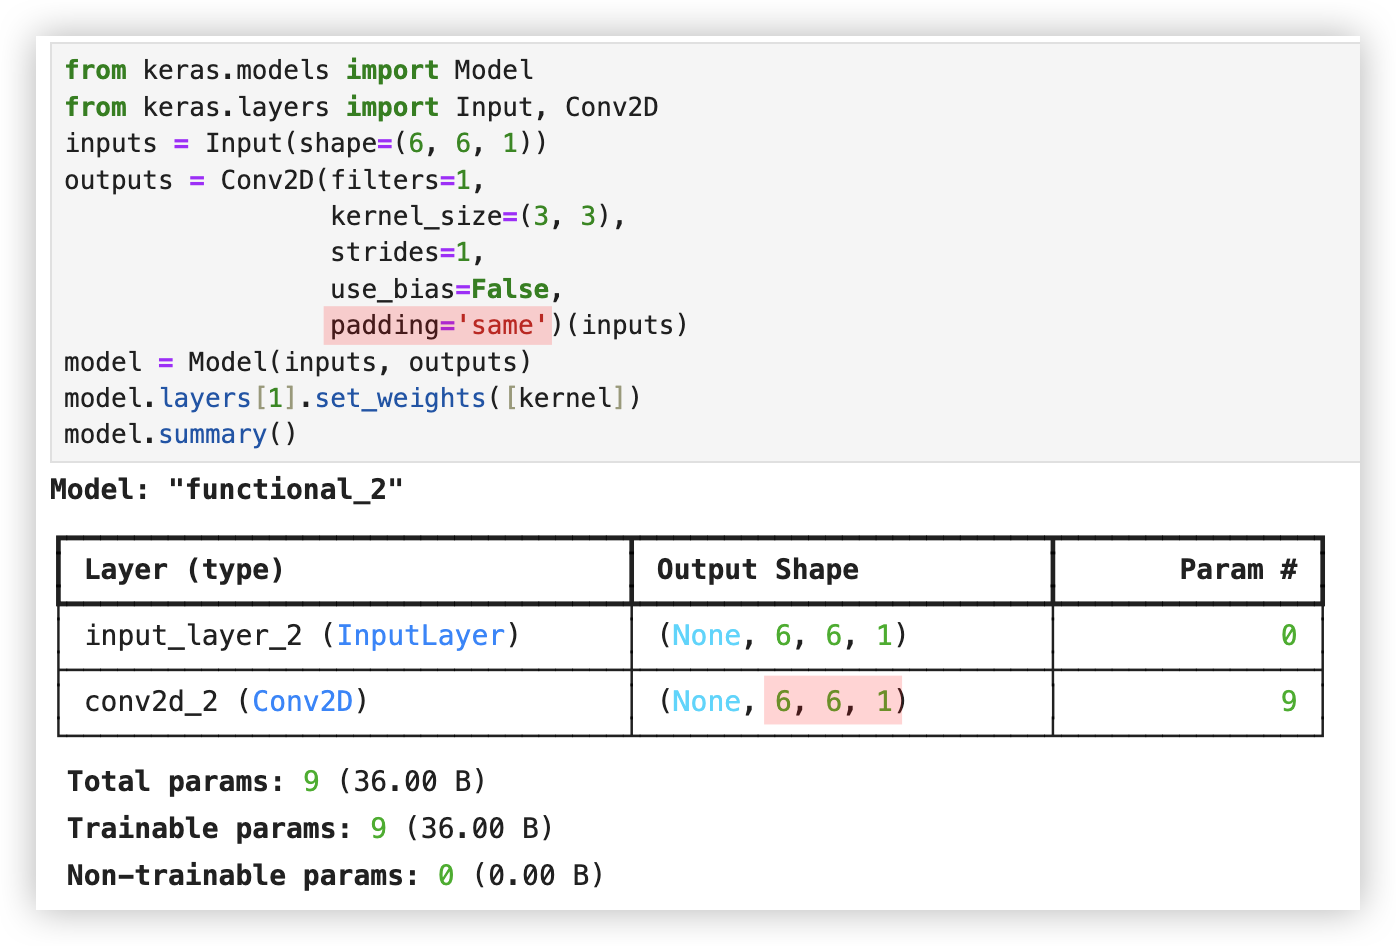
# 使用Keras中的函数API进行卷积层的构建
from keras.models import Model
from keras.layers import Input, Conv2D
inputs = Input(shape=(6, 6, 1))
outputs = Conv2D(filters=1, # 只有一个卷积核
kernel_size=(3, 3), # 卷积核尺寸大小为3x3
strides=1, # 卷积操作的步长为1
use_bias=False)(inputs) # use_bias的值为False,即不使用偏差
model = Model(inputs, outputs)
model.layers[1].set_weights([kernel])
model.summary()
2
3
4
5
6
7
8
9
10
11
12
13
14
15
16
17
18
19
20
21
22
23
24
25
26
27
28
29
30
若进行补零操作,只需在卷积层中指定padding操作的值为same.
# 池化层
作用: 缩放特征图,减少计算量!!
将滑动窗口的尺寸指定为2x2,并将步长指定为2.. 那么就相当于分割!!
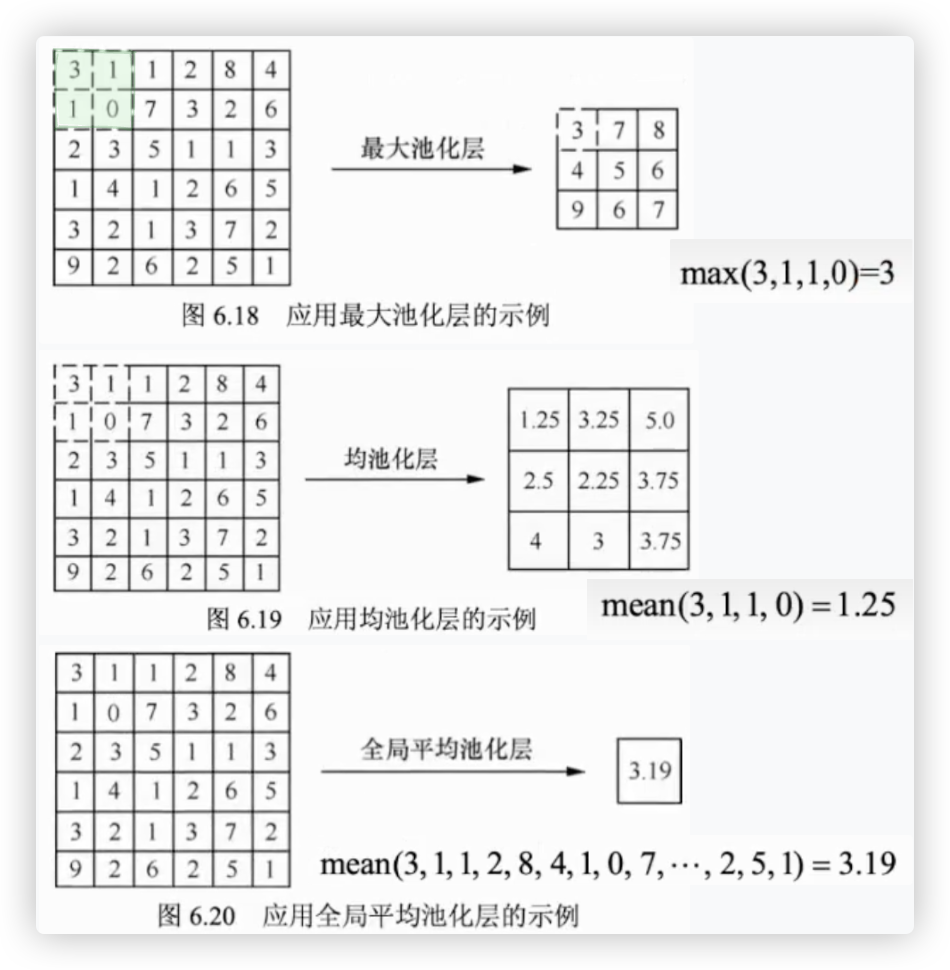
在应用池化层的时候,你可能会有一个疑问.如果将滑动窗口尺寸指定为2x2, 步长同样指定为2.
那么无论使用最大池化层或者均池化层,最后得到的特征图的尺寸都为原始图片的一半.
例如,如果图片的尺寸为 300x300, 使用的滑动窗口尺寸为2x2,步长为2,最后得到的特征图尺寸为150x150.
这样会不会导致图片丢失很多信息呢?答案是不会的.
虽然池化层会导致图片中一些细节特征的丢失,但是不会对图片本身造成过大的影响. (猫图片肉眼依旧能识别,只是清晰度降低了)
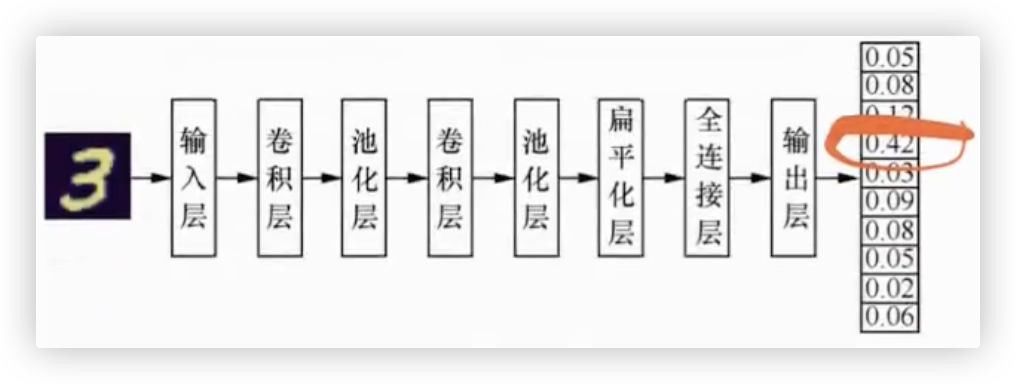
# mnist数据集实战
手写数字识别 用CNN来实现.. -- 单通道的灰色图
from keras.datasets import mnist
from keras.utils import to_categorical
# 加载MNIST数据集
(X_train, y_train), (X_test, y_test) = mnist.load_data() # X_train.shape --> (60000, 28, 28)
# 对训练集进行处理
n_train = X_train.shape[0]
X_train = X_train.reshape(n_train, 28, 28, 1)
X_train = X_train / 255
y_train = to_categorical(y_train) # 训练集标签独热编码
# 对测试集进行处理
n_test = X_test.shape[0]
X_test = X_test.reshape(n_test, 28, 28, 1)
X_test = X_test / 255
y_test = to_categorical(y_test) # 测试集标签独热编码
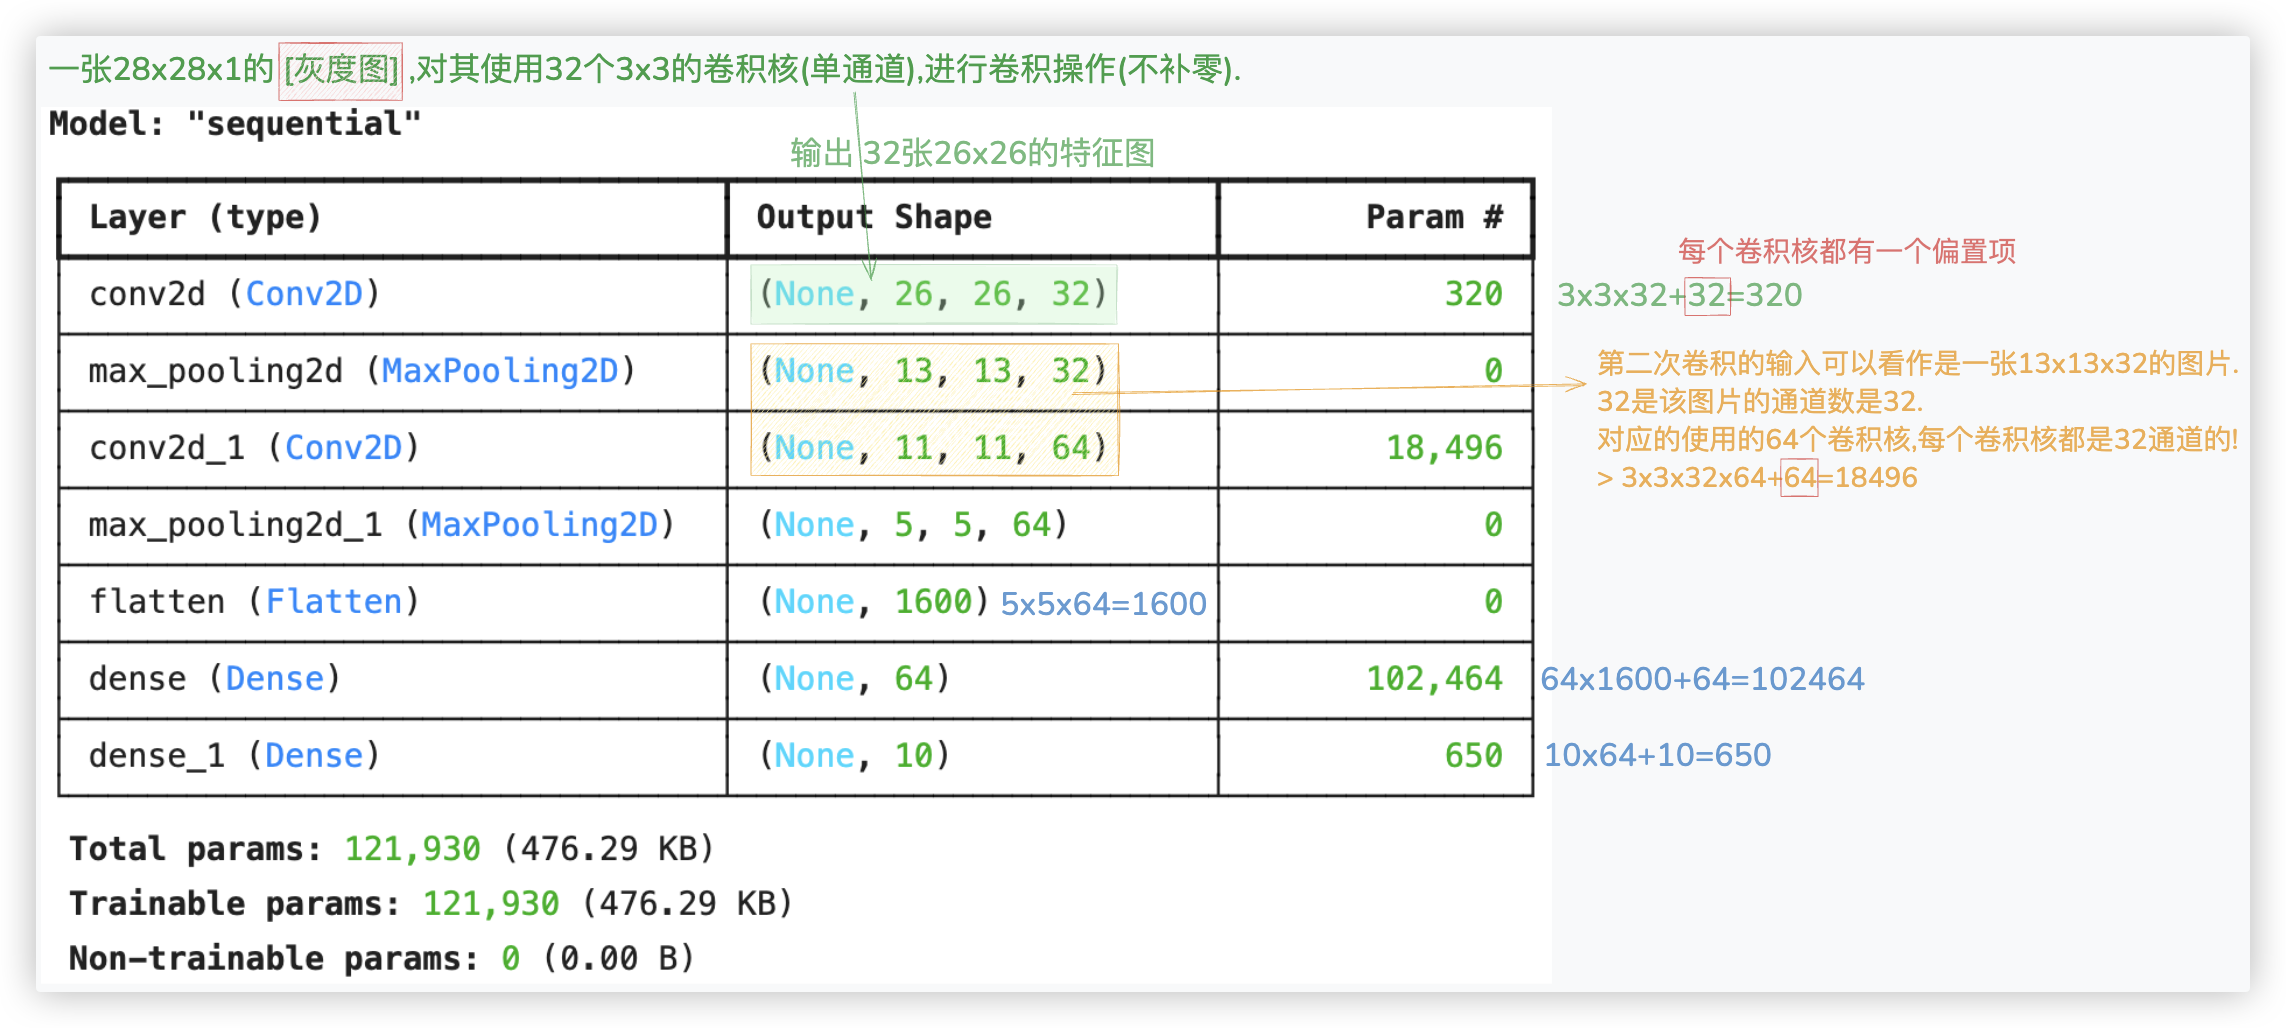
from keras.layers import Conv2D, MaxPooling2D, Flatten, Dense
from keras.models import Sequential
from keras.optimizers import RMSprop
# 构建全连接神经网络
model = Sequential()
# 第一个卷积层与池化层
model.add(Conv2D(filters=32,
kernel_size=(3, 3),
activation='relu',
input_shape=(28, 28, 1)))
model.add(MaxPooling2D(pool_size=(2, 2)))
# 第二个卷积层与池化层
model.add(Conv2D(filters=64,
kernel_size=(3, 3),
activation='relu'))
model.add(MaxPooling2D(pool_size=(2, 2)))
# 扁平化层
model.add(Flatten())
# 全连接层
model.add(Dense(64, activation='relu'))
# 输出层
model.add(Dense(10, activation='softmax'))
model.summary()
2
3
4
5
6
7
8
9
10
11
12
13
14
15
16
17
18
19
20
21
22
23
24
25
26
27
28
29
30
31
32
33
34
35
36
37
38
39
40
41
42
model.compile(optimizer=RMSprop(),
loss='categorical_crossentropy',
metrics=['accuracy'])
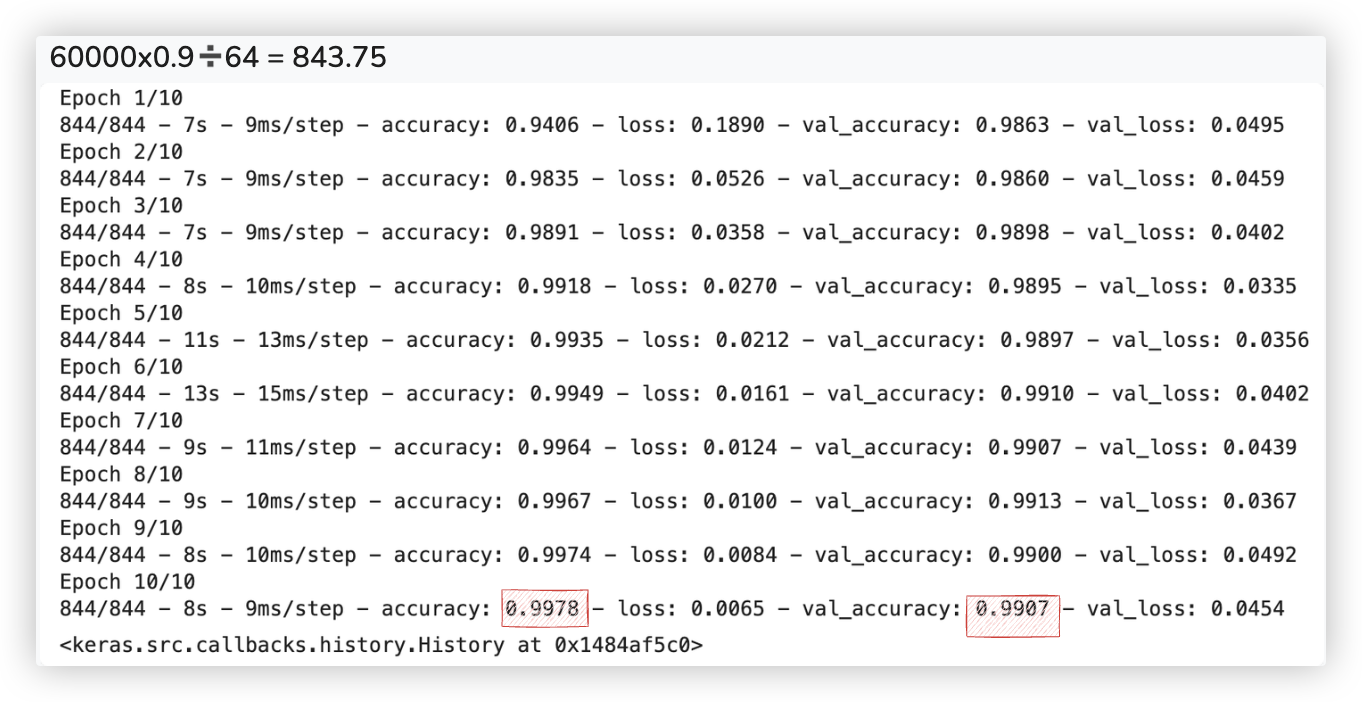
model.fit(X_train,
y_train,
epochs=10,
validation_split=0.1,
verbose=2,
batch_size=64)
2
3
4
5
6
7
8
9
10
# CIFAR-10数据集实战
图片分类 用CNN来实现.. -- 三通道的彩色图
from keras.datasets import cifar10
from keras.utils import to_categorical
(X_train, y_train), (X_test, y_test) = cifar10.load_data()
y_train = to_categorical(y_train)
y_test = to_categorical(y_test)
X_train.shape # (50000, 32, 32, 3)
from keras.models import Sequential
from keras.layers import Conv2D, MaxPooling2D, Flatten, Dense
from keras.optimizers import Adam
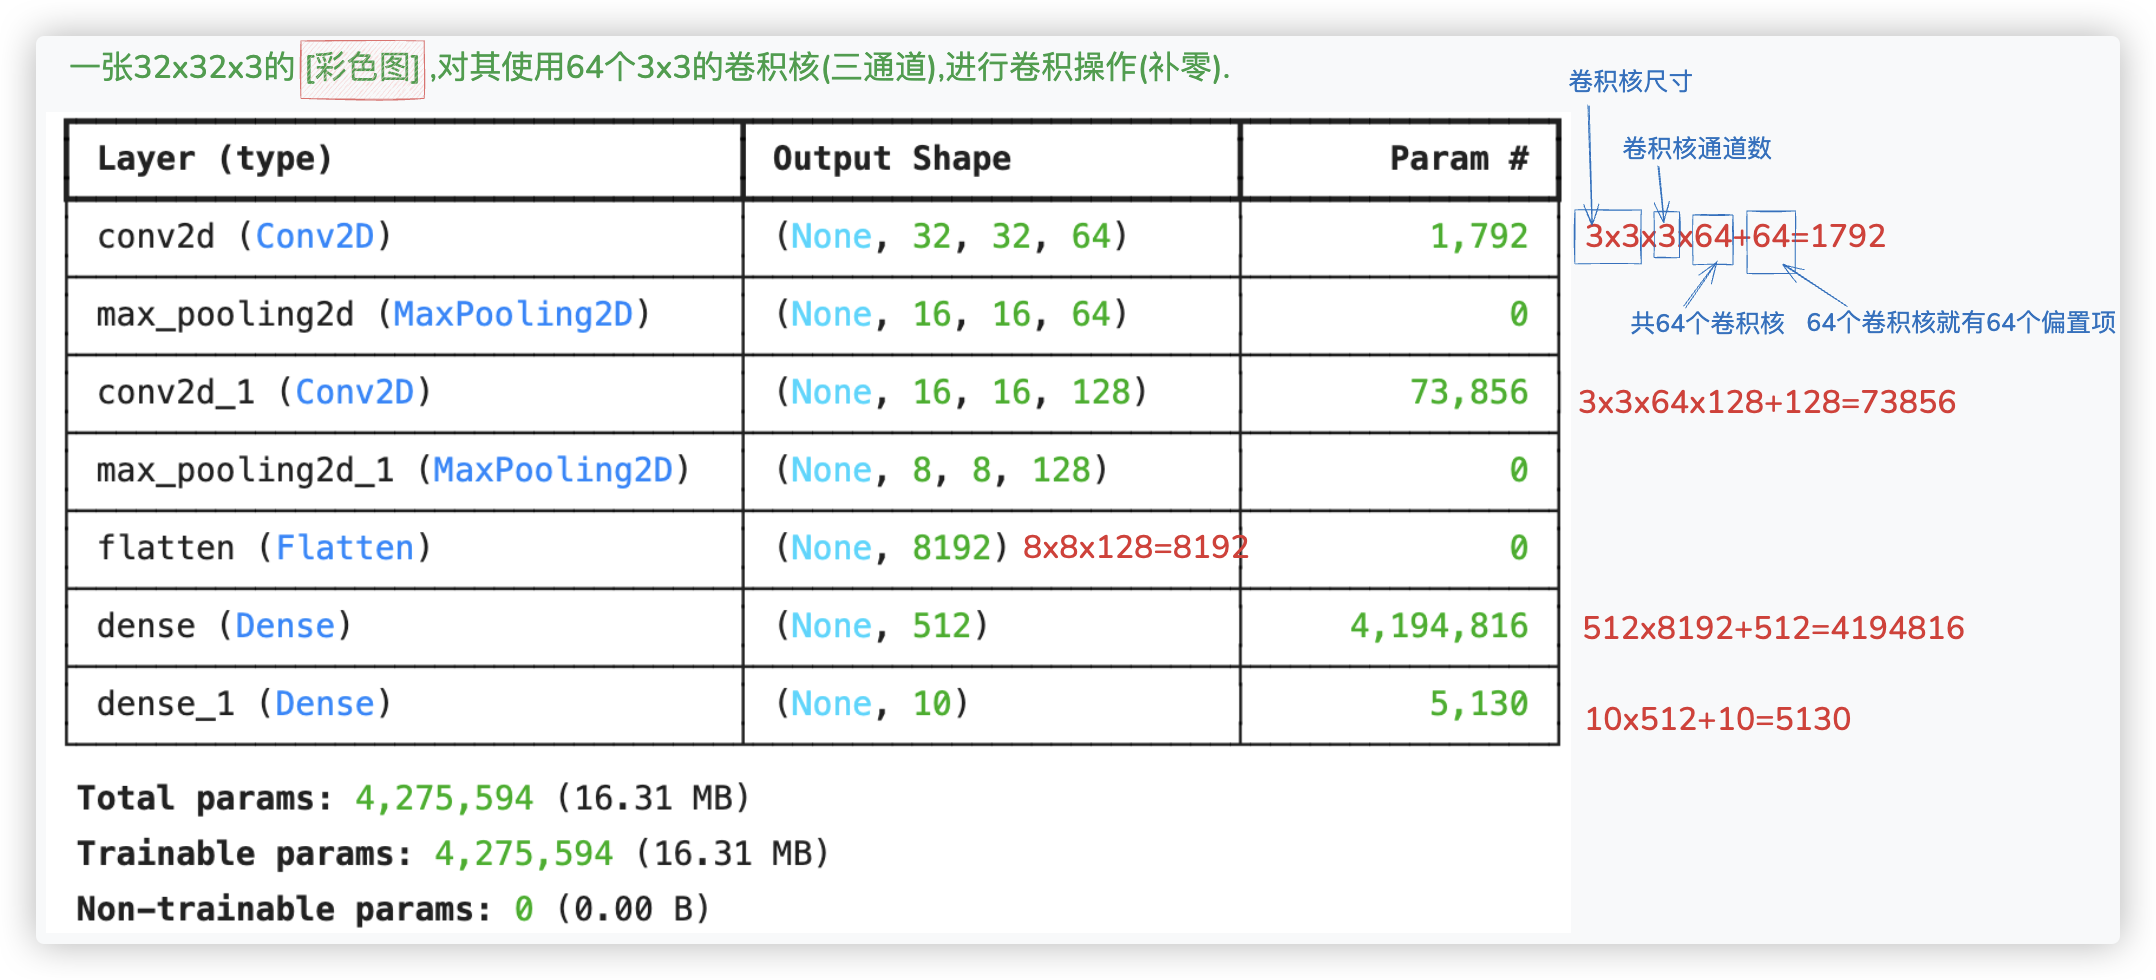
model = Sequential()
# 第一个卷积层
model.add(Conv2D(input_shape=(32, 32, 3),
filters=64,
kernel_size=(3, 3),
padding='same',
strides=1,
activation='relu'))
# 第一个池化层
model.add(MaxPooling2D(pool_size=(2, 2)))
# 第二个卷积层
model.add(Conv2D(filters=128,
kernel_size=(3, 3),
padding='same',
strides=1,
activation='relu'))
# 第二个池化层
model.add(MaxPooling2D(pool_size=(2, 2)))
# 扁平化
model.add(Flatten())
# 全连接层
model.add(Dense(512, activation='relu'))
# 输出层
model.add(Dense(10, activation='softmax'))
model.summary()
2
3
4
5
6
7
8
9
10
11
12
13
14
15
16
17
18
19
20
21
22
23
24
25
26
27
28
29
30
31
32
33
34
35
36
model.compile(loss='categorical_crossentropy',
              optimizer=Adam(learning_rate=0.0001),
              metrics=['accuracy'])

from keras.src.legacy.preprocessing.image import ImageDataGenerator
generator = ImageDataGenerator(
    featurewise_center=True,
    featurewise_std_normalization=True,
    rotation_range=10,
    width_shift_range=0.1,
    height_shift_range=0.1,
    horizontal_flip=True)
generator.fit(X_train)
model.fit(
    generator.flow(X_train, y_train, batch_size=64),
    # steps_per_epoch=5000,
    epochs=10)
2
3
4
5
6
7
8
9
10
11
12
13
14
15
16
17
我就不训练了,训练10轮,最终的识别准确率能达到90%以上..