 元类
元类
# 元类介绍
在python中一切皆对象,则我们用class关键字定义的类本身也是一个对象.
负责产生该对象的类称之为元类, 即 元类是我们自定义类的类.
换个说法, 我们用class定义的类本质就是在实例化元类.
元类是负责产生类的,我们学习元类/自定义元类的 目的 在于:
1> 控制class定义类的过程; 2> 控制 调用类(该类是class定义的)产生实例化对象的过程.
元类里的 __init__ 控制元类产生的实例化对象 (即类) 初始化的过程 ;
元类里的 __call__ 控制实例化对象"实例化/调用"产生实例的过程.
# 创建类的两种方式
大前提: Python一切皆对象,那么类也是一个对象.则用class关键字去创建类的过程也是一个实例化的过程;
该实例化的过程是为了得到一个类,调用的是元类..
1> 默认的元类type; 2> 自定义的元类.
# 用默认元类type
即用关键字class 进行创建.
# -- 方式一: 用的默认的元类type
class People:  # -- People = type('People',..,..)
    country = "China"

    def __init__(self, name, age):
        self.name = name
        self.age = age

    def eat(self):
        print("%s is eating." % self.name)


obj = People('dc', 22)
print(type(obj))     # <class '__main__.People'> -- obj对象是通过People类实例化得到的!!
print(type(People))  # <class 'type'> -- 所有用class关键字创建的类都默认是type类实例化得到的!!
print(obj)           # <__main__.People object at 0x7f91cde7eac0>
print(People)        # <class '__main__.People'>
2
3
4
5
6
7
8
9
10
11
12
13
14
15
16
17
# 内置函数exec
exec(object[, globals[, locals]]) :
参数一: 包含一系列python代码的 字符串
参数二: 全局作用域(字典形式), 如果不指定, 默认为globals()
参数三: 局部作用域(字典形式), 如果不指定, 默认为locals()
可以把exec命令的执行当成是一个函数的执行,会将执行期间产生的名字存放于局部名称空间中.
g_dic = {'x': 1, 'y': 2}
l_dic = {'m': 3, 'n': 4, 'x': 5, 'y': 6}
x, y, m, n = 10, 20, 30, 40

exec(
    '''
global x,z
x=100
z=200
m=300
print(m,n,x,y) # 300 4 100 6
               # -- x的值为100,而不是l_dic中的5,是因为global关键字
               #    它已经告诉python解释器,函数里但凡对x变量的引用,都会解析成全局变量..
               #    它还使得对x变量的赋值也是在对全局变量进行操作
''', g_dic, l_dic)

print(g_dic)  # {'x': 100, 'y': 2,'z':200,...}
print(l_dic)  # {'m': 300, 'n': 4, 'x': 5, 'y': 6} -- 可以看到m变量的值被覆盖了

# --- --- ---

cmd = """
x = 1
y = 2
print('>>>>:')
"""
local_dic = {}
exec(cmd, {}, local_dic)
print(local_dic)  # -- 将执行过程中产生的名字都丢到local_dic里面去啦!
"""运行结果如下:
>>>>:
{'x': 1, 'y': 2}
"""

# --- --- --- 模拟类定义阶段,开辟命名空间,将类体执行过程中产生的名字放到命名空间里的过程.
class Foo:
    x = 1
    def fun(self):pass

cmd = """
x = 1
def fun(self):pass
"""
class_dic = {}  # -- 定义类的局部命名空间
exec(cmd, {}, class_dic)
print(class_dic)  # {'x': 1, 'fun': <function fun at 0x7fcfdfe799d0>}
2
3
4
5
6
7
8
9
10
11
12
13
14
15
16
17
18
19
20
21
22
23
24
25
26
27
28
29
30
31
32
33
34
35
36
37
38
39
40
41
42
43
44
45
46
# 创建类的三要素
创建类的3个要素: 类名、基类、类的名称空间.
class_name = 'People'
class_bases = (object, )
class_dic = {}
class_body = """
country = "China"

def __init__(self, name, age):
    self.name = name
    self.age = age

def eat(self):
    print("%s is eating." % self.name)
"""
exec(class_body, {}, class_dic)

# -- 准备好创建类的三个要素
print(class_name)   # People
print(class_bases)  # (<class 'object'>,)
# {
#   'country': 'China',
#   '__init__': <function __init__ at 0x7fb7b45799d0>,
#   'eat': <function eat at 0x7fb7b4579940>
# }
print(class_dic)

# -- type(类名,基类,类的名称空间)
#    Ps:一般会将type赋值给的变量的名字,命名的跟class_name一样
Peo = type(class_name, class_bases, class_dic)
print(Peo)  # <class '__main__.People'>
2
3
4
5
6
7
8
9
10
11
12
13
14
15
16
17
18
19
20
21
22
23
24
25
26
27
28
29
# 自定义的元类
# class创建类的流程
在用默认元类type创建类的方式中, 我们可以分析出 class的运行原理:(而非元类的运行原理)
1> 拿到一个字符串格式的类名 class_name = "People"
2> 拿到一个类的基类们 class_bases = (object, )
3> 执行类体代码, 拿到一个类的名称空间 class_dic = {...}
4> 调用 People = type(class_name, class_bases, class_dic)
class关键字是上述四个步骤的封装.
class Mymeta(type):  # -- 只有继承了type类才能称之为一个元类,否则就是一个普通的自定义类

    def __init__(self, class_name, class_bases, class_dic):
        print(self)         # <class '__main__.People'> 注意哦,Mymeta实例化出的是一个类
        print(class_name)   # People
        print(class_bases)  # (<class 'object'>,)
        # {
        #     '__module__': '__main__',
        #     '__qualname__': 'People',
        #     'country': 'China',
        #     '__init__': <function People.__init__ at 0x7f9ce3555700>,
        #     'eat': <function People.eat at 0x7f9ce3555a60>
        # }
        print(class_dic)
        # (<class '__main__.Mymeta'>, <class 'type'>, <class 'object'>)
        print(Mymeta.__mro__)
        # -- People = Mymeta(...)  self是People,其所在类是Mymeta,看Mymeta类的mro链
        #    super()会得到一个特殊对象,此处是绑定方法,所以不用写self.
        super(Mymeta, self).__init__(class_name, class_bases, class_dic)  # -- 重用父类功能


# -- People默认继承object类,metaclass默认值为type.
#    class的运行原理第4步是用type实例化出People对象.
#    在这里,我们不使用type,使用自定义的元类Mymeta实例化出People对象.
#    People = Mymeta(类名,基类们,类的名称空间)
#        调用Mymeta类创建了一个空对象'即空的名称空间{}'后;
#        空对象People会连同Mymeta括号内的参数一起传给Mymeta下的__init__方法,完成初始化
class People(object, metaclass=Mymeta):
    country = "China"

    def __init__(self, name, age):
        self.name = name
        self.age = age

    def eat(self):
        print("%s is eating." % self.name)
2
3
4
5
6
7
8
9
10
11
12
13
14
15
16
17
18
19
20
21
22
23
24
25
26
27
28
29
30
31
32
33
34
35
36
# 添加一些判断
# -- 应用:自定义元类控制类的产生过程,类的产生过程其实就是元类的调用过程
class Mymeta(type):

    def __init__(self, class_name, class_bases, class_dic):
        temp = class_dic.get("__doc__")
        # -- or左侧条件成立的话,or右侧就不会执行啦!!也就保证or右侧执行时,temp一定不为None.
        if temp is None or len(temp.strip()) == 0:
            raise TypeError("类中必须有文档注释,并且不为空.")
        if not class_name.istitle():
            raise TypeError("类名首字母必须大写.")
        super(Mymeta, self).__init__(class_name, class_bases, class_dic)


class People(object, metaclass=Mymeta):
    """这是一个People类!"""
    country = "China"

    def __init__(self, name, age):
        self.name = name
        self.age = age

    def eat(self):
        print("%s is eating." % self.name)


print(getattr(People, "__doc__", None))
2
3
4
5
6
7
8
9
10
11
12
13
14
15
16
17
18
19
20
21
22
23
24
25
26
# 自定义类的实例化
自定义元类来控制类的调用过程, 即类的实例化过程
# __call__
# 原理
class Foo:

    def __call__(self, *args, **kwargs):
        print(self)    # <__main__.Foo object at 0x7fa1f868cac0>
        print(args)    # (1, 2, 3)
        print(kwargs)  # {'x': 4, 'y': 5}
        return "返回值123"


obj = Foo()
# -- 要想让obj这个实例化对象变成一个可调用的对象,需要在该对象的类中定义一个__call__方法
#    该方法会在调用实例化对象obj时自动触发,调用obj的返回值就是__call__方法的返回值
print(obj(1, 2, 3, x=4, y=5))  # 返回值123  --  obj的调用会触发Foo中__call__方法的执行
2
3
4
5
6
7
8
9
10
11
12
13
由此得知, 调用一个对象, 就是触发对象所在类中的__call__方法的执行!
Python处处皆对象, People也是一个对象, 并且People它是可以调用的!
那么在实例化得到People对象的Mymeta类中也必然存在一个__call__方法!!!
# 元类中的__call__
Mymeta ---(实例化)--- People ---(实例化)--- obj
People实例化得到obj会对People进行调用,则Mymeta中一定会有__call__方法.
# -- 应用:自定义元类控制类的产生过程,类的产生过程其实就是元类的调用过程
class Mymeta(type):

    def __call__(self, *args, **kwargs):
        print(self)    # <class '__main__.People'>
        print(args)    # ('dc',)
        print(kwargs)  # {'age': 18}


class People(object, metaclass=Mymeta):
    country = "China"

    def __init__(self, name, age):
        self.name = name
        self.age = age

    def eat(self):
        print("%s is eating." % self.name)


# -- 调用People就是在调用Mymeta类中的__call__方法
#    然后将People传给self,溢出的位置参数传给*,溢出的关键字参数传给**
#    调用People的返回值就是调用__call__的返回值
obj = People('dc', age=18)
print(obj)  # None
2
3
4
5
6
7
8
9
10
11
12
13
14
15
16
17
18
19
20
21
22
23
24
25
回顾一下,抛开元类的知识不谈, 就单纯的People('dc', 18)得到一个类的实例化对象obj, 这一过程经历了什么?
step1: 调用类创建了一个空对象 '空的名称空间' {}
step2: 自动触发类中__init__功能的执行, 将空对象传给self参数
# 调用元类产生的类
那么,自定义的元类Mymeta在__call__方法中一定会实现这三件事:
1> 产生一个People的空对象obj
2> 调用__init__方法初始化对象obj
3> 返回初始化好的obj
接下来,我们将默认元类type干的事情进行还原.
# -- 应用:自定义元类控制类的产生过程,类的产生过程其实就是元类的调用过程
class Mymeta(type):

    def __call__(self, *args, **kwargs):
        # -- !!!必须写self参数,代表创建的是该self的空对象 固定用法!!
        #    此处是self指代的是类People
        #    要找__new__这个属性,若People的namespace中没有,依次再去object、Mymeta、type中找
        obj = self.__new__(self)  # -- 【1】.通过__new__方法先造一个People的空对象
        # -- 这里也涉及到属性查找,该self(即People)中有__init__方法,就直接使用它
        #    抛开元类不谈,类的实例化对象自动调用__init__绑定方法时,不用传self.. 就是因为在这里帮忙传啦
        self.__init__(obj, *args, **kwargs)  # -- 【2】.调用__init__为该空对象初始化独有的属性
        return obj  # -- 【3】.返回一个初始化好的对象obj


# -- People = Mymeta(People,...,...) 是在创建类,主要操作的是Mymeta中的__init__
# -- People()是在调用Mymeta中的__call__创建实例化对象
class People(object, metaclass=Mymeta):
    country = "China"

    def __init__(self, name, age):
        self.name = name
        self.age = age

    def eat(self):
        print("%s is eating." % self.name)

    def __new__(cls, *args, **kwargs):
        # print(cls)  # <class '__main__.People'>
        # cls.__new__(cls)  # -- 直接报错,递归死循环
        # print(cls.__mro__)  # -- (<class '__main__.People'>, <class 'object'>)
        obj = super().__new__(cls)  # -- 完整写法为: super(People,cls)
        return obj


obj = People('dc', age=18)
print(obj.__dict__)  # {'name': 'dc', 'age': 18}
obj.eat()  # dc is eating.
2
3
4
5
6
7
8
9
10
11
12
13
14
15
16
17
18
19
20
21
22
23
24
25
26
27
28
29
30
31
32
33
34
35
36
37
# 属性查找
结合 python继承的实现原理+元类 重新看属性的查找应该是什么样子呢???
在学习完元类后, 更进一步理解了"python处处皆对象",提一点,用class自定义的类全都是对象
包括object类本身也是元类type的 一个实例,可以用type(object)验证.
继承的实现原理 + 将类当成对象.下述继承应该说成是:
对象StanfordTeacher继承对象Foo, 对象Foo继承对象Bar, 对象Bar继承对象object
于是属性查找应该分成 两层 :
一层是对象层 (基于c3算法的MRO) 的查找, 另外一个层则是类层(即元类层)的查找!!
Ps: 若StanfordTeacher实例化出obj对象,obj通过 . 进行属性引用时,会先在自己的namespace中查找独有属性.
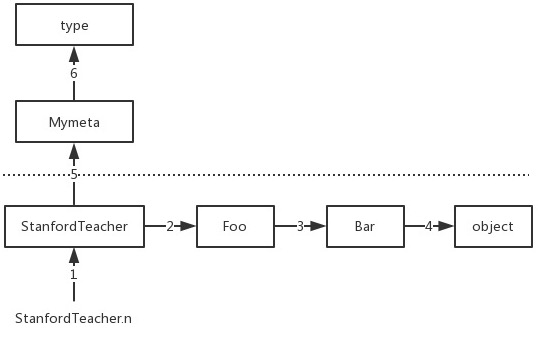
class Mymeta(type):
    n = 520
    def __call__(self, *args, **kwargs):
      	# print(self)  # <class '__main__.StanfordTeacher'>
        # -- __new__的查找顺序为StanfordTeacher->Foo->Bar->object->Mymeta->type
        obj = self.__new__(self)
        # print(self.__new__ is object.__new__)  # True
        # -- !!下方这条注释的语句,也可以创建空对象,但会直接跳过StanfordTeacher->Foo->Bar这三个类的检索
        #  obj = object.__new__(self)
        self.__init__(obj, *args, **kwargs)
        return obj

class Bar(object):
    n = 333

class Foo(Bar):
    n = 222

class StanfordTeacher(Foo, metaclass=Mymeta):
    n = 111
    school = 'Stanford'
    def __init__(self, name, age):
        self.name = name
        self.age = age
    def say(self):
        print('%s says welcome to the Stanford to learn Python' % self.name)

# -- n的查找顺序为StanfordTeacher->Foo->Bar->object->Mymeta->type
print(StanfordTeacher.n)
2
3
4
5
6
7
8
9
10
11
12
13
14
15
16
17
18
19
20
21
22
23
24
25
26
27
28
29
obj = object.__new__(self) 也可以创建空对象,但会直接跳过StanfordTeacher->Foo->Bar这三个类的检索
提一嘴: StanfordTeacher = Mymeta('StanfordTeacher','...','...') 产生类StanfordTeacher的过程就是在调用Mymeta, 而Mymeta也是type类的一个对象, 那么Mymeta之所以可以调用, 是因为在元类type中也有一个 __call__方法!!! 该方法中也会实现那三件事!!
# 实践
# 模版分析
1     # class type:
2     #     def __call__(self, *args, **kwargs):  # -- self为Mymeta对象 args是三要素 15
3     #         obj = self.__new__(self, *args, **kwargs)
4     #         self.__init__(obj, *args, **kwargs)
5     #         return obj

6     class Mymeta(type):
7        def __new__(self, *args, **kwargs):   # -- self为Mymeta对象 args是三要素 15
8             return super(Mymeta, self).__new__(self, *args, **kwargs)

9        def __init__(self, class_name, class_bases, class_dic):  # -- self为People对象 15
10            super(Mymeta, self).__init__(class_name, class_bases, class_dic)

11       def __call__(self, *args, **kwargs):  # -- self为People对象 args是('dc',18) 21
12            obj = self.__new__(self)  # -- 这里调用的是19行的代码
13            self.__init__(obj, *args, **kwargs)  # -- 调用的是16的代码 *args解包以位置参数传递
14            return obj

15    class People(object, metaclass=Mymeta):
16        def __init__(self, name, age):
17            self.name = name
18            self.age = age

          # -- 第19、20行的代码不写也是可以的
19        def __new__(self):
20            return super(People, self).__new__(self)  # -- 最后调用的是object里的__new__
                                                        #    注意,object的__new__只有一个参数

21    p = People('dc', 18)

先说一点:
  python处处皆对象,类也是一个对象. 调用对象就会触发实例化该对象的类中的__call__方法.
  以本模版为例, Mymeta()、People()会分别触发type类和Mymeta类中的call方法;

<在第15行打个断点,就知道执行顺序啦!!从上到下,class和def语句都会先执行,但函数体代码是没有马上执行的.>
第1-5行代码是type类的伪代码.
1> 从第15行代码开始分析.
   class关键字会收集创建类的三要素,类名People、基类们(object,)、执行类体代码得到的名称字典.
   注意一点:能收集到名称字典是因为第16行、第19行代码执行了,但是函数体代码并没有执行!!
2> 收集完成后,在背后会执行语句,People = Mymate('People',(object,),{...})
   Mymate对象的调用会触发type中__call__方法的运行.
3> 看第2行的伪代码,self是Mymeta对象. -- 因为对象调用绑定方法会自动将自己传递给方法的第一个参数.
   创建类的三要素会被*args以元祖形式接收.
4> 第3行的伪代码,开始实例化Mymeta对象,创建出一个空对象..这里涉及到__new__属性的查找.
   Mymeta对象中有__new__属性,跳转到第7行代码.该行代码中的self也是Mymeta对象.
   打印一下,会发现args元组里是创建类的三要素,kwargs是空字典..
   第8行代码使用了super(),此行代码等价于 `return type.__new__(self, *args, **kwargs)`
   注意一点!*args相当于将args元祖进行了拆包,以位置参数的形式进行了传递!!!
   ok,将空对象 return回了 第3行的伪代码, 并赋值给了obj对象. 实则此obj就是 People对象!
5> 执行第4行的伪代码,为People对象进行初始化操作,同理,涉及__init__属性的查找.
   跳转到第9行代码.. 接着执行第10行,再回到第4行,执行第5行的return语句
6> 就此,第15行代码 People = Mymate('People',(object,),{...})的路途结束!!
7> 第21行代码的执行,会执行第12行代码,再执行第20行代码; 第13行代码的执行会执行第17行代码.
2
3
4
5
6
7
8
9
10
11
12
13
14
15
16
17
18
19
20
21
22
23
24
25
26
27
28
29
30
31
32
33
34
35
36
37
38
39
40
41
42
43
44
45
46
47
48
49
50
51
52
53
清爽版
class Mymeta(type):
    # -- 控制自定义类的创建过程 People = Mymeta('People',..,..)
    def __init__(self, class_name, class_bases, class_dic):
        super(Mymeta, self).__init__(class_name, class_bases, class_dic)

    # -- 控制自定义类的调用 p = People('dc',18)
    def __call__(self, *args, **kwargs):
        obj = self.__new__(self)
        self.__init__(obj, *args, **kwargs)
        return obj

class People(object, metaclass=Mymeta):
    def __init__(self, name, age):
        self.name = name
        self.age = age
2
3
4
5
6
7
8
9
10
11
12
13
14
15
# 小试身手
1> 在自定义元类Mymeta中把自定义类People的数据属性都变成大写
2> 在自定义元类Mymeta中完成People实例对象p独有属性的定制,自定义类People无需使用__init__方法
"""
class type:
    def __call__(self, *args, **kwargs):
        # print(self)  # <class '__main__.Mymeta'>
        obj = self.__new__(self, *args, **kwargs)  # -- 产生Mymeta的一个对象People
        self.__init__(obj, *args, **kwargs)
        return obj
"""
class Mymeta(type):
    def __new__(self, class_name, class_bases, class_dic):
        print(self)  # <class '__main__.Mymeta'> !!!!!!
        update_dic = {}
        for k, v in class_dic.items():
            if not callable(v) and not k.startswith("__"):
                update_dic[k.upper()] = v
            else:
                update_dic[k] = v
        # -- 这里是创建一个Mymeta的空的实例化对象People
        #    等同于 return type.__new__(self, class_name, class_bases, update_dic)
        return super(Mymeta, self).__new__(self, class_name, class_bases, update_dic)

    def __call__(self, *args, **kwargs):
        print(self)  # -- <class '__main__.People'> !!!!!!
        # -- 要求实例化时传参必须为关键字形式
        if args:
            raise TypeError("must use keyword argument for key function!")
        obj = self.__new__(self)
        for k, v in kwargs.items():
            obj.__dict__[k] = v
        return obj


class People(object, metaclass=Mymeta):  # -- People = Mymeta(People,..,..)
    country = "china"

    def __init__(self, name, age):
        self.name = name
        self.age = age


print(getattr(People, 'COUNTRY'))  # china
p = People(name='dc', age=18)
print(p.__dict__)  # {'name': 'dc', 'age': 18}
2
3
4
5
6
7
8
9
10
11
12
13
14
15
16
17
18
19
20
21
22
23
24
25
26
27
28
29
30
31
32
33
34
35
36
37
38
39
40
41
42
43
3> 在元类Mymeta中控制自定义的类People产生的对象p相关的独有属性全部为隐藏属性
class Mymeta(type):

    def __call__(self, *args, **kwargs):
        obj = object.__new__(self)
        self.__init__(obj, *args, **kwargs)
        obj.__dict__ = {f'_{self.__name__}__{k}': v for k, v in obj.__dict__.items()}
        return obj


class People(object, metaclass=Mymeta):

    def __init__(self, name, age):
        self.name = name
        self.age = age


p = People('dc', 18)
print(p.__dict__)  # {'_People__name': 'dc', '_People__age': 18}
2
3
4
5
6
7
8
9
10
11
12
13
14
15
16
17
18
# 单例模式
单例模式: 即单个实例, 指的是同一个类实例化多次的结果指向同一个对象, 用于节省内存空间
应用场景:
当实例化多次得到的多个对象中存放的属性都一样时, 应该将多个对象指向同一个内存, 即同一个实例!
settings.py配置文件内容如下:
IP = "1.1.1.10"
PORT = 3306
2
若我们从配置文件中读取配置来进行实例化, 在配置相同的情况, 就没必要重复产生对象浪费内存啦!
方式二和三,约定一个规则,Mysql()不传参数,默认从配置文件中读取参数!!Hhh.
# 方式一:类方法
import settings

class Mysql:
    __instance = None

    def __init__(self, ip, port):
        self.ip = ip
        self.port = port

    @classmethod
    def from_conf(cls):
        if not cls.__instance:
            cls.__instance = cls(settings.IP, settings.PORT)
        return cls.__instance

obj1 = Mysql.from_conf()
obj2 = Mysql.from_conf()
obj3 = Mysql.from_conf()

print(obj1 is obj2 is obj3)  # True
2
3
4
5
6
7
8
9
10
11
12
13
14
15
16
17
18
19
20
# 方式二:装饰器
import settings
"""
def singleton(cls):
    _isinstance = None
    def wrapper(*args, **kwargs):
        if args or kwargs:
            return cls(*args, **kwargs)
        nonlocal _isinstance
        if not _isinstance:
            _isinstance = cls(settings.IP, settings.PORT)
        return _isinstance
    return wrapper
"""
# -- Ps:装饰器还可以用类实现,具体参考面向对象高级部分中关于描述符的知识点!!
def singleton(cls):
    # -- 可以放到类里 cls.__isinstance
    #    注意:函数中约定一个下划线,类中约定两个下划线.
    _isinstance = cls(settings.IP, settings.PORT)

    def wrapper(*args, **kwargs):
        if args or kwargs:
            return cls(*args, **kwargs)
        # -- cls.__isinstance
        return _isinstance

    return wrapper

# -- 被装饰对象可以是任意可被调用的对象 类是可以调用的
@singleton
class Mysql:
    def __init__(self, ip, port):
        self.ip = ip
        self.port = port

obj1 = Mysql()
obj2 = Mysql()
obj3 = Mysql()
print(obj1 is obj2 is obj3)  # True
2
3
4
5
6
7
8
9
10
11
12
13
14
15
16
17
18
19
20
21
22
23
24
25
26
27
28
29
30
31
32
33
34
35
36
37
38
# 方式三:元类
import settings


class Mymeta(type):

    # -- 定义类Mysql时触发
    def __init__(self, class_name, class_bases, class_dic):  # -- self为Mysql
        # -- 在Mysql调用之前,事先先从配置文件中取配置来造一个Mysql的实例出来
        self.__instance = object.__new__(self)  # -- 造出一个Mysql的空对象
        self.__init__(self.__instance, settings.IP, settings.PORT)  # -- 加载配置文件初始化Mysql的空对象
        #    上述两步可以合成下面的任意一种写法(即上方的两行代码等效于下方的两行代码中的任意一条)
        #    建议不合成 难得理解 —_-""  此__call__是type中的, 看前面的·模版分析·就晓得咋个回事了.
        # self.__instance = super().__call__(settings.IP, settings.PORT)
        # self.__instance = type.__call__(self, settings.IP, settings.PORT)

        # -- 此行模版代码放到此函数的哪个位置都可以..
        #    因为type中的__call__方法里的__new__步骤已经创建好了Mymeta的空对象.
        super(Mymeta, self).__init__(class_name, class_bases, class_dic)

    # -- Mysql调用时触发
    def __call__(self, *args, **kwargs):  # -- self为Mysql
        if args or kwargs:
            obj = self.__new__(self)
            self.__init__(obj, *args, **kwargs)
            return obj
        return self.__instance


class Mysql(object, metaclass=Mymeta):

    def __init__(self, ip, port):
        self.ip = ip
        self.port = port


# -- 没有传值则默认从配置文件中读配置来实例化,所有的实例应该指向一个内存地址
obj1 = Mysql()
obj2 = Mysql()
obj3 = Mysql()
print(obj1 is obj2 is obj3)  # True
obj4 = Mysql('127.0.0.1', 8000)
print(obj1 is obj4)  # False
2
3
4
5
6
7
8
9
10
11
12
13
14
15
16
17
18
19
20
21
22
23
24
25
26
27
28
29
30
31
32
33
34
35
36
37
38
39
40
41
42
# 补充
class MyType(type):
    def __init__(self, *args, **kwargs):
        print("2")
        super().__init__(*args, **kwargs)

    def __new__(cls, *args, **kwargs):
        print("1")
        new_cls = super().__new__(cls, *args, **kwargs)  # 创建类
        print(new_cls)  # <class '__main__.Foo'>
        return new_cls


class Foo(object, metaclass=MyType):  # 也遵循,先执行new再执行init
    pass


# 类创建对象先执行类中的new再执行init,对象加括号会执行类中的call方法
# 创建类的"东西"在创建类时也会先执行"东西"里的new再执行init,类加括号会执行"东西"里的call方法
# 意味着 类加括号会执行 "东西" 里的call方法??

# 先new后init是因为call里定义了的


根据类创建对象
1> 先执行__new__方法,创建空对象; ==> 构造方法
2> 执行类的__init__方法,初始化对象; ==> 初始化方法
Q: 对象是基于类创建的.那么类是由谁创建的?
A: 类默认是由type创建的!!
class Foo(object):
    v1 = 123
    def func(self):
        return 666
等同于
Foo = type("Foo",(object,),{"v1":123,"func":lambda self:666})  # 类名、继承类、成员

type也是一个继承了object的类,type括号后面的三个参数是init的参数???

---
类默认是由type创建的,那如何让一个类的创建改成其他东西呢? 元类!!
元类,指定类由谁来创建!!通过metaclass=..来指定!
2
3
4
5
6
7
8
9
10
11
12
13
14
15
16
17
18
19
20
21
22
23
24
25
26
27
28
29
30
31
32
33
34
35
36
37
38
39
40
41