 认证
认证
AnonymousUser类
如果用户认证失败,或者未认证,那么request.user就是 AnonymousUser/匿名用户,它是AnonymousUser类的实例化对象.

让我回顾下,看到"认证",最起码要想到啥基本的.(以下就是大白话了)
写认证类,重写authenticate和authenticate_header方法..
在authenticate方法里进行验证,简单来说就是取token、验证token,正确返回元祖(user,token),错误抛出异常
另外,认证成功,后续的request中可通过request.user和request.auth取到user和token
多个认证类的authenticate方法返回None时的逻辑(两种情况:支持匿名访问 以及 必须认证登陆成功后才能访问).
    伪代码如下:
    for authenticator in [认证类,认证类,认证类]:
        user_auth_tuple = authenticator.authenticate()  # 此处抛出了异常也不会往下执行啦.
        if user_auth_tuple:
            return
    简单来说,执行每个认证类里的authenticate方法
      - 一旦某个认证类认证成功或者认证过程抛出异常导致认证失败,不会再管后续的认证类;
      - 只有返回None,才会继续往后执行下一个认证类里的authenticate方法;
      (简而言之,这么些个认证类,只要有一个认证成功或失败,后续的认证类就不用管了)
全局认证和局部认证的配置. -- 底层本质原理就是oop的继承

看那三个案例就很快明了啦.
案例1: 项目要开发3个接口,其中1个是无需登录就能访问的接口、其余2个是必须登录才能访问的接口.
案例2: 项目要开发100个接口,其中1个是无需登录就能访问的接口、其余99个是必须登录才能访问的接口..
案例3: 后端drf项目支持很多应用, 比如网页、小程序、app, 他们都可以访问后端某个接口.访问时需要认证,获取token信息.
      一般来说, 我们可以约定这些应用的token信息通过url传递, 但前端开发不同意..
      它非要在网页中将token放到url、小程序和app中将token放到请求头中.. 这就必须让后端的接口在认证时兼顾这三种情况..

★ 示栗中,若不用NoAuthentication认证类,那么就是支持匿名访问;加上NoAuthentication,表明必须认证登陆成功才能访问!!
  扩展思维:当然可以匿名访问,然后根据request.user是否为空在业务函数里做判定.

认证时,报错 重写401 不重写403  NoAuthentication杜绝匿名用户访问.
若啥也不做,drf的配置文件里就有两个默认的认证类,他们皆返回的是None!


Q:只要给视图类配置了认证,那么该视图类的 所有方法/所有视图函数 都得经过认证后才能执行!(每个请求都会执行一遍截图中的认证源码)
  若我们自己写的视图类中有get、post、put等方法,只需要对put方法进行认证,怎么办?/ 即get、post方法不需要认证就可以执行.
A: 那么在认证类中判断请求类型是否是PUT,只对其进行认证即可!!
   或者再写个视图类,单独实现put方法,加上认证,就完了!
   - 还有种方法,重写源码中的 perform_authentication方法!
     if request.method == "PUT":
         # 正常的进行认证
         request.user
     # 提示: 不需要认证,就是匿名用户呗.
     request.user = None
     request.auth = None
2
3
4
5
6
7
8
9
10
11
12
13
14
15
16
17
18
19
20
21
22
23
24
25
26
27
28
29
30
31
32
33
34
35
36
37
38
39
40
41
42
43
44
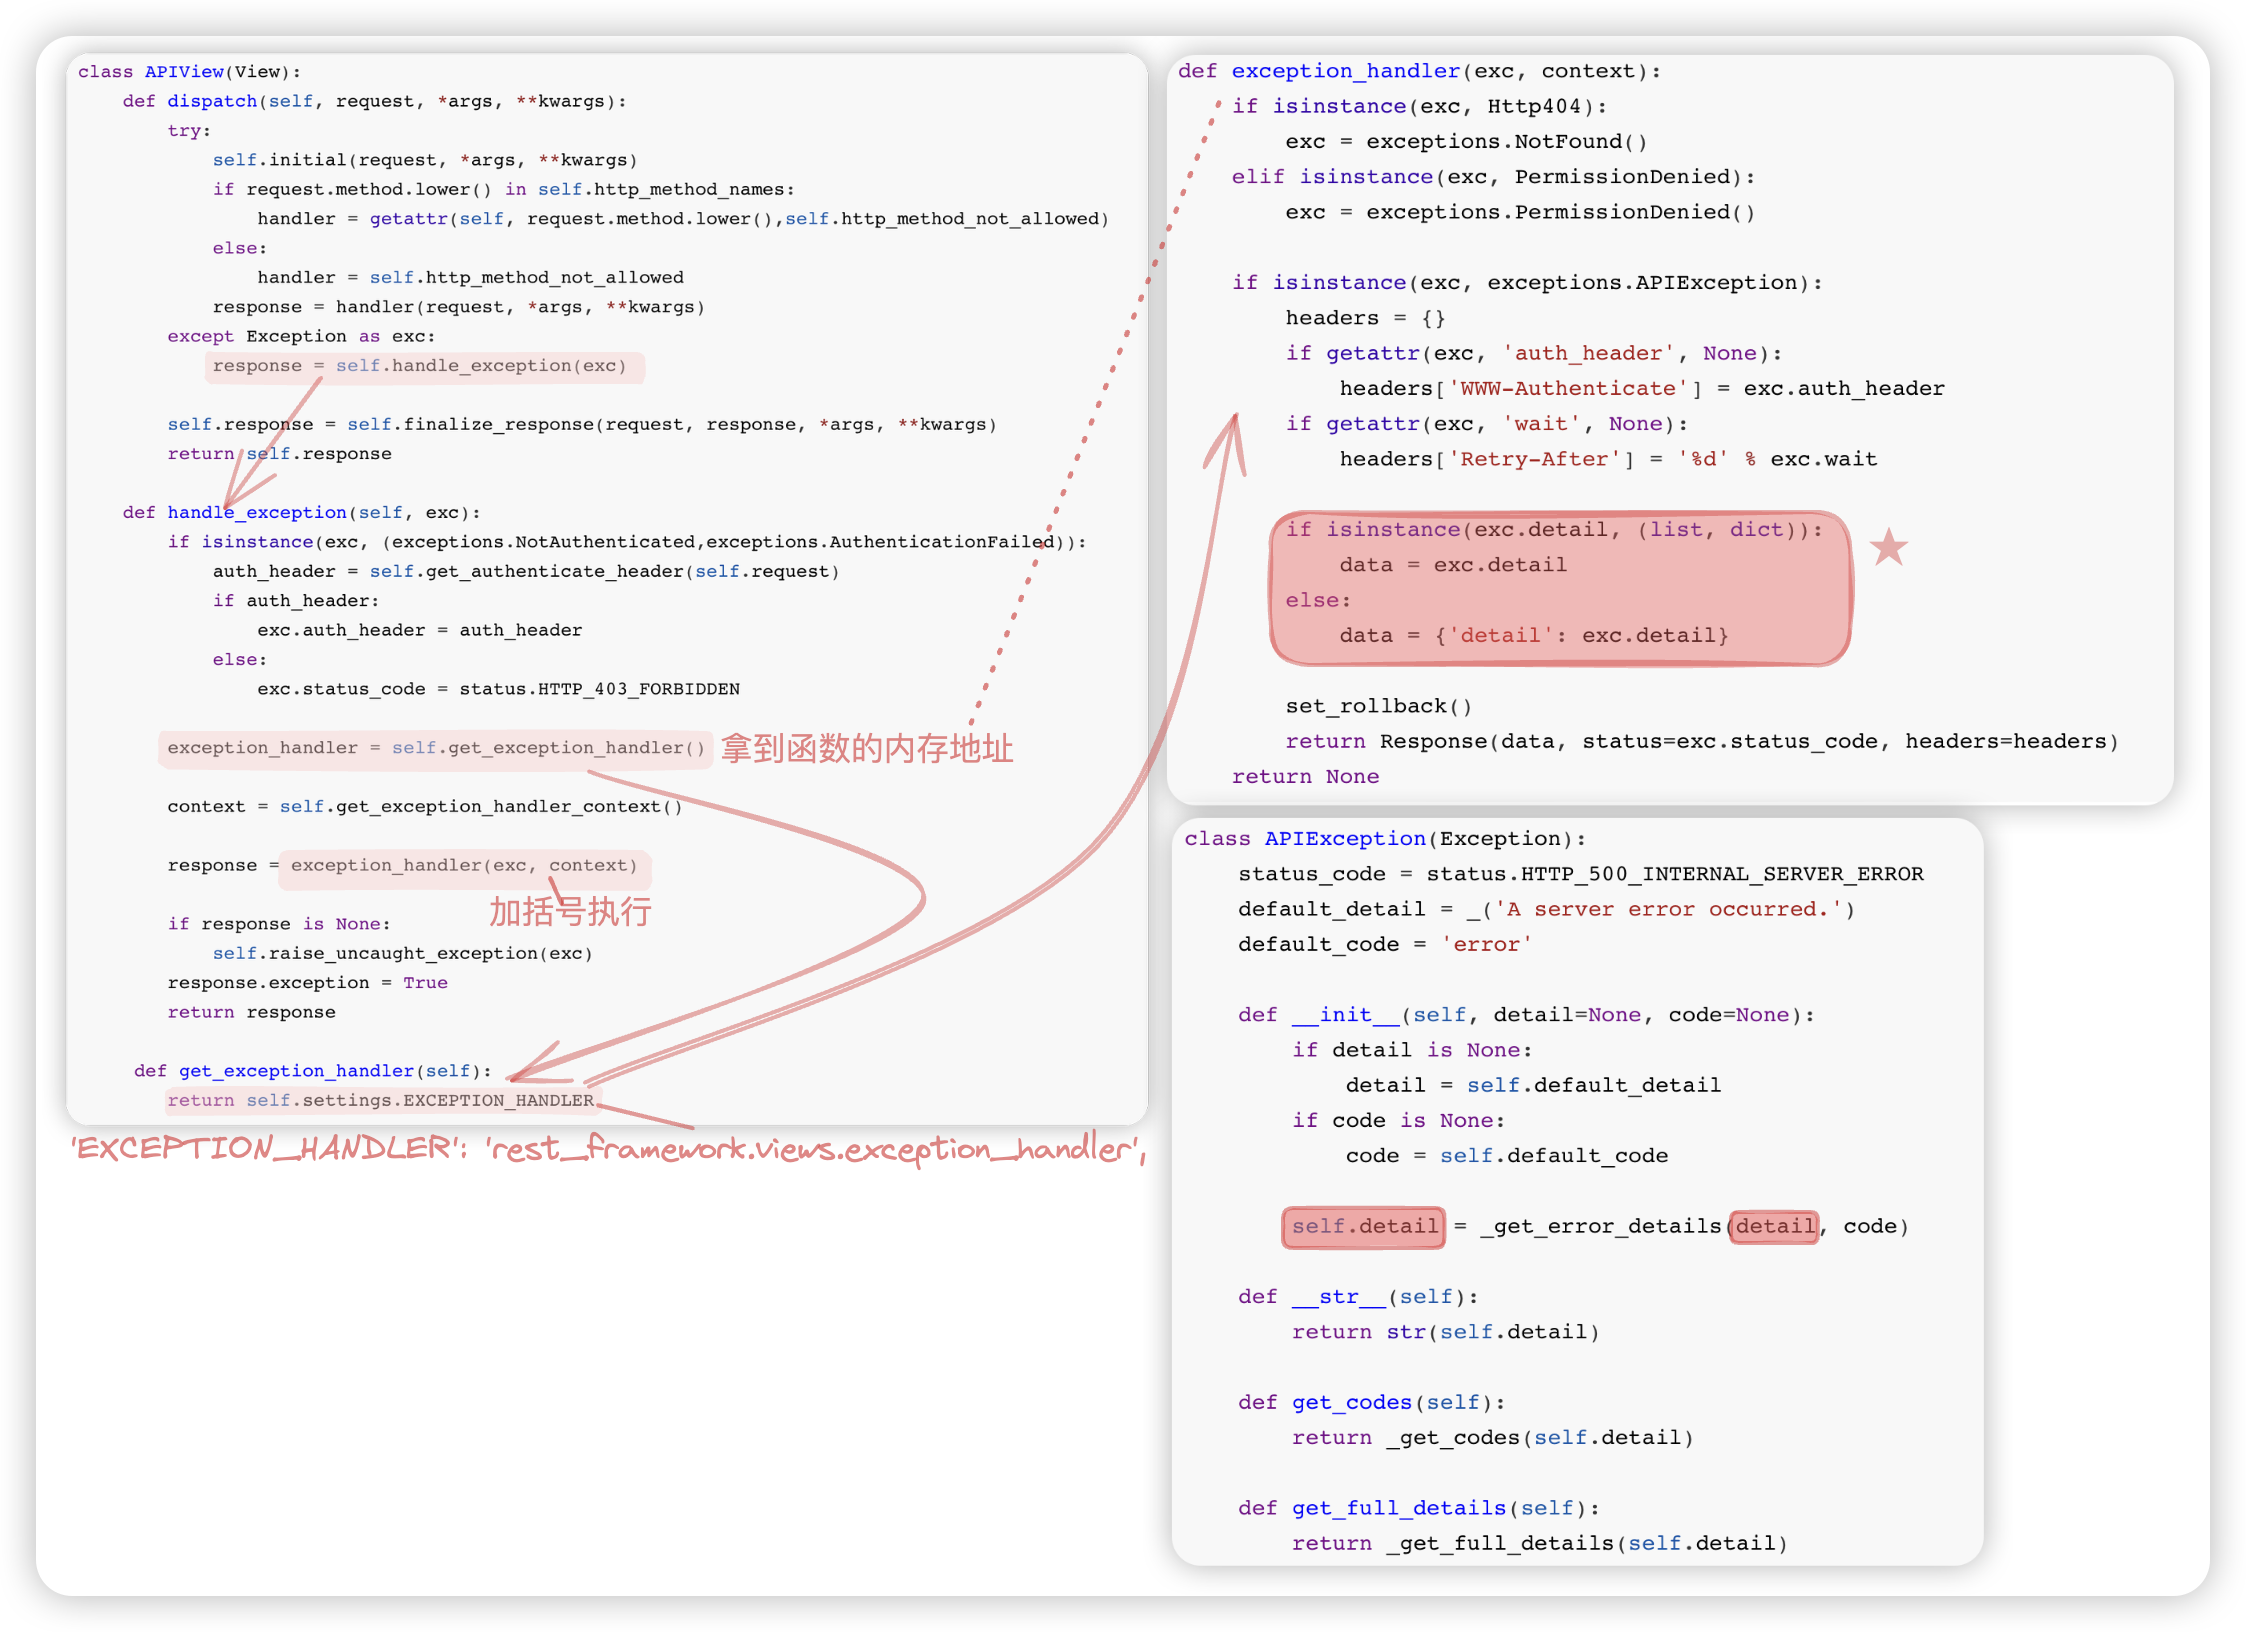
补充一点源码阅读理解, 关于 异常处理的!!
在开发API过程中, 有些功能需要登录才能访问, 有些无需登录. drf中的认证组件主要就是用来实现此功能!
# 快速使用 - 案例1
案例1: 项目要开发3个接口, 其中1个是无需登录就能访问的接口、其余2个是必须登录才能访问的接口.
# 实验结果
127.0.0.1:8000/login/             -->   "LoginView"
127.0.0.1:8000/user/?token=123    -->   "UserView"
127.0.0.1:8000/order/?token=123   -->   "OrderView"

127.0.0.1:8000/user/    -->   {"code": 1002, "error": "认证失败"}
127.0.0.1:8000/order/   -->   {"code": 1002, "error": "认证失败"}
2
3
4
5
6
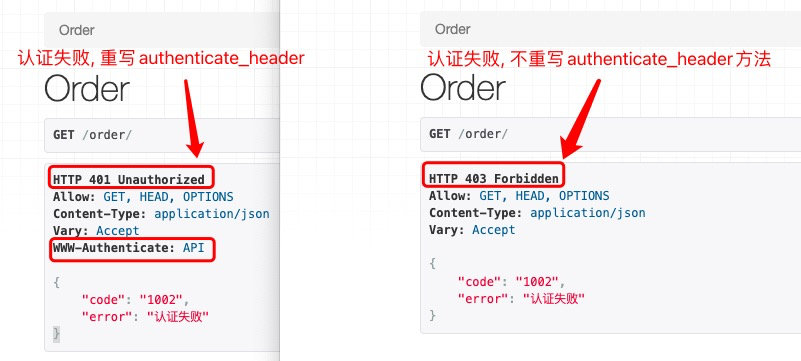
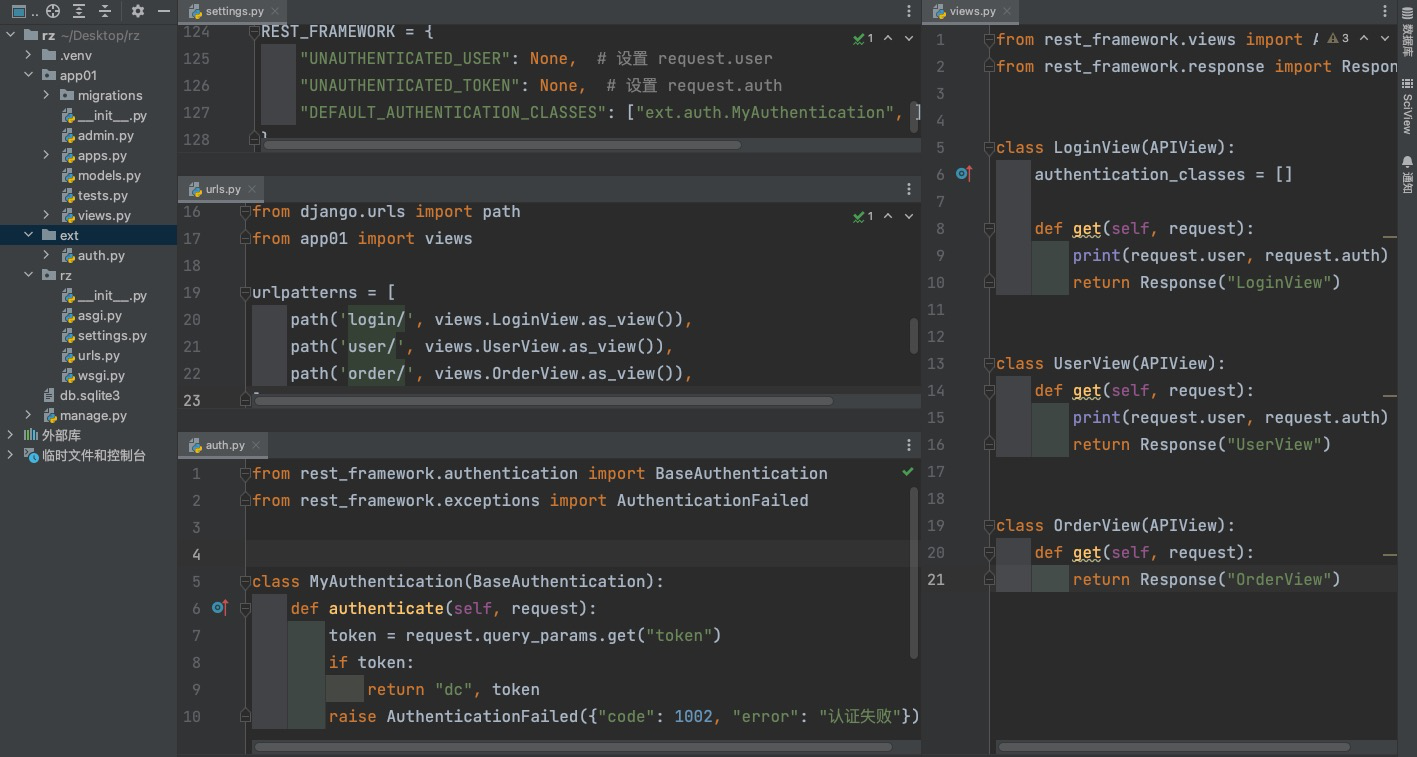
# 关键代码
settings.py
# --- drf配置!!!
REST_FRAMEWORK = {
    "UNAUTHENTICATED_USER": None,   # 设置 request.user
    "UNAUTHENTICATED_TOKEN": None,  # 设置 request.auth
}
2
3
4
5
urls.py 根路由
from django.urls import path
from app01 import views

urlpatterns = [
    path('login/', views.LoginView.as_view()),
    path('user/', views.UserView.as_view()),
    path('order/', views.OrderView.as_view()),
]
2
3
4
5
6
7
8
views.py
from rest_framework.views import APIView
from rest_framework.response import Response
from rest_framework.authentication import BaseAuthentication
from rest_framework.exceptions import AuthenticationFailed


class MyAuthentication(BaseAuthentication):
    # BaseAuthentication的源码中有两个方法,authenticate和authenticate_header
    def authenticate(self, request):
        """ ★★★
        此处我们需重写authenticate方法: To do 用户认证
        用户认证过程: 1.读取请求传递过来的token 2.校验该token的合法性
        authenticate方法的返回值有三种:
        1> 认证成功,返回元祖
           在后续认证的相关源码中,该元祖的两个值会分别赋值给request.user、request.auth
           一般request.user存储用户信息;request.auth存储Token信息
        2> 认证失败,抛出异常,返回错误信息
        3> 返回None 涉及到多个认证类 [类1,类2,类3,类4]
           会依次执行认证类的authenticate方法,若当前类的authenticate方法返回None,会逐一往后找
           直到某个类认证成功或失败,往后的认证类的authenticate方法都不再执行
           若多个认证类都返回None,会默认返回一个匿名用户! request.user的值为None,表明是匿名访问
        """
        # 提醒一下,该authenticate方法的request是drf的request!!
        # So, 看源码可知, request.query_params等同于request._request.GET
        token = request.query_params.get("token")
        # 这里简化流程,我们简单的认为只要传了token就认为登陆成功啦!
        if token:
            return "dc", token  # 表明认证成功,而且根据源码可知,一旦认证成功,后续的认证组件就不用执行了..
        # 注意此处,传递给AuthenticationFailed的是一个字符串或传递一个字典,认证失败时,返回的结果是不一样的!!
        # raise AuthenticationFailed("认证失败!")  # {"detail":"认证失败!"}
        raise AuthenticationFailed({"code": 1002, "error": "认证失败"})  # {"code": 1002, "error": "认证失败"}


    # 此处 对认证失败时响应头里的状态码进行了统一,在认证类里重写authenticate_header方法401,不重写就是403!!
    # 一般为了统一,都会加上!!
    def authenticate_header(self, request):
        """
        return 'Basic realm="API"'
        若这样返回,在认证失败后,浏览器会接受到WWW-Authenticate:API这样的响应头
        此时,浏览器会弹出一个输入框,叫用户输入用户名和密码.. 该功能在ftp服务、或者老的路由器中可能会遇到.
        该基础认证在我们的项目开发中用不到. So,我们直接返回‘API’即可.
        ◆ 认证失败响应头原本就是401,重写authenticate_header方法后,保持原样是401;
          不重写该方法,401会变成403! (在APIview的源码handle_exception方法处可以得到验证.
        """
        return "API"


class LoginView(APIView):
    authentication_classes = []  # 不需要走认证类直接访问就行

    def get(self, request):
        print(request.user, request.auth)  # None None
        return Response("LoginView")


class UserView(APIView):
    authentication_classes = [MyAuthentication, ]  # 接口需携带token登陆成功才能访问

    def get(self, request):
        print(request.user, request.auth)  # dc 123
        return Response("UserView")


class OrderView(APIView):
    authentication_classes = [MyAuthentication, ]  # 接口需携带token登陆成功才能访问

    def get(self, request):
        print(request.user, request.auth)  # dc 123
        return Response("OrderView")       # dc 123
2
3
4
5
6
7
8
9
10
11
12
13
14
15
16
17
18
19
20
21
22
23
24
25
26
27
28
29
30
31
32
33
34
35
36
37
38
39
40
41
42
43
44
45
46
47
48
49
50
51
52
53
54
55
56
57
58
59
60
61
62
63
64
65
66
67
68
69
# 常见示例 - 案例2
案例2: 项目要开发100个接口, 其中1个是无需登录就能访问的接口、其余99个是必须登录才能访问的接口..
此时就需要用到drf的全局配置!!!
★特别注意!! 当我们使用drf的全局配置时, 认证组件的类不能放在视图view.py中, 会因为导入APIView导致循环引用!!
在drf中, 优先会去全局中读取, 再去视图类中读取! 也就是说 若视图类中有, 会以视图类中的为准.. 没有就用全局的.
简单阐述下,此处的循环引用
配置文件中, "DEFAULT_AUTHENTICATION_CLASSES": ["app01.views.MyAuthentication", ],
加载配置文件时候,会通过"app01.views.MyAuthentication"加载views.py文件
views.py文件中 有代码 from rest_framework.views import APIView 会去加载APIView
APIview中有这样一行代码(如下),它又会去配置文件中加载,"app01.views.MyAuthentication".. 然而,该配置还未加载完毕.
"""
class APIView(View):
    authentication_classes = api_settings.DEFAULT_AUTHENTICATION_CLASSES
"""
So,造成了循环引用的问题!!

【解决办法】: 将认证组件的类放到单独的文件中即可!!此处是放到了ext文件夹的auth.py文件中.


api_settings,command+B跳转过去,你会看到源码中有这样几行注释:
This module provides the `api_setting` object, that is used to access
REST framework settings, checking for user settings first, then falling
back to the defaults.
意思就是,先会读取Django配置文件中的,没有的话会再读取drf配置文件中的!!
2
3
4
5
6
7
8
9
10
11
12
13
14
15
16
17
18
19
# oop的继承
主要观察 self是哪个类的实例化对象, 优先从该类中找!!
class Base:
    xxx = "hello"
    yyy = "world"

    def f1(self):
        self.f2()        # foo.f2
        print(self.xxx)  # python
        print(self.yyy)  # world

    def f2(self):
        print("base.f2")


class Foo(Base):
    xxx = "python"

    def f2(self):
        print("foo.f2")


obj = Foo()
obj.f1()
2
3
4
5
6
7
8
9
10
11
12
13
14
15
16
17
18
19
20
21
22
So, 源码中, 全局和局部都配置后, 如何查找的, 就是基于上述面向对象继承相关的知识!! 源码核心的思想如下:
class APIView:
    authentication_classes = "读取配置文件中的列表"

    def dispatch(self):
        print(self.authentication_classes)  # 自己类中有就用自己的,没有就用父类里的!!


class UserView(APIView):
    authentication_classes = []


obj = UserView()
obj.dispatch()
2
3
4
5
6
7
8
9
10
11
12
13
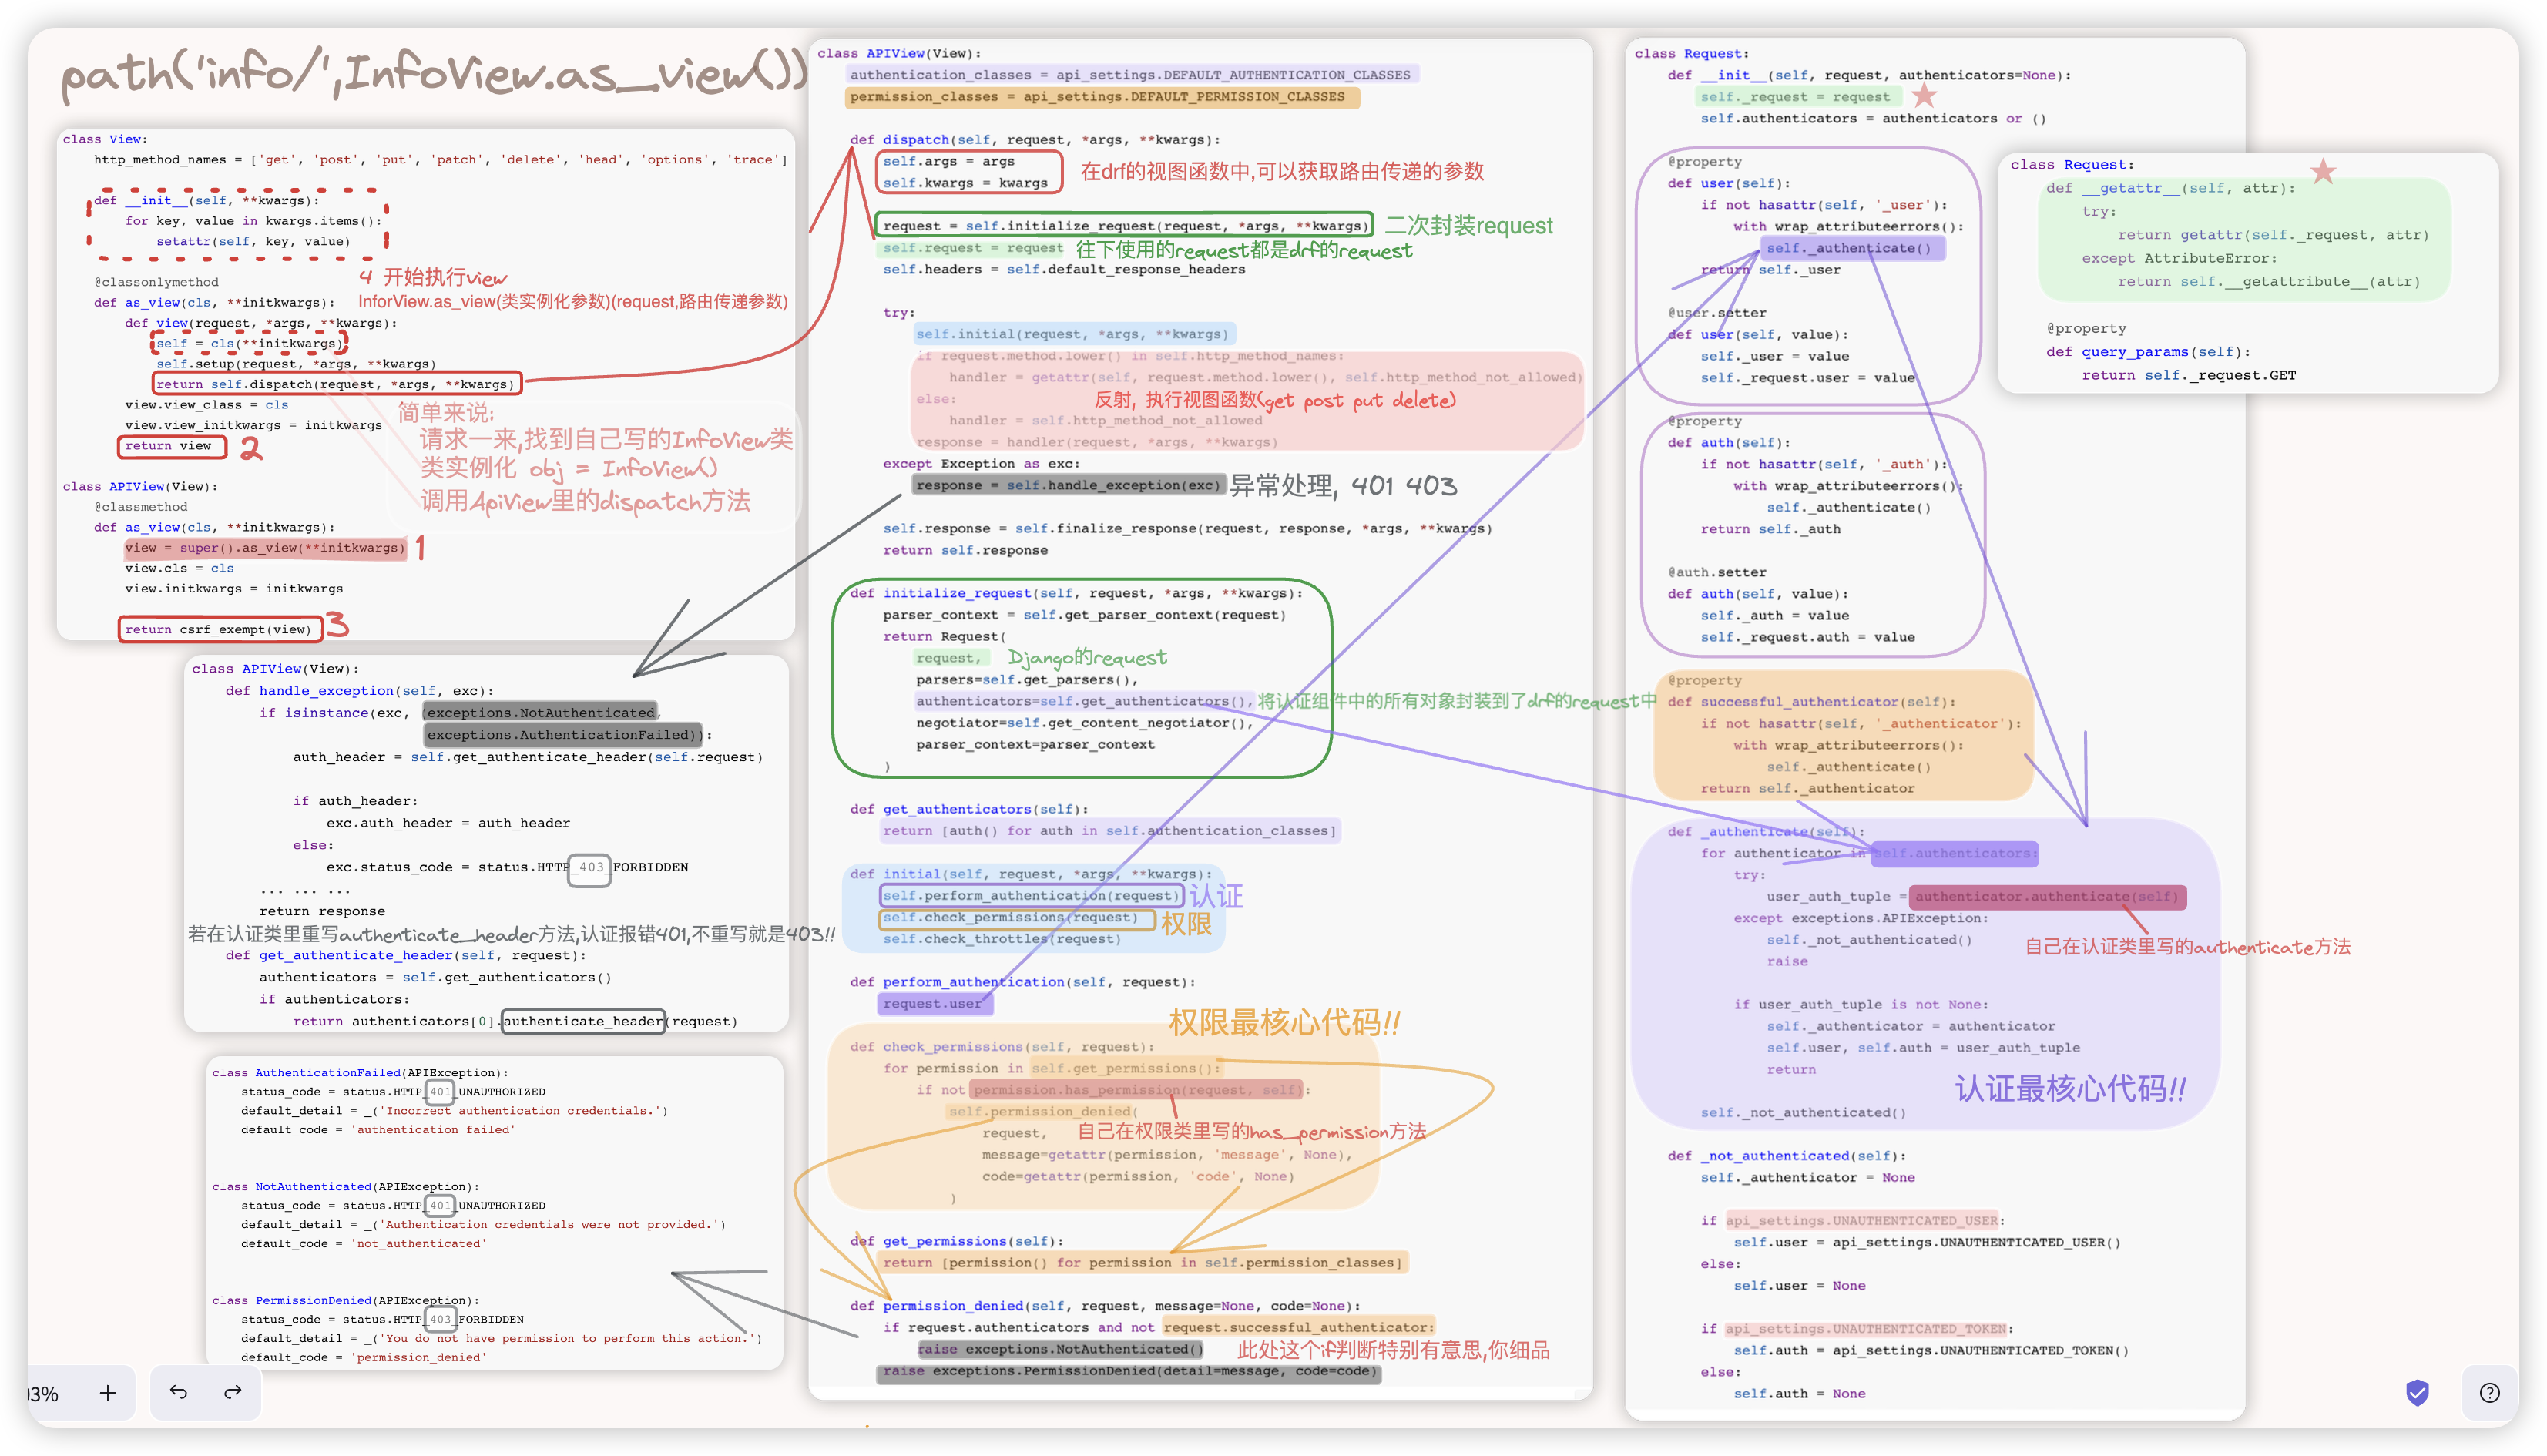
# 源码流程
小技巧: 将源码粘贴出来, 保留核心代码, 放到一处, 便于观察彼此之间的调用关系!!
再次强化记忆, self.xxx 优先自己类中找, 没有就去父类中找..
★ 回顾下,在前面详细进行了CBV的源码分析,简单来说: (确实如此,这三步是精髓)
1> 请求一来,找到自己写的UserView类
2> 实例化 obj = UserView()
3> 调用APIView里的dispatch方法 obj.dispatch()
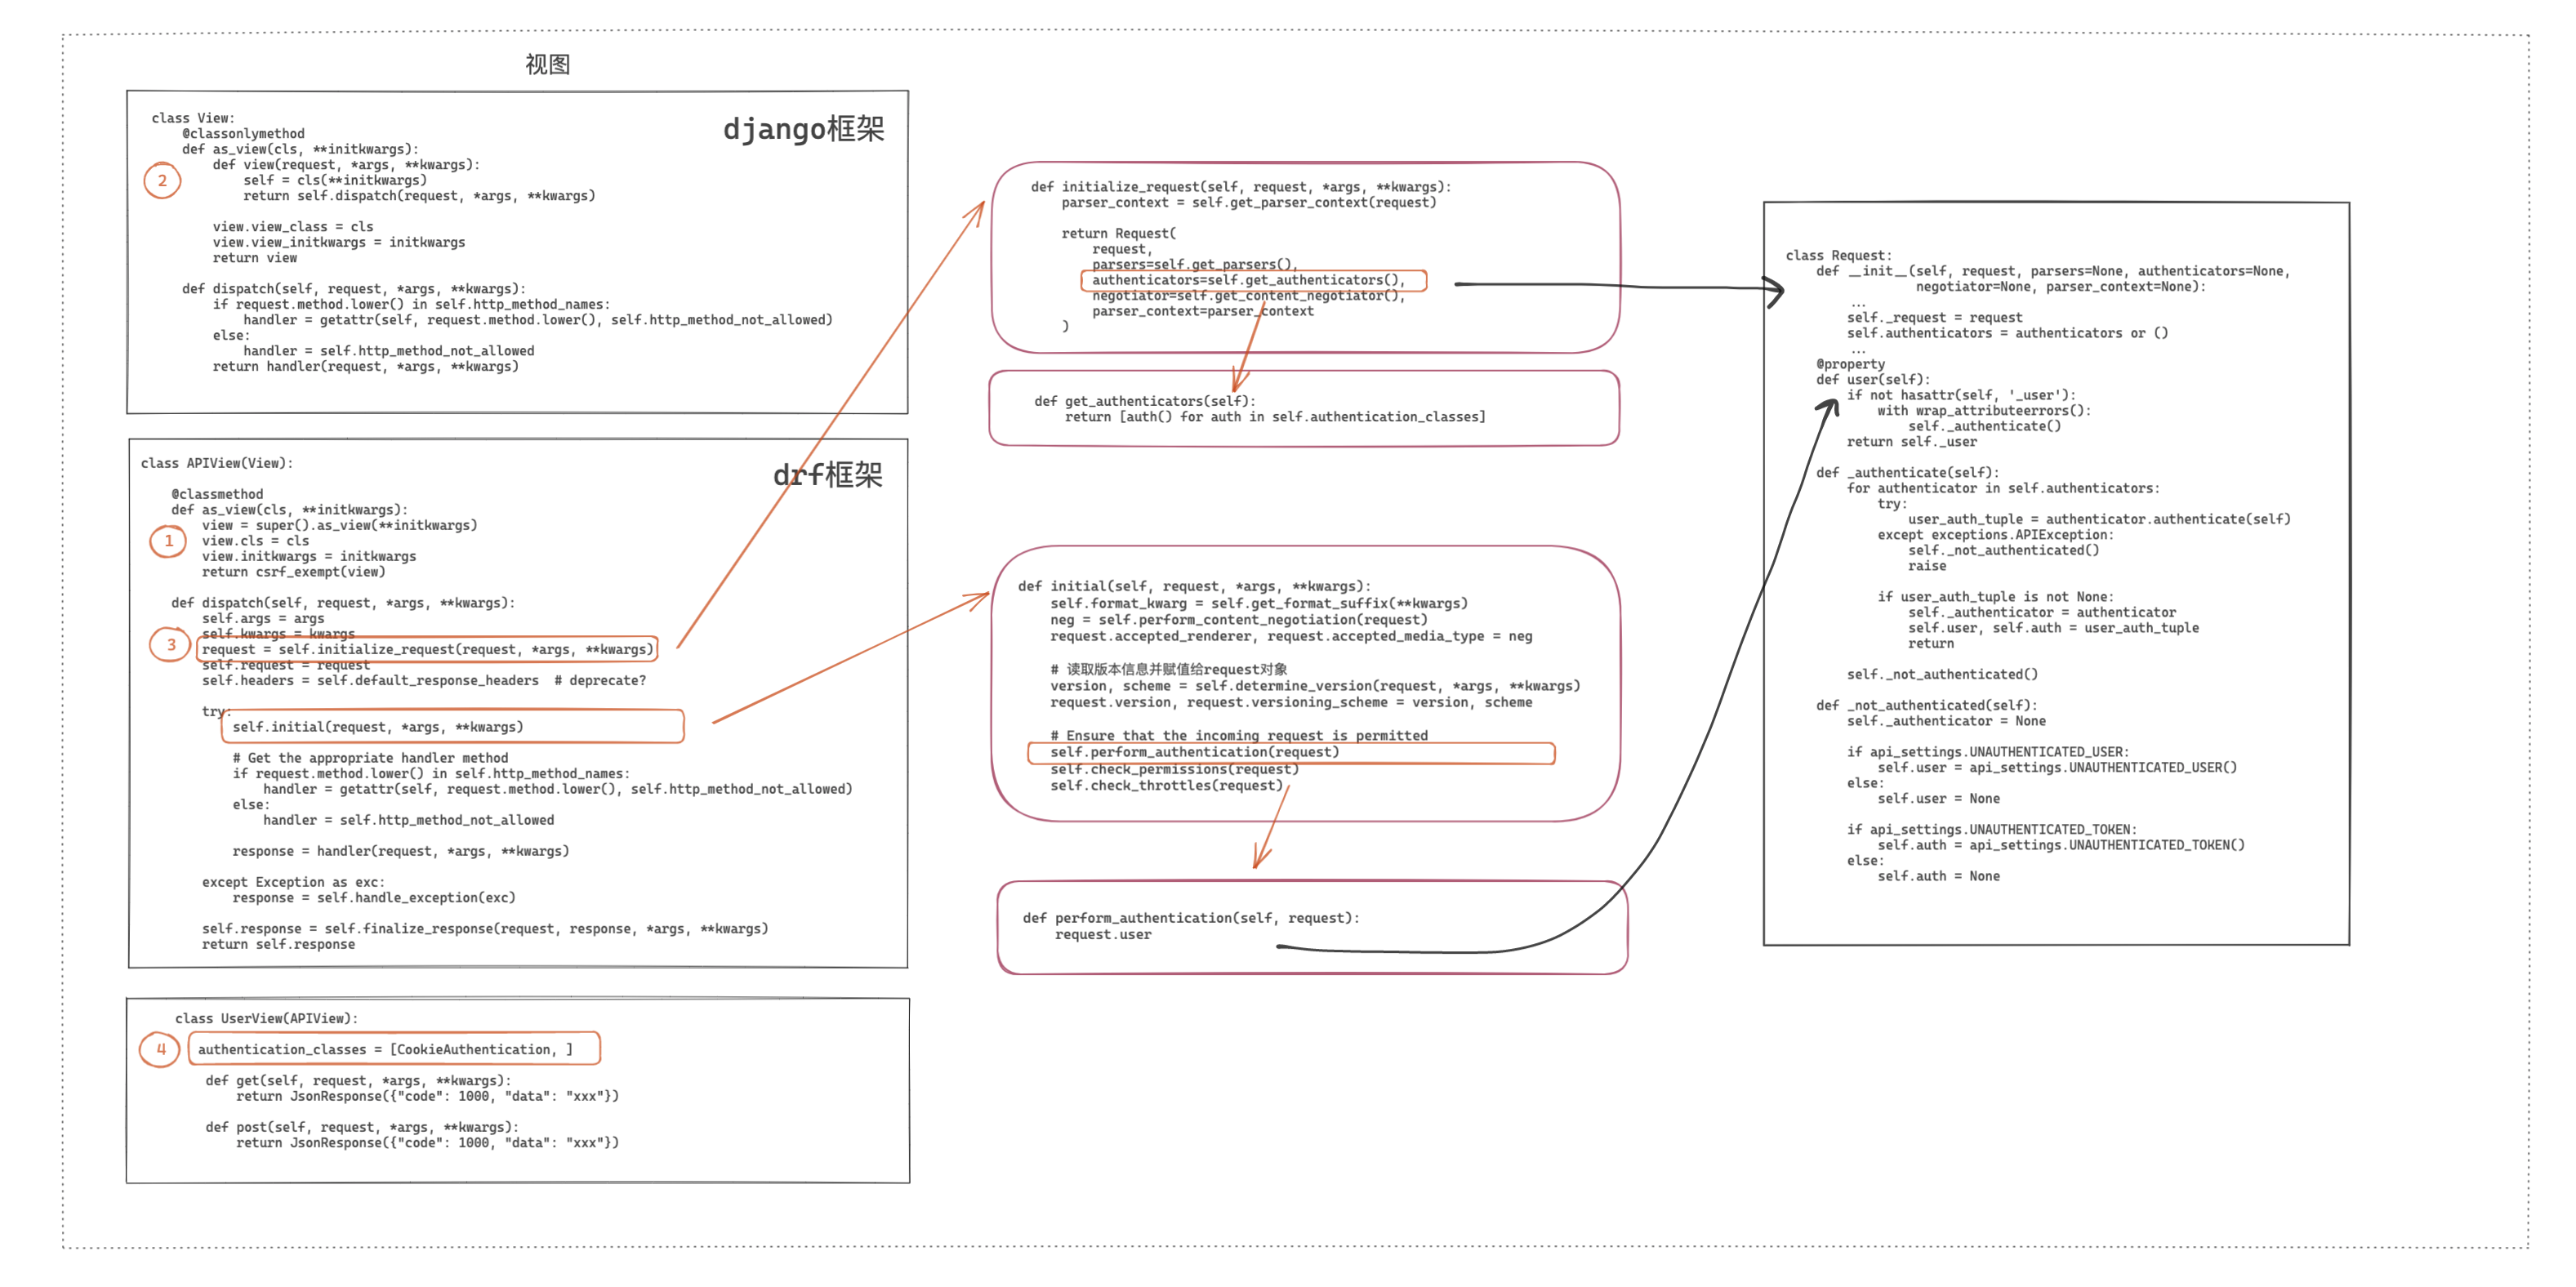
"""★ 大体流程简单说:
1. 在dispatch方法中,进行了请求的封装,封装的过程中进行了认证组件的加载
   <其本质就是实例化每个认证类的对象并封装到drf的request中>
   具体如何封装,要看drf的Request类的构造方法!
2. 进行认证,将我们自己写的认证类的authenticate方法返回的元祖赋值给了drf的request的 user和auth!!
3. 只要认证过程不抛出异常, 就可以/才能 执行视图函数;
   三大认证或者视图函数 他们抛出的异常都能在dispatch中顺利捕获到!
"""


class UserView(APIView):
    def get(self, request):
        # self.dispatch 这样写是个小技巧,便于在源码中直接跳转定位 为何可以呢?
        # 因为在源码中,self = cls() 对视图类直接实例化了.. self没有dispatch,就去其父类APIView中找!
        print(request.user, request.auth)
        return Response("UserView")


class APIView(View):
    # ★★★ 这里有个小细节,若要全局配置,DEFAULT_AUTHENTICATION_CLASSES就是key值
    #     再看这里,authentication_classes后面有s,表明是复数,value值就是个列表,["..",".."]
    #     若后面没有s,那么value值就是 ".."
    #     那全局配置时,字典名哪里找,点击api_settings,在reload_api_settings函数源码中,可看到
    #     指定了 setting == 'REST_FRAMEWORK'
    #     (这些小技巧,使得不用翻笔记,直接查源码即可,菜鸟进阶必备技巧!)
    authentication_classes = api_settings.DEFAULT_AUTHENTICATION_CLASSES  # 读取配置文件中的那个认证列表

    # ★★★★★★ 注意哦! 按照源码流程分析,到此处调用dispatch的self是视图类的实例化对象,不是APIView的实例化对象.
    def dispatch(self, request, *args, **kwargs):
        self.args = args
        self.kwargs = kwargs

        #【第一步】下面两行代码进行了请求的封装, "!<意味着往下的request都是drf中的request>!"
        # 请求的封装里封装了 --> django的request对象 + authenticators认证组件 + ..
        request = self.initialize_request(request, *args, **kwargs)
        self.request = request

        self.headers = self.default_response_headers

        try:
            #【第二步】该行代码包含了认证
            self.initial(request, *args, **kwargs)

            if request.method.lower() in self.http_method_names:
                # 反射获取get/post/put/delete等方法
                handler = getattr(self, request.method.lower(), self.http_method_not_allowed)
            else:
                handler = self.http_method_not_allowed

            #【第三步】执行视图函数
            response = handler(request, *args, **kwargs)

        except Exception as exc:  # 捕获异常
            response = self.handle_exception(exc)

        self.response = self.finalize_response(request, response, *args, **kwargs)
        return self.response  # 页面上显示 视图函数的返回/异常错误信息


    def initialize_request(self, request, *args, **kwargs):
        parser_context = self.get_parser_context(request)

        # 点击Request,command+b进行跳转. 看下Request类的构造方法!
        return Request(
            request,
            parsers=self.get_parsers(),
            authenticators=self.get_authenticators(),  # 将认证组件中的所有对象封装到了drf的request中!!
            negotiator=self.get_content_negotiator(),
            parser_context=parser_context
        )


    def get_authenticators(self):
        # self.authentication_classes 优先在自己类中找,没有,就在父类APIView中找
        # 父类APIView中是有authentication_classes这个类变量的,它的值是我们写在配置文件里的全局配置
        # (虽说从配置文件中读取到的是字符串,但不用担心,它会自动通过反射找到相应的类)
        # 循环出来的是类,auth()进行了类的实例化操作!!
        return [auth() for auth in self.authentication_classes]  # 得到了多个认证类的实例化对象!!


    def initial(self, request, *args, **kwargs):
        self.perform_authentication(request)  # 进行认证

        self.check_permissions(request)
        self.check_throttles(request)


    def perform_authentication(self, request):
        request.user


    # - 对认证失败时,响应头的状态码403和401的探究!!
    def handle_exception(self, exc):  # exc是抛出的异常
        # AuthenticationFailed类型的错误是我们在认证类的authenticate函数中认证不通过抛出的异常!!
        if isinstance(exc, (exceptions.NotAuthenticated,
                            exceptions.AuthenticationFailed)):
            # WWW-Authenticate header for 401 responses, else coerce to 403
            auth_header = self.get_authenticate_header(self.request)

            if auth_header:
                exc.auth_header = auth_header
            else:
                exc.status_code = status.HTTP_403_FORBIDDEN
        ... ... ...
        return response


    def get_authenticate_header(self, request):
        authenticators = self.get_authenticators()  # 获取多个认证类的实例化对象,在第一步中对request的封装也用到了.
        if authenticators:
            # 执行自己写的认证类里的authenticate_header方法!!若无该方法,会执行父类BaseAuthentication里的
            # 只不过BaseAuthentication里的authenticate_header方法里写了个pass,代表啥也没写!!
            return authenticators[0].authenticate_header(request)


class Request:
    def __init__(self, request, authenticators=None):
        self._request = request
        self.authenticators = authenticators or ()

    @property
    def user(self):
        # 最开始,Request类的构造方法里是没有 _user 这个成员的.
        # Ps:格外话,思考并验证了一个问题,若构造方法中写了self.user = None又通过@property装饰了user方法,是会冲突报错的!!
        #    报错,AttributeError: can't set attribute
        # (后来人的补充标注:上述这个格外话,不严谨.看看就行,不要纠结!)
        if not hasattr(self, '_user'):
            with wrap_attributeerrors():
                self._authenticate()
        return self._user


    @user.setter
    def user(self, value):
        self._user = value
        self._request.user = value


    # 细品,认证成功,在视图类的函数里调用request.user 直接返回的就是self._auth
    # 一开始时,肯定会执行self._authenticate()
    @property
    def auth(self):
        if not hasattr(self, '_auth'):
            with wrap_attributeerrors():
                self._authenticate()
        return self._auth


    @auth.setter
    def auth(self, value):
        self._auth = value
        self._request.auth = value


    def _authenticate(self):
        # 读取每个认证组件对象,执行authenticate方法!!
        # 注意多个认证类时的执行流程!!
        """
        会依次执行认证类的authenticate方法,若当前类的authenticate方法返回None,会逐一往后找
        直到某个类认证成功或失败,往后的认证类的authenticate方法都不再执行
        若多个认证类都返回None,会默认返回一个匿名用户! request.user的值为None,表明是匿名访问
        ★ 注意,若都返回None,通过对dispatch函数的分析,视图是会执行的!!只不过,self.user、self.auth皆为None.
        """
        for authenticator in self.authenticators:
            try:
                user_auth_tuple = authenticator.authenticate(self)  # !!此处的self是drf的request对象!!
            # -- 若认证失败,authenticate函数里会抛出<认证失败AuthenticationFailed>的异常!
            #    注意,AuthenticationFailed继承了APIException!
            except exceptions.APIException:
                self._not_authenticated()  # ▲ 认证失败执行该方法
                raise  # !!!然后将异常往上抛..
                """怎么个抛法?
                Request类的user方法调用的_authenticate方法,user方法中没有捕获,再往上看
                APIView类的perform_authentication调用user方法,没有捕获,再往上抛
                APIView类的initial调用perform_authentication方法,没有捕获,再往上抛
                APIView类的dispatch方法调用initial方法,在该位置有异常处理!!
                -- 捕获了异常,执行了APIView类里的handle_exception方法!!
                """

            # 认证通过后,即user_auth_tuple的bool值为True,走这里
            if user_auth_tuple is not None:
                self._authenticator = authenticator
                # 在我们自己写的视图类的函数中,可通过request.user,request.auth取到
                # ★!! 注意:赋值就会调用@user.setter以及@auth.setter装饰的方法!! 这样self._auth中就有值啦.
                self.user, self.auth = user_auth_tuple  # 将元祖进行了 拆包/解压赋值
                return  # 后续的认证类就不用管啦! 这里直接跳出了for循环!要引起注意哦!

        self._not_authenticated()  # ▲ 所有认证类的authenticate方法全都返回None,也会执行该方法.

    # 这玩意儿跟匿名用户相关.
    def _not_authenticated(self):
        self._authenticator = None

        # 去配置文件中读取,判断为真,就加括号执行 所以在settings.py中的drf配置
        """
        REST_FRAMEWORK = {
            "UNAUTHENTICATED_USER": None,
            "UNAUTHENTICATED_TOKEN": None,
        }
        UNAUTHENTICATED_USER、UNAUTHENTICATED_TOKEN 其值是可以写成匿名函数的!
        """
        if api_settings.UNAUTHENTICATED_USER:
            self.user = api_settings.UNAUTHENTICATED_USER()
        else:
            self.user = None

        if api_settings.UNAUTHENTICATED_TOKEN:
            self.auth = api_settings.UNAUTHENTICATED_TOKEN()
        else:
            self.auth = None
2
3
4
5
6
7
8
9
10
11
12
13
14
15
16
17
18
19
20
21
22
23
24
25
26
27
28
29
30
31
32
33
34
35
36
37
38
39
40
41
42
43
44
45
46
47
48
49
50
51
52
53
54
55
56
57
58
59
60
61
62
63
64
65
66
67
68
69
70
71
72
73
74
75
76
77
78
79
80
81
82
83
84
85
86
87
88
89
90
91
92
93
94
95
96
97
98
99
100
101
102
103
104
105
106
107
108
109
110
111
112
113
114
115
116
117
118
119
120
121
122
123
124
125
126
127
128
129
130
131
132
133
134
135
136
137
138
139
140
141
142
143
144
145
146
147
148
149
150
151
152
153
154
155
156
157
158
159
160
161
162
163
164
165
166
167
168
169
170
171
172
173
174
175
176
177
178
179
180
181
182
183
184
185
186
187
188
189
190
191
192
193
194
195
196
197
198
199
200
201
202
203
204
205
206
207
208
209
210
# 常见示例 - 案例3
案例3: 后端drf项目支持很多应用, 比如网页、小程序、app, 他们都可以访问后端某个接口..
访问时需要认证, 获取token信息, 一般来说, 我们可以约定这些应用的token信息通过url传递, 但前端开发不同意..
它非要在网页中将token放到url、小程序和app中将token放到请求头中.. 这就必须让后端的接口在认证时兼顾这三种情况..这就得对 源码中 多个认证类 执行流程的进行分析.. 然后再编写代码实现.
下方的代码 是用"局部"配置的方式来实现的.. 可以自行改成"全局"的方式.
from rest_framework.authentication import BaseAuthentication
from rest_framework.exceptions import AuthenticationFailed
from rest_framework.views import APIView
from rest_framework.response import Response


# 从URL获取token信息
class URLAuthentication(BaseAuthentication):
    def authenticate(self, request):
        token = request.query_params.get("token")
        if token:
            return "dc", token
        return


# 从请求头中获取token信息
class HeaderAuthentication(BaseAuthentication):
    def authenticate(self, request):
        token = request.META.get("HTTP_AUTHORIZATION")  # HTTP_ 的前缀是Django自己加的
        if token:
            return "dc", token
        return


# 前面的认证都返回None,那么最后这抛出异常
class NoAuthentication(BaseAuthentication):
    def authenticate(self, request):
        raise AuthenticationFailed({"code": 1002, "error": "认证失败"})


class OrderView(APIView):
    # URLAuthentication, HeaderAuthentication 都没认证成功,就执行NoAuthentication主动抛出异常!!
    # ★ 若不用NoAuthentication认证类,那么就是支持匿名访问;加上NoAuthentication,表明必须认证登陆成功才能访问!!
    authentication_classes = [URLAuthentication, HeaderAuthentication, NoAuthentication]

    def get(self, request):
        print(request.user, request.auth)  # 若支持匿名访问的话,值就是None、None
        return Response("LoginView")
2
3
4
5
6
7
8
9
10
11
12
13
14
15
16
17
18
19
20
21
22
23
24
25
26
27
28
29
30
31
32
33
34
35
36
37
38
# 综合案例 - 用户登陆+认证
用户登陆成功后, 后端返回前端一个token, 前端将其进行存储(eg: 网页可存在cookie以及storage中)
浏览器携带该token访问后端的接口.
# 关键代码
login登陆接口不需要认证; user用户接口需要认证!!
settings.py
# --- drf配置!!!
REST_FRAMEWORK = {
    "UNAUTHENTICATED_USER": None,  # 设置 request.user
    "UNAUTHENTICATED_TOKEN": None,  # 设置 request.auth
    "DEFAULT_AUTHENTICATION_CLASSES": [
        "ext.auth.QueryParamsAuthentication",
        "ext.auth.HeaderAuthentication",
        "ext.auth.NoAuthentication",
    ],
}
2
3
4
5
6
7
8
9
10
models.py
"""
数据库迁移后,在数据库中手动添加数据
xiaoming 123123
xiaohong 123456
"""

from django.db import models


class UserInfo(models.Model):
    """用户表"""
    username = models.CharField(verbose_name="用户名", max_length=32)
    password = models.CharField(verbose_name="密码", max_length=64)
    # 为了简便,此处临时将token放在数据库中;drf项目中token的存放,一般会借助jwt.
    token = models.CharField(verbose_name="TOKEN", max_length=64, null=True, blank=True)
2
3
4
5
6
7
8
9
10
11
12
13
14
15
urls.py 根路由
from django.urls import path
from app01 import views

urlpatterns = [
    path('login/', views.LoginView.as_view()),
    path('user/', views.UserView.as_view()),
]
2
3
4
5
6
7
app01/views.py
import uuid

from rest_framework.response import Response
from rest_framework.views import APIView

from app01 import models


class LoginView(APIView):
    authentication_classes = []

    def post(self, request):
        # 1.接收用户POST请求提交的用户名和密码
        # request._request.body --:> b'{"username":"xiaoming","password":"123123"}'
        # request.data --:> {'username': 'xiaoming', 'password': '123123'}
        user = request.data.get("username")
        pwd = request.data.get("password")
        # 2.数据库校验
        # user_obj = models.UserInfo.objects.filter(**request.data).first()
        user_obj = models.UserInfo.objects.filter(username=user, password=pwd).first()
        if not user_obj:
            return Response({"status": False, "msg": "用户名或密码错误"})
        # 注意:每次登陆成功,数据库中该用户的token都会更改
        token = str(uuid.uuid4())
        user_obj.token = token
        user_obj.save()
        return Response({"status": True, "data": token})


class UserView(APIView):
    def get(self, request):
        print(request.user, request.auth)
        return Response("UserView-get")

    def post(self, request):
        print(request.user, request.auth)
        return Response("UserView-post")
2
3
4
5
6
7
8
9
10
11
12
13
14
15
16
17
18
19
20
21
22
23
24
25
26
27
28
29
30
31
32
33
34
35
36
37
ext/auth.py
from rest_framework.authentication import BaseAuthentication
from rest_framework.exceptions import AuthenticationFailed
from app01 import models


class QueryParamsAuthentication(BaseAuthentication):
    def authenticate(self, request):
        token = request.query_params.get("token")
        if not token:  # 加该判断是因为,在数据库中手动创建的用户的token信息一开始是空的
            return
        user_object = models.UserInfo.objects.filter(token=token).first()
        if user_object:
            return user_object, token
        return

    def authenticate_header(self, request):
        return "API"


class HeaderAuthentication(BaseAuthentication):
    def authenticate(self, request):
        token = request.META.get("HTTP_AUTHORIZATION")  # HTTP_ 的前缀是Django自己加的
        if not token:
            return
        user_object = models.UserInfo.objects.filter(token=token).first()
        if user_object:
            return user_object, token
        return

    def authenticate_header(self, request):
        return "API"


class NoAuthentication(BaseAuthentication):
    def authenticate(self, request):
        raise AuthenticationFailed({"status": False, "error": "认证失败"})
2
3
4
5
6
7
8
9
10
11
12
13
14
15
16
17
18
19
20
21
22
23
24
25
26
27
28
29
30
31
32
33
34
35
36
# 进行验证
用Postman进行验证!! -- 使得我们无需关注前端的编写.
-- 登陆
   POST请求  http://127.0.0.1:8000/login/  发送json格式数据{"username":"xiaoming","password":"111111"}
       请求成功,后端返回
           {"status": true,"data": "63f453fd-5c52-473d-aa6b-a276208ecd34"}
       请求失败,后端返回
           {"status": false,"msg": "用户名或密码错误"}
-- 访问接口
   GET请求  http://127.0.0.1:8000/user/?token=63f453fd-5c52-473d-aa6b-a276208ecd34
       请求成功,后端返回
           "UserView-post"
   POST请求 http://127.0.0.1:8000/user/  请求头中添加,AUTHORIZATION=63f453fd-5c52-473d-aa6b-a276208ecd34
       请求成功,后端返回
           "UserView-post"
   请求失败,无论是GET还是POST请求,后端都返回
       {"status": "False","error": "认证失败"}
2
3
4
5
6
7
8
9
10
11
12
13
14
15
# 模拟
用python代码模拟认证源码执行过程 (包含了drf的CBV过程)
auth.py
import random


class BaseAuthentication:
    def authenticate(self, request):
        raise NotImplementedError(".authenticate() must be overridden.")

    def authenticate_header(self, request):
        pass


class QueryParamsAuthentication(BaseAuthentication):
    def authenticate(self, request):
        # token = request.query_params.get("token")
        token = random.choice([0, 1])
        if token:
            return "dc-query", token

    def authenticate_header(self, request):
        return "API"


class HeaderAuthentication(BaseAuthentication):
    def authenticate(self, request):
        # token = request.META.get("HTTP_AUTHORIZATION")
        token = random.choice([0, 1])
        if token:
            return "dc-header", token

    def authenticate_header(self, request):
        return "API"


class NoAuthentication(BaseAuthentication):
    def authenticate(self, request):
        raise Exception("报错-前面的都返回None,认证失败")
2
3
4
5
6
7
8
9
10
11
12
13
14
15
16
17
18
19
20
21
22
23
24
25
26
27
28
29
30
31
32
33
34
35
36
run.py
from auth import QueryParamsAuthentication, HeaderAuthentication, NoAuthentication


class View:
    @classmethod
    def as_view(cls):
        def view(request, *args, **kwargs):
            self = cls()
            return self.dispatch(request, *args, **kwargs)

        return view

    def dispatch(self, request, *args, **kwargs):
        pass


class APIView(View):
    authentication_classes = [QueryParamsAuthentication, HeaderAuthentication]

    @classmethod
    def as_view(cls):
        # view = super(APIView, cls).as_view()
        view = super().as_view()
        return view

    def dispatch(self, request, *args, **kwargs):
        self.args = args
        self.kwargs = kwargs
        request = self.initialize_request(request, *args, **kwargs)  # 二次封装request
        try:
            self.initial(request, *args, **kwargs)
            handler = getattr(self, request.method.lower())
            return handler(request, *args, **kwargs)
        except Exception as e:
            print(e)

    def initialize_request(self, request, *args, **kwargs):
        return Request(
            request,
            authenticators=self.get_authenticators(),
        )

    def get_authenticators(self):
        return [auth() for auth in self.authentication_classes]

    def initial(self, request, *args, **kwargs):
        self.perform_authentication(request)  # 进行认证

    def perform_authentication(self, request):
        request.user


class Request:
    def __init__(self, request, authenticators=None):
        self._request = request
        self.authenticators = authenticators or ()

    def __getattr__(self, attr):
        try:
            return getattr(self._request, attr)
        except AttributeError:
            return self.__getattribute__(attr)

    @property
    def user(self):
        if not hasattr(self, '_user'):
            self._authenticate()
        return self._user

    @user.setter
    def user(self, value):
        self._user = value
        self._request.user = value

    def _authenticate(self):
        for authenticator in self.authenticators:
            try:
                user_auth_tuple = authenticator.authenticate(self)
            except Exception:
                self._not_authenticated()
                raise

            if user_auth_tuple is not None:
                self.user, self.auth = user_auth_tuple
                return

        self._not_authenticated()

    def _not_authenticated(self):
        self.user = None
        self.auth = None


if __name__ == '__main__':
    import random


    class DjangoRequest:
        def __init__(self):
            self.method = random.choice(['GET', 'POST'])  # 模拟发送的请求类型


    class InfoView(APIView):
        # 有NoAuthentication,则不让其匿名访问,即不会执行视图函数
        authentication_classes = [QueryParamsAuthentication, HeaderAuthentication, NoAuthentication]

        def get(self, request, xx):
            print(self.args, self.kwargs)  # (111,) {}
            print(request.user, request.auth)
            return "InfoView-GET"

        def post(self, request, xx):
            print(self.args, self.kwargs)  # (111,) {}
            print(request.user, request.auth)
            return "InfoView-POST"


    request = DjangoRequest()
    print(InfoView.as_view()(request, 111))  # 111是模拟路由参数传递!


"""打印结果可能是下方5种中的任意一种,因为程序里是随机的.
(111,) {}
dc-query 1
InfoView-POST

(111,) {}
dc-query 1
InfoView-GET

(111,) {}
dc-header 1
InfoView-POST

(111,) {}
dc-header 1
InfoView-GET

报错-前面的都返回None,认证失败
None
"""
"""
Ps:若将InfoView类中的authentication_classes变量删除,相当于没有NoAuthentication
   那么运行结果的request.user、request.auth 的值还可能是 None None 表明是匿名访问啦.
"""
2
3
4
5
6
7
8
9
10
11
12
13
14
15
16
17
18
19
20
21
22
23
24
25
26
27
28
29
30
31
32
33
34
35
36
37
38
39
40
41
42
43
44
45
46
47
48
49
50
51
52
53
54
55
56
57
58
59
60
61
62
63
64
65
66
67
68
69
70
71
72
73
74
75
76
77
78
79
80
81
82
83
84
85
86
87
88
89
90
91
92
93
94
95
96
97
98
99
100
101
102
103
104
105
106
107
108
109
110
111
112
113
114
115
116
117
118
119
120
121
122
123
124
125
126
127
128
129
130
131
132
133
134
135
136
137
138
139
140
141
142
143
144
145
