 js案例
js案例
# 模态框
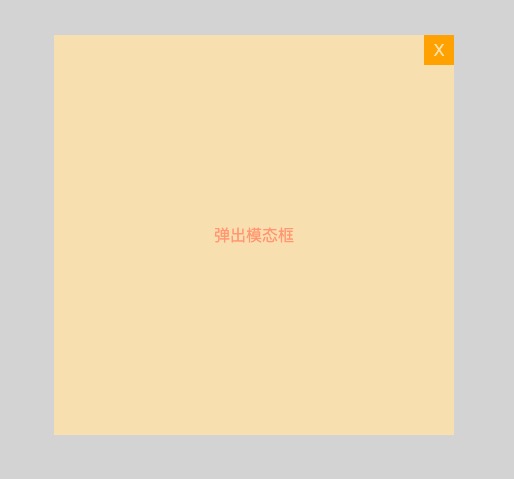
思路一: 本来页面中没有模态框,临时用js建出来添加到页面中!

点击图一 弹出图二的页面效果(图一被覆盖,整个屏幕背景为灰色);点击图二的"x"叉 回到图1的页面..
图二中灰色背景为box1盒子;橙色背景为box2盒子,box2相对于box1盒子水平垂直居中..;'X'按钮是box3盒子..
<!doctype html>
<html lang="en">
<head>
    <meta charset="UTF-8">
    <title>模态框 思路1</title>
</head>
<head>
    <style>
        * {
            margin: 0;
            padding: 0
        }

        #btn {
            height: 100px;
            width: 100px;
            line-height: 100px;
            text-align: center;
            color: lightsalmon;
            display: block;
            margin: 0 auto;
        }

        .box1 {
            /* 绝对定位飘起来啦 距离四边为0,则盒子铺满整个屏幕 */
            position: absolute;
            top: 0;
            bottom: 0;
            left: 0;
            right: 0;
            background-color: lightgray;
        }

        .box2 {
            width: 400px;
            height: 400px;
            background-color: wheat;
            color: lightsalmon;
            line-height: 400px;
            text-align: center;
            /* margin: 100px auto; */
            /* 子绝父相 盒子2相对于box1水平垂直居中 */
            position: absolute;
            left: 50%;
            margin-left: -200px;
            top: 50%;
            margin-top: -200px;
        }

        .box3 {
            width: 30px;
            height: 30px;
            background-color: orange;
            color: wheat;
            line-height: 30px;
            text-align: center;
            /* 跑到右上角 */
            position: absolute;
            top: 0;
            right: 0;
        }

    </style>
</head>
<body>
<input type="button" value="弹出模态框" id="btn">
<script>
    // 思路1: 本来页面中没有模态框,临时用js建出来添加到页面中!
    var oBtn = document.getElementById("btn")
    oBtn.onclick = function () {
        // 相当于文档树结构: body>div.box1>div.box2>div.box3
        var oBody = document.getElementsByTagName("body")[0]
        var oBox1 = document.createElement("div")
        var oBox2 = document.createElement("div")
        var oBox3 = document.createElement("div")
        oBox2.innerText = "弹出模态框"
        oBox3.innerText = "X"
        oBody.appendChild(oBox1)
        oBox1.appendChild(oBox2)
        oBox2.appendChild(oBox3)
        oBox1.classList.add("box1")
        oBox2.classList.add("box2")
        oBox3.classList.add("box3")

        // 应该用函数嵌套写在这,若写在外边,代码从上而下的运行,还没触发oBtn的点击事件的话,oBox3是找不到的
        oBox3.onclick = function () {
            // 不建议刷新页面..会重新访问服务器
            oBody.removeChild(oBox1)
        }
    }
</script>
</body>
</html>
1
2
3
4
5
6
7
8
9
10
11
12
13
14
15
16
17
18
19
20
21
22
23
24
25
26
27
28
29
30
31
32
33
34
35
36
37
38
39
40
41
42
43
44
45
46
47
48
49
50
51
52
53
54
55
56
57
58
59
60
61
62
63
64
65
66
67
68
69
70
71
72
73
74
75
76
77
78
79
80
81
82
83
84
85
86
87
88
89
90
91
92
93
2
3
4
5
6
7
8
9
10
11
12
13
14
15
16
17
18
19
20
21
22
23
24
25
26
27
28
29
30
31
32
33
34
35
36
37
38
39
40
41
42
43
44
45
46
47
48
49
50
51
52
53
54
55
56
57
58
59
60
61
62
63
64
65
66
67
68
69
70
71
72
73
74
75
76
77
78
79
80
81
82
83
84
85
86
87
88
89
90
91
92
93
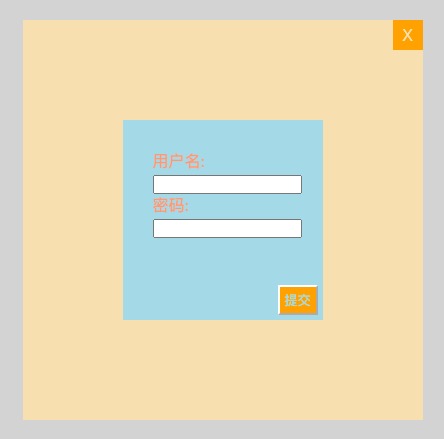
思路2: 先将模态框写在页面中,通过设置 display:none; 先隐藏box1盒子.
简单的给蓝色的box2盒子添加了点登录的内容..
蓝色背景为登录的盒子(本质上是from表单 但绝对定位啦 相对于box2盒子水平垂直居中)

<!doctype html>
<html lang="en">
<head>
<meta charset="UTF-8">
<title>模态框 思路2</title>
</head>
<head>
<style>
* {
margin: 0;
padding: 0
}
#btn {
height: 100px;
width: 100px;
line-height: 100px;
text-align: center;
color: lightsalmon;
display: block;
margin: 0 auto;
}
.box1 {
position: absolute;
top: 0;
bottom: 0;
left: 0;
right: 0;
background-color: lightgray;
/* 思路2 -------------------------!!!*/
display: none;
}
.box2 {
width: 400px;
height: 400px;
background-color: wheat;
color: lightsalmon;
/* 子绝父相 盒子2相对于box1水平垂直居中 */
position: absolute;
left: 50%;
margin-left: -200px;
top: 50%;
margin-top: -200px;
}
.box3 {
width: 30px;
height: 30px;
background-color: orange;
color: wheat;
line-height: 30px;
text-align: center;
/* 'X' 跑到右上角 */
position: absolute;
top: 0;
right: 0;
}
/* 表单的样式 */
.login {
/* 尽管是from标签 但是通过绝对定位可以设置宽高*/
width: 200px;
height: 200px;
background-color: lightblue;
/* 子绝父相 login盒子相对于box2盒子水平垂直居中 */
position: absolute;
left: 50%;
margin-left: -100px;
top: 50%;
margin-top: -100px;
padding: 30px;
box-sizing: border-box;
}
/* 简单设置了下提交按钮的样式 (´▽`)好丑.. */
.login div:nth-of-type(3) input {
position: absolute;
bottom: 5px;
right: 5px;
width: 40px;
height: 30px;
background-color: orange;
color: lightblue;
border-color: white;
}
</style>
</head>
<body>
<input type="button" value="弹出模态框" id="btn">
<div class="box1">
<div class="box2">
<from class="login">
<div>
用户名:
<input type="text" name="username">
</div>
<div>
密码:
<input type="password" name="pwd">
</div>
<div>
<input type="button" value="提交">
</div>
</from>
<div class="box3">X</div>
</div>
</div>
<script>
// 思路2: 先将模态框写在页面中,通过设置display:none;先隐藏box1盒子,不显示也不占用位置.
// 还是存在文档树中的哦.
var oBtn0 = document.getElementById("btn");
var oBox1 = document.getElementsByClassName("box1")[0];
var oBox3 = document.getElementsByClassName("box3")[0];
oBtn0.onclick = function () {
oBox1.style.display = "block";
};
oBox3.onclick = function () {
oBox1.style.display = "none";
// 清除用户名密码输入框里的内容
// 否则的话,在输入框输入内容后,点击叉按钮回到页面1,再点击按钮到页面2,输入框里的内容还在..
document.getElementsByName("username")[0].value = ""
document.getElementsByName("pwd")[0].value = ""
}
</script>
</body>
</html>
1
2
3
4
5
6
7
8
9
10
11
12
13
14
15
16
17
18
19
20
21
22
23
24
25
26
27
28
29
30
31
32
33
34
35
36
37
38
39
40
41
42
43
44
45
46
47
48
49
50
51
52
53
54
55
56
57
58
59
60
61
62
63
64
65
66
67
68
69
70
71
72
73
74
75
76
77
78
79
80
81
82
83
84
85
86
87
88
89
90
91
92
93
94
95
96
97
98
99
100
101
102
103
104
105
106
107
108
109
110
111
112
113
114
115
116
117
118
119
120
121
122
123
124
125
126
127
128
129
130
131
132
# 点击有惊喜

每次点击盒子,盒子的文本内容和背景颜色都会变化,形成一个循环.
<!doctype html>
<html lang="en">
<head>
    <meta charset="UTF-8">
    <title>点击有惊喜</title>
    <style>
        .box {
            width: 200px;
            height: 200px;
            background-color: lightsalmon;
            line-height: 200px;
            text-align: center;
            margin: auto;
            font-size: 20px;
            color: white;
        }
    </style>
</head>
<body>
<div class="box">
    点击有惊喜!
</div>
<script>
    var oBox = document.getElementsByClassName("box")[0];
    var count = 0; // 记录状态的变量 需求有四种情况
    oBox.onclick = function () {
        count++;
        if (count == 1) {
            this.style.backgroundColor = "indianred";
            this.innerText = "继续点击!"
        } else if (count == 2) {
            this.style.backgroundColor = "darkkhaki";
            this.innerText = "精彩即将揭晓!"
        } else if (count == 3) {
            this.style.backgroundColor = "lightblue";
            this.innerText = "你是个傻瓜!"
        } else {
            this.style.backgroundColor = "lightsalmon"; // 还原成最初的颜色
            this.innerText = "点击有惊喜!"
            // 重置count的初始值.
            count = 0;
            // Ps: 因为有四种情况,可以在每次判断的时候对4取余数,`if (count%4==1){}`达到同样的效果!
        }
    }
</script>
</body>
</html>
1
2
3
4
5
6
7
8
9
10
11
12
13
14
15
16
17
18
19
20
21
22
23
24
25
26
27
28
29
30
31
32
33
34
35
36
37
38
39
40
41
42
43
44
45
46
47
2
3
4
5
6
7
8
9
10
11
12
13
14
15
16
17
18
19
20
21
22
23
24
25
26
27
28
29
30
31
32
33
34
35
36
37
38
39
40
41
42
43
44
45
46
47
# 简易评论框

<!doctype html>
<html lang="en">
<head>
<meta charset="UTF-8">
<title>简易评论框</title>
<style>
* {
margin: 0;
padding: 0;
}
.box1 {
width: 500px;
min-height: 200px;
padding: 10px;
background-color: lightsalmon;
}
.box1 > p {
border-left: 4px solid lightgray;
padding: 5px;
font-size: 20px;
color: white;
}
.box1 ul li {
margin-top: 5px;
padding: 5px;
list-style: none;
background-color: lightblue;
color: snow;
}
.box1 ul li p:nth-child(2) {
color: gray;
padding: 5px;
font-size: 21px;
}
.box2 {
margin-top: 20px;
}
.del {
color: indianred;
/* p标签里的span居然可以使用margin..这是我不知道的. */
margin-left: 240px;
cursor: pointer; /* 鼠标移动到span标签上面呈小手形状 */
}
</style>
</head>
<body>
<div style="margin: 50px;">
<div class="box1">
<p>评论区</p>
<ul></ul>
</div>
<div class="box2">
<p>留言内容</p>
<textarea name="" id="content" cols="30" rows="10"></textarea>
<p>
<input type="button" value=" 提交 " id="btn">
<input type="button" value=" 统计 " id="cal">
</p>
</div>
</div>
<script>
var oBtn = document.getElementById("btn")
var oTextarea = document.getElementById("content")
var oUl = document.getElementsByTagName("ul")[0]
var count = 0; // 多少楼
oBtn.onclick = function () {
var val = oTextarea.value; // 获取评论框里输入的内容.
if (val.length != 0) {
var li = document.createElement("li"); // 创造一个li标签,放评论信息(楼层信息+评论内容)
var p1 = document.createElement("p"); // 创造一个p标签,放楼层信息
var p2 = document.createElement("p"); // 创造一个p标签,放评论内容
// 拼接楼层信息
count = document.getElementsByTagName("li").length + 1
var d = new Date()
p1.innerHTML = "☆ " + "<span class = 'num'>" + count + "</span>" + "楼" +
" " + d.toLocaleString() +
"<span class='del'>删除</span>"
// 因为后面会对count和删除进行操作,所以将其放到了span标签里
// 处理评论内容
p2.innerText = val
// 将p1、p2放到li中
li.appendChild(p1)
li.appendChild(p2)
// 若评论框里有内容,则添加li标签;不加这一个判断的话,可能会加空的li标签..
// 逻辑上没有问题,但就是没评论,前面的创造标签这些准备工作不就白忙活了嘛.
// 所以这个if判断应该放在最前面,提高效率!
// if (val.length != 0) {
// oUl.appendChild(li)
// oTextarea.value = ""
// }
// 往ul里添加li,并清除评论框的内容.
oUl.appendChild(li)
oTextarea.value = ""
// ------ 删除评论的功能 ------ ╮(╯▽╰)╭
// 注意哦!!像getElementsByClassName取出来的结果是对象
// 此对象可以像数组一样通过下标取值,但本质上不是数组,不能通过indexOf取巧
var delButtons = document.getElementsByClassName("del")
// 找到的是当前评论'楼层信息里的span标签'
var currentButton = delButtons[delButtons.length - 1]
// 注意!! this是指 触发这个点击事件的标签 这里是包含'删除'字样的span标签
currentButton.onclick = function () {
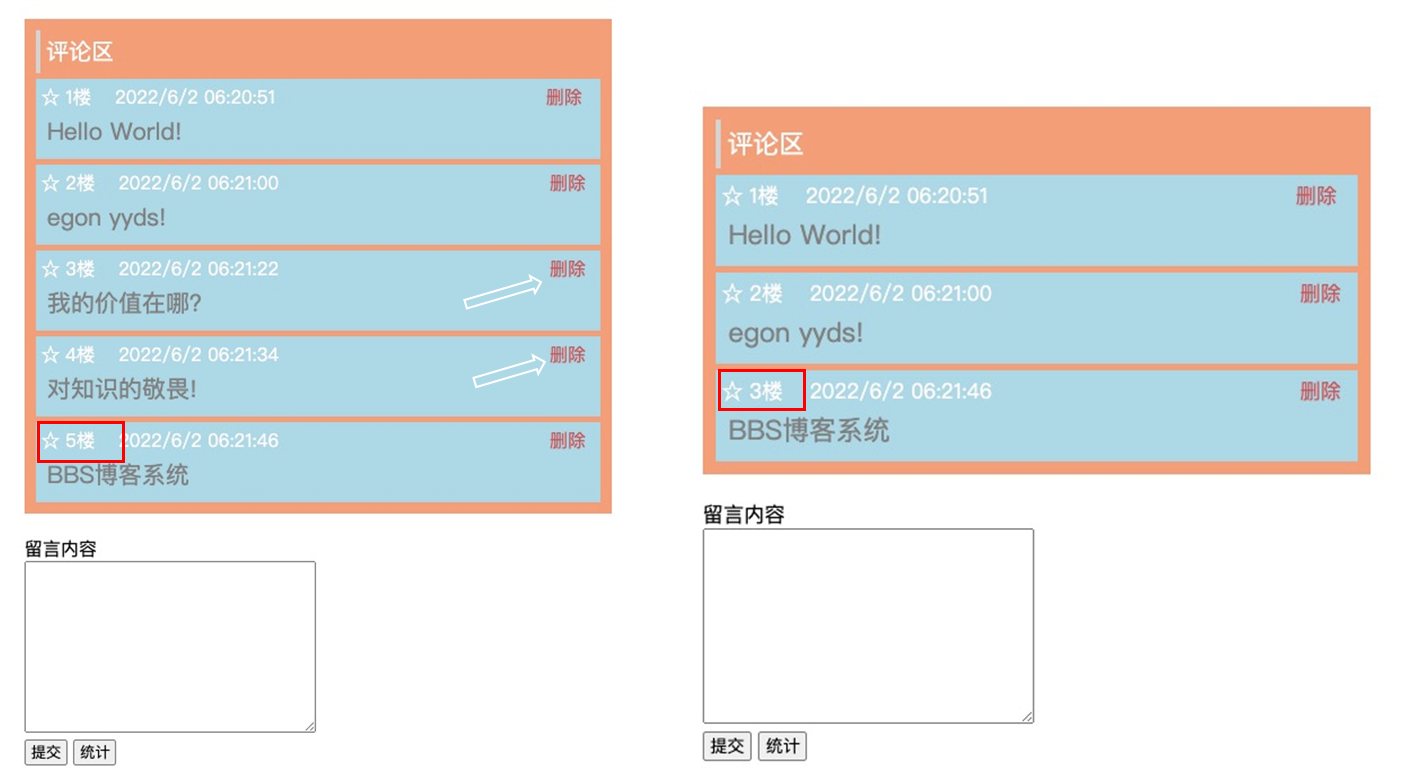
// --- 把后面楼层信息的所在楼层数都减1
// Ps有一个思路:span的父级的父级为li,找li的往下的所有兄弟元素?没有对应的方法,pass.
// 以删除的这一行为起始点,将后面的所有评论楼层信息里的楼层数减1
var allNum = document.getElementsByClassName("num"); // 总共的楼层
var currentNum = this.previousElementSibling; // 包含多少楼的span
// 外层循环找索引,内层循环改楼层
for (var i = 0; i < allNum.length; i++) {
// 若遍历出来的元素一致,就是我们需要的索引 当前要删除楼层的索引
if (currentNum == allNum[i]) {
// 从往后的楼层开始 所以i+1
// alert(i) 测试是否找到索引
for (var j = i + 1; j < allNum.length; j++) {
allNum[j].innerText = parseInt(allNum[j].innerText) - 1;
}
break;
}
}
oUl.removeChild(this.parentNode.parentNode) // span的爹是p,p的爹是li
count--; // 因为最后要统计多少楼,所以这里需要减1
}
}
}
// 统计功能 略.(熬夜学习好困 不想弄了( ̄O ̄;))
</script>
</body>
</html>
1
2
3
4
5
6
7
8
9
10
11
12
13
14
15
16
17
18
19
20
21
22
23
24
25
26
27
28
29
30
31
32
33
34
35
36
37
38
39
40
41
42
43
44
45
46
47
48
49
50
51
52
53
54
55
56
57
58
59
60
61
62
63
64
65
66
67
68
69
70
71
72
73
74
75
76
77
78
79
80
81
82
83
84
85
86
87
88
89
90
91
92
93
94
95
96
97
98
99
100
101
102
103
104
105
106
107
108
109
110
111
112
113
114
115
116
117
118
119
120
121
122
123
124
125
126
127
128
129
130
131
132
133
134
135
136
137
138
# 选项卡

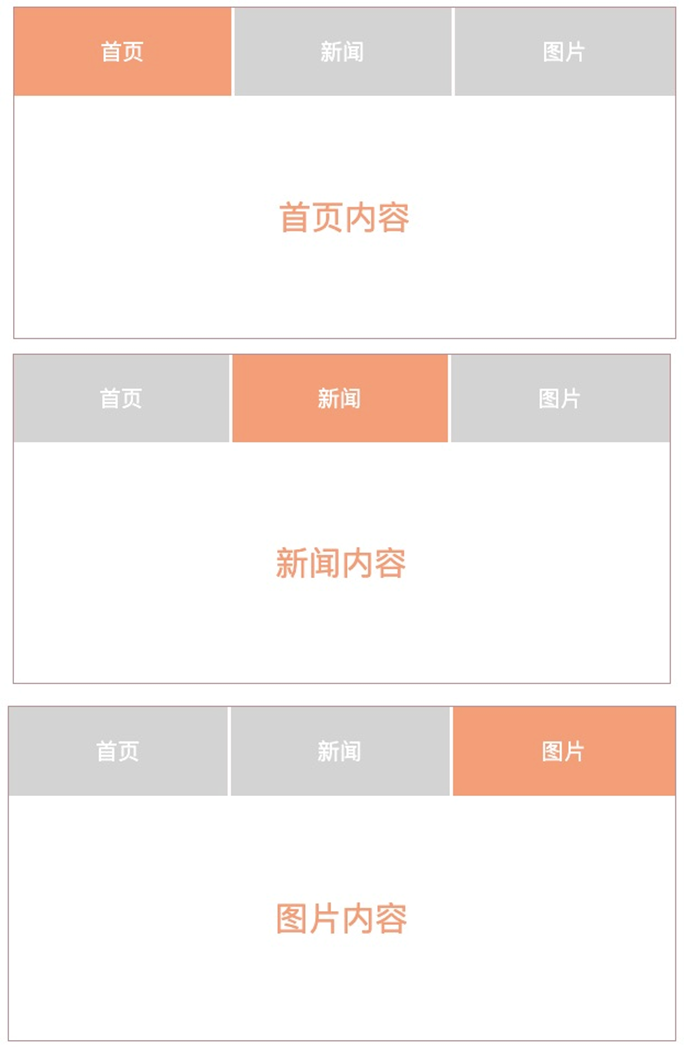
整体思路是,先设置内容区域全部隐藏;设置初始的active激活样式,通过js改变标签是否具有active.
<!doctype html>
<html lang="en">
<head>
    <meta charset="UTF-8">
    <title>选项卡</title>
    <style>
        * {
            margin: 0;
            padding: 0;
        }

        .box {
            width: 600px;
            height: 300px;
            border: 1px solid rosybrown;
            margin: 20px auto;
        }

        ul > li {
            list-style: none;
            float: left;
            width: 200px;
            height: 80px;
            background-color: lightgray;
            line-height: 80px;
            text-align: center;
            font-size: 20px;
            color: white;
        }

        ul > li:not(:last-child) {
            border-right: 3px solid snow;
            box-sizing: border-box;
        }

        .clearfix {
            *zoom: 1;
        }

        .clearfix:before, .clearfix:after {
            content: "";
            display: table;
        }

        .clearfix:after {
            clear: both; /* 清除左右两边浮动 */
        }

        .content {
            width: 600px;
            height: 220px;
            display: none; /* 默认全部隐藏 */
            line-height: 220px;
            text-align: center;
            font-size: 30px;
            color: lightsalmon;
        }

        /* 交集选择器 包含active类的li标签*/
        /* 激活状态 */
        li.active {
            background-color: lightsalmon;
        }

        div.active {
            display: block;
        }

    </style>
</head>
<body>
<div class="box">
    <ul class="clearfix">
        <li class="active">首页</li>
        <li>新闻</li>
        <li>图片</li>
    </ul>
    <div class="content active">首页内容</div>
    <div class="content">新闻内容</div>
    <div class="content">图片内容</div>
</div>
<script>
    var arr = document.getElementsByTagName('li');
    for (var i = 0; i < arr.length; i++) {
        arr[i].n = i; // 存储当前i的值到对象中 对象添加了个属性
        arr[i].onclick = function () {
            var oActive = document.getElementsByClassName("active");
            /*
            思路1: 找到所有的 active类 然后删除!
                错误1:本来试图通过forEach来解决,但oActive并不是一个数组对象
                错误2:for循环删除oActive的元素后,oActive里面的元素个数会变的,所以
                    j < oActive.length 不可以
                    oActive[j].classList 不可以
            思路2: 循环li标签删除active,对应下标的div标签的active一并删除
                for (var j = 0; j < arr.length; j++) {
                    arr[j].classList.remove("active");
                    document.getElementsByClassName("content")[j].classList.remove("active")
                }
            */
            var len = oActive.length;
            for (var j = 0; j < len; j++) {
                oActive[0].classList.remove("active");
            }

            /*
            代码从上而下执行,在外循环过程种,循环体代码产生了三个函数,
						当函数触发找i的值时,i的值已经变为3了..
            解决方案:
                1> 用闭包;
                2> 每次循环,都将i的值放到对象里面去.`arr[i].n = i;
                3> 用let i;
                   document.getElementsByClassName("content")[i].classList.add("active")
            这里我们选择第二种方案.
            */
            this.classList.add("active")
            document.getElementsByClassName("content")[this.n].classList.add("active")
        }
    }
</script>
</body>
</html>
1
2
3
4
5
6
7
8
9
10
11
12
13
14
15
16
17
18
19
20
21
22
23
24
25
26
27
28
29
30
31
32
33
34
35
36
37
38
39
40
41
42
43
44
45
46
47
48
49
50
51
52
53
54
55
56
57
58
59
60
61
62
63
64
65
66
67
68
69
70
71
72
73
74
75
76
77
78
79
80
81
82
83
84
85
86
87
88
89
90
91
92
93
94
95
96
97
98
99
100
101
102
103
104
105
106
107
108
109
110
111
112
113
114
115
116
117
118
119
120
121
# 仿淘宝搜索框


<!doctype html>
<html lang="en">
<head>
    <meta charset="UTF-8">
    <title>搜索框</title>
    <style>
        * {
            margin: 0;
            padding: 0;
        }

        #search {
            position: relative;
        }

        input {
            display: block; /* 可以去掉这行看下效果.. 很玄学╮(╯▽╰)╭ */
            outline: none; /* 去除原有的边框样式 */
            border: 2px solid #f2a83c;
            border-radius: 10px;
            width: 490px;
            height: 50px;
            padding: 5px;
            /* 出现了 margin-top陷阱. 父级盒子一并被顶了下来..*/
            margin-top: 20px;
            /* 这样的话 哪怕加了边框和padding属性 整体的高宽都不会变 */
            box-sizing: border-box;
        }

        label {
            position: absolute;
            line-height: 50px;
            text-align: center;
            left: 10px;
            font-size: 12px;
            color: gray;
        }
    </style>
</head>
<body>
<!-- search盒子是被input盒子撑起来的.. -->
<div id="search">
    <label for="text" id="msg">egon yyds!</label>
    <input type="text" id="text">
</div>

<script>
    var txt = document.getElementById('text');
    var msg = document.getElementById('msg');

    //检测用户表单输入的时候
    txt.oninput = function () {
        //控制元素显示隐藏
        if (this.value == '') {
            msg.style.display = 'block';
        } else {
            msg.style.display = 'none';
        }
    }
</script>
</body>
</html>
1
2
3
4
5
6
7
8
9
10
11
12
13
14
15
16
17
18
19
20
21
22
23
24
25
26
27
28
29
30
31
32
33
34
35
36
37
38
39
40
41
42
43
44
45
46
47
48
49
50
51
52
53
54
55
56
57
58
59
60
61
62
2
3
4
5
6
7
8
9
10
11
12
13
14
15
16
17
18
19
20
21
22
23
24
25
26
27
28
29
30
31
32
33
34
35
36
37
38
39
40
41
42
43
44
45
46
47
48
49
50
51
52
53
54
55
56
57
58
59
60
61
62
# 用户名和密码验证

需求:
1> 用户名由4位数字和字母组成;密码由6位数字和字母组成;
2> 当鼠标移开input框,会进行校验,校验成功,输入框变为绿色.
若输入内容不符合规范,输入框变为红色,会在一旁显示错误信息,3秒后,错误信息和输入框内容清空.
3> 只有用户名和密码都验证成功才会提交成功!
<!doctype html>
<html lang="en">
<head>
<meta charset="UTF-8">
<title>用户名和密码校验</title>
<style>
span {
margin-left: 10px;
color: lightcoral;
}
input {
outline: none;
}
</style>
</head>
<body>
<form>
<p>
用户名:
<input type="text" name="username">
<span></span>
</p>
<p>
密码:
<input type="password" name="pwd">
<span></span>
</p>
<p>
<input type="button" value="提交" id="btn">
</p>
</form>
<script>
// var isOk1 = false
// var isOk2 = false
var reg1 = new RegExp('(?!^[0-9]+$)(?!^[a-zA-Z]+$)^[0-9A-Za-z]{4}$')
var errorInfo1 = "用户名不为空 由4位字母和数字组成."
var inp1 = document.getElementsByName("username")[0]
var reg2 = new RegExp('(?!^[0-9]+$)(?!^[a-zA-Z]+$)^[0-9A-Za-z]{6}$')
var errorInfo2 = "密码不为空 由6位字母和数字组成."
var inp2 = document.getElementsByName("pwd")[0]
var btn = document.getElementById("btn")
verify = function (currentObj, errorInfo, reg) {
var res = reg.test(currentObj.value) // 是否符合正则规范,符合返回true,否则返回false
if (!res) {
currentObj.style.border = "1px solid red" // 不符合规范,设置此input框边框为红色
// "用户名为4位,必须由字母和数字组成"
// "密码为6位,必须由字母和数字组成"
currentObj.nextElementSibling.innerText = errorInfo
// 3秒后提示错误信息和input框里的内容消失
setTimeout(function () {
currentObj.nextElementSibling.innerText = ""
currentObj.value = ""
}, 3000)
} else {
// 符合规范,设置此input框边框为绿色
currentObj.style.border = "1px solid green"
// 传isOk没用的啦! 是值传递,全局变量的isOk1和isOk2是不会改变的.. isOk = true;
// 用给对象添加属性的方式实现! 通过对象传递参数!!!
currentObj.isOk = true;
}
}
// 表单事件onblur -- 鼠标离开输入框的时候
inp1.onblur = function () {
verify(inp1, errorInfo1, reg1)
}
inp2.onblur = function () {
verify(inp2, errorInfo2, reg2)
}
btn.onclick = function () {
console.log(inp1.isOk, inp2.isOk)
if (inp1.isOk && inp2.isOk) {
alert("提交成功!")
} else {
alert("请重新填写!")
}
inp1.value = ""
inp2.value = ""
inp1.style.border = ""
inp2.style.border = ""
inp1.isOk = false;
inp2.isOk = false
}
/*
inp1.onblur = function () {
var res = reg1.test(this.value)
if (!res) {
this.style.border = "1px solid red"
this.nextElementSibling.innerText = "用户名为4位,必须由字母和数字组成"
setTimeout(function () {
inp1.nextElementSibling.innerText = ""
inp1.value = ""
}, 3000)
} else {
this.style.border = "1px solid green"
isOk1 = true
}
}
*/
</script>
</body>
</html>
1
2
3
4
5
6
7
8
9
10
11
12
13
14
15
16
17
18
19
20
21
22
23
24
25
26
27
28
29
30
31
32
33
34
35
36
37
38
39
40
41
42
43
44
45
46
47
48
49
50
51
52
53
54
55
56
57
58
59
60
61
62
63
64
65
66
67
68
69
70
71
72
73
74
75
76
77
78
79
80
81
82
83
84
85
86
87
88
89
90
91
92
93
94
95
96
97
98
99
100
101
102
103
104
105
106
107
108
109
110
111
112
113
