 css网页布局之定位流
# 相对定位
position : relative
**相对定位就是相对于自己在标准流中的位置来移动 **[参照物] 在没有使用定位之前,自身的初始位置..
[注意点]
1> 相对定位是 不脱离 标准流的,会继续在标准流中占用一份空间
2> 在相对定位中同一个方向上的定位属性只能使用一个,使用这四个元素不会影响到标准流的布局
即: top/bottom 只能用一个; left/right 只能二选一
3> 给相对定位的标签设置 margin 或 padding , 是以该标签原来的位置为基础来进行偏移的,
会影响到标准流的布局
<head>
    <style>
        div {
            width: 150px;
            height: 150px;
        }

        .box1 {
            background-color: cadetblue;
        }

        .box2 {
            background-color: darkseagreen;
            position: relative;
            top: 20px;
            left: 20px;
            margin-top: 30px;
        }

        .box3 {
            background-color: indianred;
        }
    </style>

</head>
<body>
    <div class="box1"></div>
    <div class="box2"></div>
    <div class="box3"></div>
</body>
2
3
4
5
6
7
8
9
10
11
12
13
14
15
16
17
18
19
20
21
22
23
24
25
26
27
28
29
30
相对对位的应用场景
1> **用于对元素进行微调 **
2> 配合后面的绝对定位来使用
因为input和img是inline-block行内块级元素,所以当box1浮动后,会出现字围现象.

<head>
    <style>
        .box1 {
            width: 100px;
            height: 100px;
            background-color: lightblue;
            float: left;
        }

        input {
            height: 50px;
            width: 200px;
            margin-left: 20px;
        }

        input:focus {
            outline: none;
            background-color: #eee;
        }

        img {
            height: 50px;
            position: relative;
            top: 20px; /* 微调 */
        }

    </style>

</head>
<body>
    <div class="box1"></div>
    <input type="text" name="call" placeholder="请输入图片中的验证码..">
    <img src="call.jpeg" alt="">
</body>
2
3
4
5
6
7
8
9
10
11
12
13
14
15
16
17
18
19
20
21
22
23
24
25
26
27
28
29
30
31
32
33
34
# 绝对定位
position:absolute
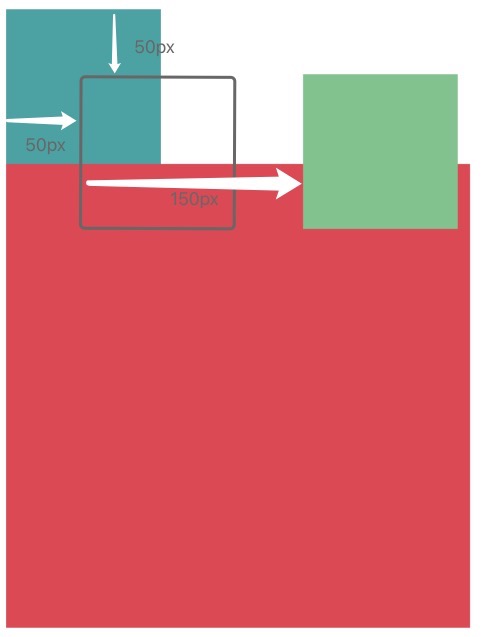
绝对定位就是相对于body或者某个定位流中的祖先元素来定位[参照物] step1: 若绝对定位的元素有 处于定位流(相对 绝对 固定) 中的祖先元素(父亲 爷爷 太爷爷..),
那么这个绝对定位的元素就会以定位流的祖先元素( 离它最近的那个 )作为参考点..
step2: 否则.绝对定位的元素会以 body元素 作为参照物..[注意点]
1> 绝对定位的元素是 脱离 标准流的,所以绝对定位的元素不区分块级元素/行内元素/行内块级元素
即只要是绝对定位的元素都可以设置宽度和高度
ps: 准确来说是 半脱离标准流 ,效果有点类似于浮动,但不像浮动那样仅局限于水平布局..
2> 如果一个绝对定位的元素是以body作为参考点, 那么其实是以网页 首屏 的宽度和高度作为参考点,
而不是以整个网页的宽度和高度作为参考点,会相对于body定位会随着页面的滚动而滚动
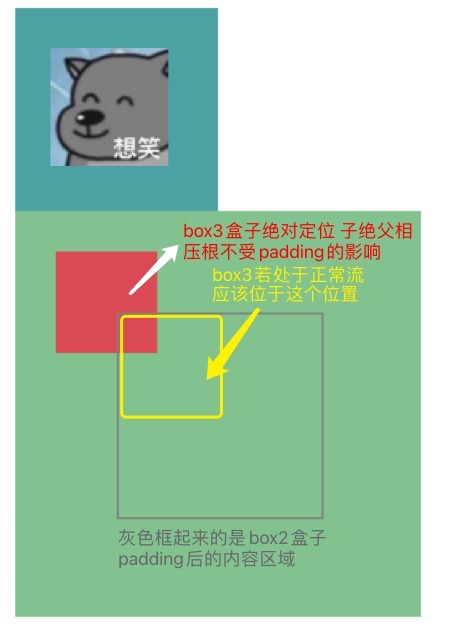
3> 一个绝对定位的元素会 忽略祖先元素的padding 属性..
# 以body为参照物

<head>
    <style>
        .box1 {
            width: 100px;
            height: 100px;
            background-color: cadetblue;
        }

      	/* box2盒子是span行内标签 */
        .box2 {
            width: 100px;
            height: 100px;
            background-color: darkseagreen;

            /* 绝对定位的元素不区分块级元素|行内元素|行内块级元素 */
            /* step1: 半脱离文档流,跟浮动一样,脱离的位置还是要取决于处于标准流时所在位置 */
            position: absolute;
            /* step2: box2盒子没有定位流的祖先元素,以body元素为参照物进行移动 */
            top:50px;
            left: 50px;
            /* step3: 可以单纯的理解成改变了left的值为200px; */
            margin-left: 150px;
          	/* ps:
          		当然给此盒子设置的css样式的先后顺序不同呈现的过程可能不一样,但最后的效果是一样的
							我是为了方便给自己找一个好理解好用文字表达的过程,将margin-left写到了最后..
          	*/
        }

        .box3 {
            width: 300px;
            height: 300px;
            background-color: indianred;
        }
    </style>

</head>
<body>
    <div class="box1"></div>
    <span class="box2"></span> <!-- 行内元素 -->
    <div class="box3"></div>
</body>
2
3
4
5
6
7
8
9
10
11
12
13
14
15
16
17
18
19
20
21
22
23
24
25
26
27
28
29
30
31
32
33
34
35
36
37
38
39
40
41
[验证] 绝对定位以body为参照物时是以<首屏>为准!!
<!--
预想的效果,回到顶部的按钮,在页面的右下角..
但页面内容超过一屏后,会随着滚动条的滚动而滚动,不会一直处于右下角..
解决方案: 固定定位.
-->
<head>
    <style>
        .box1 {
            position: absolute;
            width: 100px;
            height: 100px;
            background-color: indianred;

            text-align: center;
            line-height: 100px;
            color: lightblue;
            text-decoration: none;
            border-radius: 50%;

            bottom: 0px;
            right: 0px;
        }

        .box2 {
            width: 3000px;
            height: 3000px;
        }
    </style>
</head>
<body>
    <a href="#" class="box1">回到顶部</a>
    <div class="box2"></div>
</body>
2
3
4
5
6
7
8
9
10
11
12
13
14
15
16
17
18
19
20
21
22
23
24
25
26
27
28
29
30
31
32
33
# 以祖先为参照物
里面涉及一个重要的口诀: 子绝父相.!!
子绝父相应用: 盒子嵌套,让一个小盒子在一个大盒子范围中移动
ps:联想到背景图片的移动,参照物-添加背景图片的标签
下方的效果图中写错了,是标准流不是正常流.. 懒得再倒腾了 将就看吧 不影响理解..╮(╯▽╰)╭

<head>
    <style>
        .box1 {
            width: 100px;
            height: 100px;
            background-color: cadetblue;
        }

        .box2 {
            width: 100px;
            height: 100px;
            background-color: darkseagreen;
            position: relative;
            /*
                padding是什么?边框与内容之间的距离
                box2的内容是包含高100px宽100px的区域..
                box3处于标准流时,box2的内容还包含的有box3这一个盒子..
                现如今,box3绝对定位..脱离了标准流..  (゚o゚;;
            */
            padding: 50px;
        }

        .box3 {
            width: 50px;
            height: 50px;
            background-color: indianred;
            position: absolute;

            /* 一个绝对定位的元素不会受到祖先元素padding属性的影响..  */
            left: 20px;
            top: 20px;
        }
    </style>

</head>
<body>
    <div class="box1"></div>
    <!--
        子绝父相: 盒子嵌套,让一个小盒子在一个大盒子范围中移动
        ps 联想到背景图片的移动,参照物-添加背景图片的标签
    -->
    <div class="box2">
        <div class="box3"></div>
    </div>
</body>
2
3
4
5
6
7
8
9
10
11
12
13
14
15
16
17
18
19
20
21
22
23
24
25
26
27
28
29
30
31
32
33
34
35
36
37
38
39
40
41
42
43
44
45
# 绝对定位水平居中
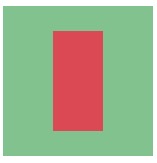
当一个盒子绝对定位之后不能使用
margin: 0 auto;让盒子自身居中;
ps: 提一嘴, 若是背景图片的话,直接background-position:center就行...可以通过以下方式实现: 先子绝父相,子盒子设置
left: 50%; margin-left:"-当前盒子宽度一半"px;
top: 50%; margin-top:"-当前盒子高度一半"px;

<!-- 这效果图有点像一款泡泡糖 给我看馋了!! -->
<head>
    <style>
        .box2 {
            width: 150px;
            height: 150px;
            background-color: darkseagreen;
            position: relative;
        }
        .box3 {
            width: 50px;
            height: 100px;
            background-color: indianred;
            position: absolute;

            left: 50%; /* 是父盒子宽度的百分之50 */
            margin-left: -25px; /* 子盒子宽度的一半 */
            top:50%; /* 是父盒子高度的百分之50 */
            margin-top: -50px; /* 子盒子高度的一半 */
        }
    </style>

</head>
<body>
    <div class="box2">
        <div class="box3"></div>
    </div>
</body>
2
3
4
5
6
7
8
9
10
11
12
13
14
15
16
17
18
19
20
21
22
23
24
25
26
27
28
# 绝对定位练习

<head>
    <style>
        ul > li {
            float: left;
            width: 100px;
            height: 50px;
            background-color: lightblue;
            list-style: none;
            text-align: center;
            line-height: 50px;
        }

        ul > li:not(:last-child) {
            border-right: 2px solid indianred;
        }

        ul > li:hover {
            background-color: cadetblue;
        }

        /* 使用背景图片 */
        .bg {
            background-image: url("1.jpeg");
            background-repeat: no-repeat;
            background-size: 30%;
            background-position: right top;
        }

        /*  使用定位流  */
        ul > li:nth-child(3) {
            position: relative;
        }

        img {
            position: absolute;
            width: 30%;
            right: 0;
            top: -25%;
        }

    </style>
</head>
<body>
    <ul>
        <li>html</li>
        <li>css</li>
        <!-- 设置背景图片的方式,只能在标签内部..
        <li class="bg">javascript</li>
        -->
        <li>
            javascript
            <img src="1.jpeg">
        </li>
        <li>jquery</li>
        <li>bootstrap</li>
    </ul>
</body>
2
3
4
5
6
7
8
9
10
11
12
13
14
15
16
17
18
19
20
21
22
23
24
25
26
27
28
29
30
31
32
33
34
35
36
37
38
39
40
41
42
43
44
45
46
47
48
49
50
51
52
53
54
55
56
57
# 盒子铺满整个屏幕
需求: 让盒子铺满整个屏幕..
<head>
    <style>
        /* 方式一: 当前盒子的祖先元素很多的话,全都要设置其高度为100%..很麻烦
        * {
            margin: 0;
            padding: 0;
        }

        html, body {
            height: 100%;
        }

        .box {
            height: 100%;
            background-color: lightsalmon;
        }
        */

        /* 方式二: 用绝对定位 能达到跟上方代码一样的效果! */
        .box {
            background-color: lightsalmon;
            position: absolute;
            top: 0;
            left: 0;
            right: 0;
            bottom: 0;
        }
    </style>
</head>
<body>
    <div class="box"></div>
</body>
2
3
4
5
6
7
8
9
10
11
12
13
14
15
16
17
18
19
20
21
22
23
24
25
26
27
28
29
30
31
32
# 固定定位
position: fixed;
固定定位可以让某一个元素不随着滚动条的滚动而滚动[参照物] 浏览器窗口
[注意点] 1> 页面如何滚动,这个盒子显示的位置不变.
2> 固定定位的元素是脱离标准流的,不会占用标准流中的空间
3> E6不支持固定定位
前面的那个回到顶部按钮,只需要修改一行代码就能解决, 将position: absolute;改为``position: fixed;`.****
# z-index
z-index属性: 用于指定定位的元素的覆盖关系.
注意几个点:
1> z-index值没有单位,就是一个正整数. z-index值默认是0.
2> 只有处于定位流(相对 绝对 固定)的元素才能设置z-index.. 浮动元素是使用不了的.
3> 首先定位了的元素永远能够压住没有定位的元素;
若定位元素z-index值都一样,看html body部分代码,写在后面的压住前面的..
4> 从父现象父亲怂了,儿子再牛逼也没用Hhhh
父元素没有z-index值, 那么子元素谁的z-index大谁盖住谁
父元素z-index值不一样, 那么父元素谁的z-index大谁盖住谁
<body>
    <div class="father1">
        <div class="son1"></div>
    </div>


    <div class="father2">
        <div class="son2"></div>
    </div>
</body>
2
3
4
5
6
7
8
9
10
# 博客页面练习

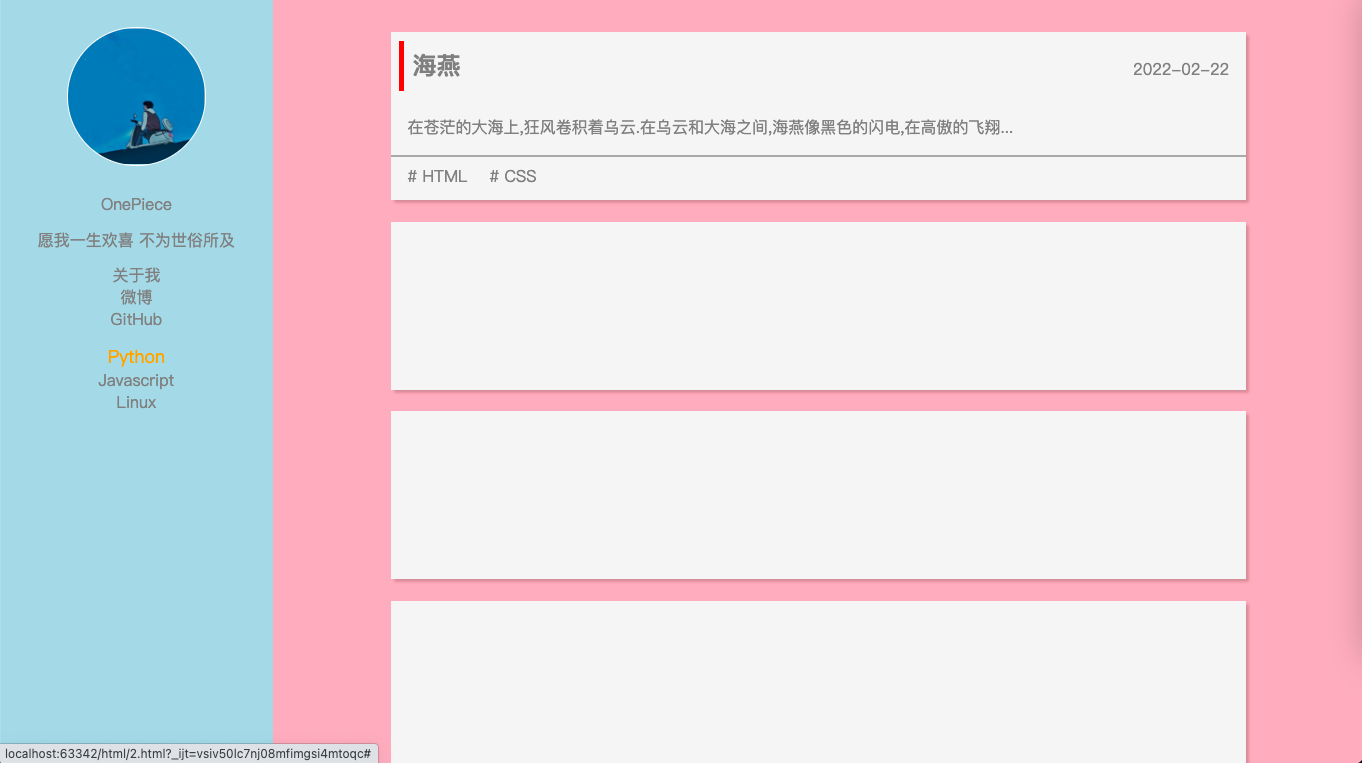
分析思考历程: 一步步的剖析...
[HTML标签结构]
此页面划分左右两个盒子A和B
A中可以划分5个小盒子,分别放头像、博客名、个性签名、一些链接、一些分类
我的思考,盒子里面内容是一句话可以放在p标签里, 一个词语可以放在span标签里
若是一系列的相似内容,可以使用ul>li*n标签
B中是一连串的文章,先是用一个大盒子装这些文章.
都分别用一个盒子装着(每篇文章的结构相同,所以这些盒子的css样式相同)
文章盒子里面可以划分三个小盒子,分别放 文章标题与发表时间、文章简介、文章所属分类..
一连串的文章,ul>li标签是一种选择,但感觉很别扭;用class名相同的div盒子装更好..(经验)
ps: 像一条条相似结构的评论,大佬用的又是ul>li标签,别纠结.. 能实现效果就行.我们不是专门搞前端的.
[CSS样式]
在划分HTML标签结构时候,就应该根据盒子所包含的内容设置类选择器的名字..
eg: article_list blog_link blog_tag ... ... ...(跟python变量一样,看名字就是啥意思 相当于注释)
清除浏览器原有的外边距和内边距;
AB盒子左右布局用float;
为了响应式布局,需要设置body和html标签的高度都为100%
注意css样式的继承性!
用通用的清除浮动的代码解决article_header浮动带来的问题...
(管它呢,浮动出现了问题就用它解决 不纠结啦!!)
左侧的A盒子应该使用固定定位,fixed,来替代A盒子的左浮动..
给B盒子设置的背景颜色只占首屏..解决办法,给body元素设置..
Q: 我想让放头像的盒子随着浏览器窗口的缩放而等比例缩放..
A:第一想法是将header-img盒子的宽高都设置为100%, 但忽略了致命的一点, 它的父级元素blog_left盒子的宽高不是一样的.. 谷歌后,绝对尝试使用伪元素的方法解决.. 其原理很简单,有一个盒子box0,我只给它设置相对于它父级盒子的百分比宽度, 使用伪元素after给盒子box0里添加一个空的子盒子撑起box0的高度,这个空盒子设置css属性padding-top:100%;why?因为这个百分比的内边距是相对于box0的宽度而言的!这样一来二去.. header-img盒子的宽高就一样啦. 万事具备只欠东风了吗?我起初在写html标签的时候,在header-img盒子里面写了个img标签.. 刚开始我还没意识到空的img标签也是占空间的, 导致我使用伪元素得到的是长方形,百思不得其解.. 知道问题出在哪了, 解决也很简单, 子绝父相..
<!-- 关键代码如下 -->
.header_img{
    width: 50%;
    margin: 10% auto;
    border-radius: 50%;
    border: 1px solid white;
		overflow: hidden; /* 将超出标签的部分裁剪掉 */
    position: relative;
}

.header_img img{
		position: absolute;
		max-width: 100%; /* 图片的最大宽度值是相对于header_img父盒子而言 */
		left:0;
		top:0;
}

.header_img:after{
    content: '';
    display: block;
    padding-top: 100%;
}

<div class="header_img">
  	<img src="111.png" alt="">
</div>
2
3
4
5
6
7
8
9
10
11
12
13
14
15
16
17
18
19
20
21
22
23
24
25
26
PS: 再提供个思路,是从固定比例的头像出发.. "百分比padding与固定比例图片自适应布局"
参考链接:https://www.zhangxinxu.com/wordpress/2017/08/css-percent-padding-image-layout/
待解决问题:
浏览器缩放的时候,B盒子里的元素里的文字会错乱,文字不在盒子期待的位置...想过用绝对定位来解决,但失败了,暂且搁置吧!!
<!DOCTYPE html>
<html lang="en">
<head>
    <meta charset="UTF-8">
    <title>blog</title>
    <style>
        /* -- 一些准备工作 -- */
        * {
            padding: 0;
            margin: 0;
        }

        html, body {
            height: 100%;
            background-color: lightpink;
        }

        /* 通用的清除浮动代码 */
        .clear_fix {
            *zoom: 1
        }

        .clear_fix:before, .clear_fix:after {
            content: " ";
            display: table
        }

        .clear_fix:after {
            clear: both
        }

        /* -- 左右布局AB盒子 -- */
        .blog_left {
            width: 20%;
            height: 100%;
            background-color: lightblue;
            /*float: left;*/
            /*
                这里就用的了css的继承性
                以color、font-(字体属性)、text-(文本属性)、line-开头的属性可以继承
            */
            color: gray;
            text-align: center;
            /* 固定定位  */
            position: fixed;
            top: 0;
            left: 0;
        }

        .blog_right {
            width: 80%;
            height: 100%;
            /*background-color: lightpink;*/
            float: right;
        }

        /* -- 开始左边A盒子的布局 -- */
        /* 一些简单通用的工作 */
        a {
            /* a标签的文字颜色和下划线是不能继承别人的 */
            text-decoration: none;
            color: gray;
        }

        a:hover {
            color: orange;
            font-size: 18px;
        }

        .blog_link ul li {
            list-style: none;
        }

        /* 博客头像 */
        .header_img {
            width: 50%;
            margin: 10% auto;
            border-radius: 50%;
            border: 1px solid white;
            overflow: hidden; /* 将超出标签的部分裁剪掉 */
            position: relative;
        }

        .header_img img {
            position: absolute;
            max-width: 100%; /* 它的值是相对于父级元素来说的 */
            /*
               按道理这里的绝对定位的元素默认应该出现在左上角的
               但是它的祖级元素blog_left盒子设置了属性text-align: center;
               因为继承性,它就跑到中间去了.. 用left top解决..
             */
            left: 0;
            top: 0;
        }

        .header_img:after {
            content: '';
            display: block;
            padding-top: 100%;
        }

        /* A盒子里面几个小盒子的上外边距 */
        .blog_name, .blog_info, .blog_link, .blog_tag {
            /* 没设置高,内容撑起的高度 宽度默认100% */
            margin-top: 5%;
        }

        /* -- 开始右边B盒子的布局 -- */
        .article_list {
            height: 100%;
            padding: 1%;
        }

        .article {
            width: 80%;
            height: 22%;
            margin: 2% auto;
            background-color: whitesmoke;
            box-shadow: 3px 3px 3px rgba(0, 0, 0, 0.2);
            color: gray;
        }

        /* 感觉这个是B盒子的点睛之笔 一下子就活啦 */
        .article * {
            padding: 1%;
        }

        .article_header p {
            float: left;
            font-size: 24px;
            font-weight: bold;
            border-left: 5px solid red;
        }

        .article_header span {
            float: right;
            margin-top: 1%;
        }

        .article_info {
            border-bottom: 2px solid darkgrey;
        }


    </style>
</head>
<body>
<div class="blog_left">
    <div class="header_img">
        <img src="111.jpeg" alt="">
    </div>
    <div class="blog_name">
        <span>OnePiece</span>
    </div>
    <div class="blog_info">
        <p>愿我一生欢喜 不为世俗所及</p>
    </div>
    <div class="blog_link">
        <ul>
            <li><a href="#">关于我</a></li>
            <li><a href="#">微博</a></li>
            <li><a href="#">GitHub</a></li>
        </ul>
    </div>
    <div class="blog_tag">
        <ul>
            <li><a href="#">Python</a></li>
            <li><a href="#">Javascript</a></li>
            <li><a href="#">Linux</a></li>
        </ul>
    </div>
</div>
<div class="blog_right">
    <div class="article_list">
        <div class="article">
            <div class="article_header clear_fix">
                <p>海燕</p>
                <span>2022-02-22</span>
            </div>
            <div class="article_info">
                <p>在苍茫的大海上,狂风卷积着乌云.在乌云和大海之间,海燕像黑色的闪电,在高傲的飞翔...</p>
            </div>
            <div class="article_tag">
                <span># HTML</span>
                <span># CSS</span>
            </div>
        </div>
        <div class="article"></div>
        <div class="article"></div>
        <div class="article"></div>
        <div class="article"></div>
        <div class="article"></div>
        <div class="article"></div>
    </div>
</div>
</body>
</html>
2
3
4
5
6
7
8
9
10
11
12
13
14
15
16
17
18
19
20
21
22
23
24
25
26
27
28
29
30
31
32
33
34
35
36
37
38
39
40
41
42
43
44
45
46
47
48
49
50
51
52
53
54
55
56
57
58
59
60
61
62
63
64
65
66
67
68
69
70
71
72
73
74
75
76
77
78
79
80
81
82
83
84
85
86
87
88
89
90
91
92
93
94
95
96
97
98
99
100
101
102
103
104
105
106
107
108
109
110
111
112
113
114
115
116
117
118
119
120
121
122
123
124
125
126
127
128
129
130
131
132
133
134
135
136
137
138
139
140
141
142
143
144
145
146
147
148
149
150
151
152
153
154
155
156
157
158
159
160
161
162
163
164
165
166
167
168
169
170
171
172
173
174
175
176
177
178
179
180
181
182
183
184
185
186
187
188
189
190
191
192
193
194
195
196
197
